






在 nginx 源码编译中添加 headers-more-nginx-module 模块,核心做法是在执行 ./configure 时通过 --add-module 参数指定该模块的本地源码路径。这样做会将模块静态编译进 nginx 二进制文件,从而启用 more_set_headers、more_clear_headers 等指令来精细控制 http 响应头。如果配置路径正确且依赖环境完整,编译成功后即可在 nginx.conf 中使用这些新指令。

如何获取并准备 headersmore 模块源码
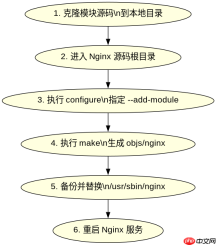
要添加此模块,首先需要获取其源代码。通常从 GitHub 克隆仓库到本地目录是最直接的方式。这一步骤确保了后续编译时 --add-module 能找到正确的源文件。准备好源码后,需要进入 Nginx 原始源码目录进行配置。
# 假设 Nginx 源码在 /usr/local/src/nginx-1.24.0
# 模块源码下载到 /usr/local/src/headers-more-nginx-module
cd /usr/local/src/nginx-1.24.0
./configure --prefix=/etc/nginx \
            --sbin-path=/usr/sbin/nginx \
            --modules-path=/usr/lib64/nginx/modules \
            --conf-path=/etc/nginx/nginx.conf \
            --error-log-path=/var/log/nginx/error.log \
            --http-log-path=/var/log/nginx/access.log \
            --pid-path=/run/nginx.pid \
            --lock-path=/run/nginx.lock \
            --http-client-body-temp-path=/var/cache/nginx/client_temp \
            --http-proxy-temp-path=/var/cache/nginx/proxy_temp \
            --http-fastcgi-temp-path=/var/cache/nginx/fastcgi_temp \
            --http-uwsgi-temp-path=/var/cache/nginx/uwsgi_temp \
            --http-scgi-temp-path=/var/cache/nginx/scgi_temp \
            --user=nginx \
            --group=nginx \
            --with-http_ssl_module \
            --with-http_realip_module \
            --with-http_addition_module \
            --with-http_sub_module \
            --with-http_gzip_static_module \
            --with-http_stub_status_module \
            --with-http_v2_module \
            --with-http_secure_link_module \
            --with-mail \
            --with-stream \
            --add-module=/usr/local/src/headers-more-nginx-module
make
上述命令中,--add-module=/usr/local/src/headers-more-nginx-module 是关键。它告诉编译器去那个目录寻找模块源码。执行 make 后,生成的 objs/nginx 文件即包含了该模块。注意不要执行 make install,除非你确定要覆盖现有的 Nginx 安装,或者你正在构建一个全新的包。通常建议将生成的 objs/nginx 替换掉系统现有的 /usr/sbin/nginx,并重启服务。
验证模块是否成功加载及基本用法
编译完成后,验证模块是否生效的最简单方法是检查 Nginx 的版本信息或模块列表。使用 -V 参数(大写)可以查看编译时的所有配置选项。如果在输出中看到 --add-module=.../headers-more-nginx-module,说明配置阶段已成功识别该模块。此外,可以通过启动 Nginx 并尝试使用模块指令来确认运行时行为。


# 验证编译配置
/usr/sbin/nginx -V

# 在 nginx.conf 中添加测试指令
server {
    listen 80;
    server_name example.com;

    location / {
        more_set_headers "X-Powered-By: Custom Header";
        more_clear_headers Server;
        proxy_pass http://backend;
    }
}
在 nginx.conf 中,more_set_headers 用于设置或覆盖特定的响应头,而 more_clear_headers 用于删除指定的响应头。例如,上面的配置会向所有响应添加 X-Powered-By: Custom Header,并移除默认的 Server 头。保存配置后,执行 nginx -t 检查语法,然后 nginx -s reload 重载配置。使用 curl -I http://example.com 查看响应头,应能看到新增的头信息且 Server 头消失。这证明了模块已正确集成并工作。
基于 headersmore 模块处理冲突响应头的具体策略
在实际应用中,经常遇到上游服务器(如后端应用)设置的响应头与 Nginx 默认或安全策略冲突的情况。例如,后端可能设置了 X-Frame-Options 为 SAMEORIGIN,但你可能希望强制为 DENY 以增强安全性。此时,more_set_headers 的优势在于它能无条件覆盖原有头部,而不是像标准 proxy_hide_header 那样先隐藏再添加,或者受限于某些指令的执行顺序。
具体做法是在 location 或 server 块中直接使用 more_set_headers。由于 headers-more-nginx-module 在输出过滤器链中的位置较晚,它可以确保即使后端已经发送了头部,Nginx 也能在发送给客户端之前进行修改。这种机制对于统一多后端服务的响应头格式非常有效,无需修改每个后端应用的代码。


