



第一章
第二章
第三章
第四章
第五章
第六章
第七章
第八章


Android 开发手册
本节引言:
相信大家对点击列表,然后进入详情这种App并不陌生吧,在购物类App和新闻类App中最为常见: 下面我们简单来讲一下流程逻辑!
逻辑流程讲解:

刚好公司测试妹子的测试机上装了楚楚街9块9的APP,呵呵,直接就照这个来研究吧:
嘿嘿,市面上很多APP都是这种样子的,而这个可以用我们学到的Fragment来实现: 可能gif动画看不清,笔者用界面原型工具画个大概吧:
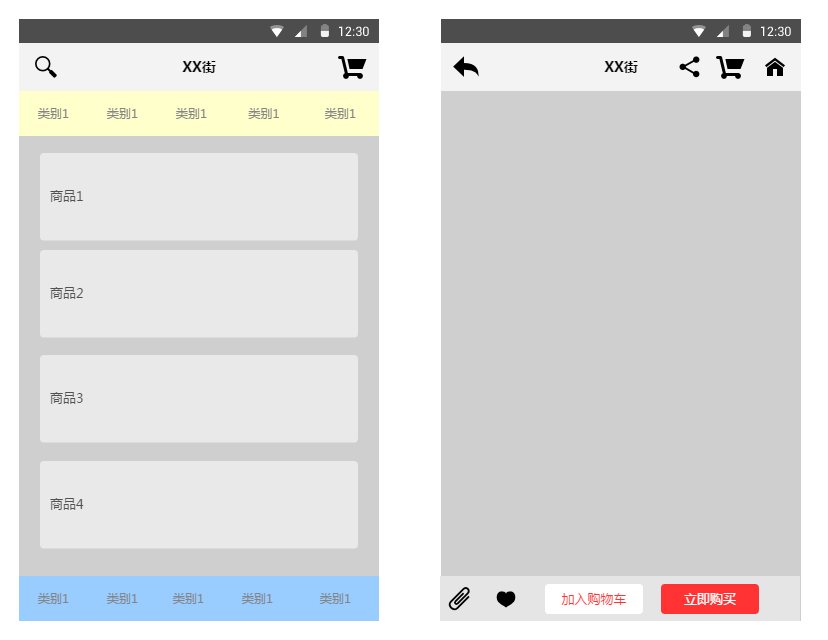
大概就这样,中间区域是一个布局容器,一般是FrameLayout,然后我们将一个Fragment replace 到这个容器中或者add也行,而这个Fragment中有一个listview,当我们点击这个ListView中的一项, 中间容器中的Fragment就会被replace成对应详细信息的Fragment所替代,如果我们只是replace的话, 就不会保存第一个Fragment的状态,用户又得从头开始浏览,这肯定是很不方便的,这里我们可以 通过Fragment栈的addtobackStack和popbackstack来解决这个问题!当replace的同时,我们将被替换 的Fragment添加到stack中,当用户点击回退按钮时,调用popbackstack弹出栈,具体实现见下述代码 示例!
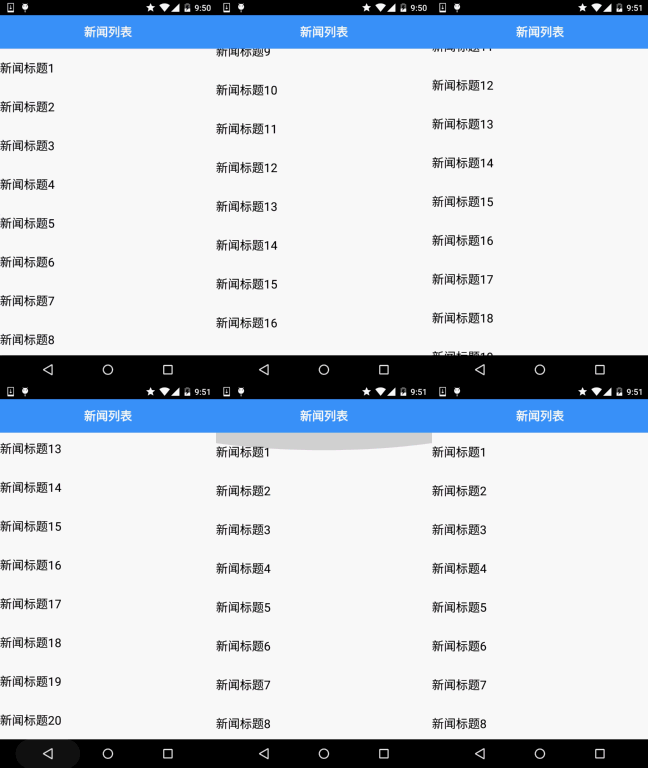
2.代码示例:简单新闻类APP列表和内容切换的实现
运行效果图:
实现代码:
Step 1:先把两个Fragment以及Activity的布局实现了
fg_newlist.xml:
<?xml version="1.0" encoding="utf-8"?>
<LinearLayout xmlns:android="http://schemas.android.com/apk/res/android"
    android:layout_width="match_parent"
    android:layout_height="match_parent"
    android:background="../style/images/white"
    android:orientation="horizontal">

    <ListView
        android:id="@+id/list_news"
        android:layout_width="match_parent"
        android:layout_height="match_parent" />

</LinearLayout>
fg_context.xml:
<?xml version="1.0" encoding="utf-8"?>
<LinearLayout xmlns:android="http://schemas.android.com/apk/res/android"
    android:layout_width="match_parent"
    android:layout_height="match_parent"
    android:orientation="vertical">

    <TextView
        android:id="@+id/txt_content"
        android:layout_width="match_parent"
        android:layout_height="match_parent"
        android:gravity="center"
        android:textColor="../style/images/blue"
        android:textSize="20sp" />

</LinearLayout>
activity_main.xml:
<RelativeLayout xmlns:android="http://schemas.android.com/apk/res/android"
    xmlns:tools="http://schemas.android.com/tools"
    android:layout_width="match_parent"
    android:layout_height="match_parent"
    tools:context=".MainActivity">

    <TextView
        android:id="@+id/txt_title"
        android:layout_width="match_parent"
        android:layout_height="56dp"
        android:background="../style/images/blue"
        android:textColor="../style/images/white"
        android:text="新闻列表"
        android:textSize="20sp"
        android:textStyle="bold"
        android:gravity="center"/>

    <FrameLayout
        android:id="@+id/fl_content"
        android:layout_width="match_parent"
        android:layout_height="match_parent"
        android:layout_below="@id/txt_title"/>

</RelativeLayout>
Step 2:实现我们的业务Bean类和自定义BaseAdapter类:
Data.java:
/**
 * Created by Jay on 2015/9/6 0006.
 */
public class Data {

    private String new_title;
    private String new_content;

    public Data(){}

    public Data(String new_title, String new_content) {
        this.new_title = new_title;
        this.new_content = new_content;
    }

    public String getNew_title() {
        return new_title;
    }

    public String getNew_content() {
        return new_content;
    }

    public void setNew_title(String new_title) {
        this.new_title = new_title;
    }

    public void setNew_content(String new_content) {
        this.new_content = new_content;
    }
}
MyAdapter.java:
/**
 * Created by Jay on 2015/9/6 0006.
 */
public class MyAdapter extends BaseAdapter{

    private List<Data> mData;
    private Context mContext;

    public MyAdapter(List<Data> mData, Context mContext) {
        this.mData = mData;
        this.mContext = mContext;
    }

    @Override
    public int getCount() {
        return mData.size();
    }

    @Override
    public Object getItem(int position) {
        return null;
    }

    @Override
    public long getItemId(int position) {
        return position;
    }

    @Override
    public View getView(int position, View convertView, ViewGroup parent) {
        ViewHolder viewHolder;
        if(convertView == null){
            convertView = LayoutInflater.from(mContext).inflate(R.layout.list_item,parent,false);
            viewHolder = new ViewHolder();
            viewHolder.txt_item_title = (TextView) convertView.findViewById(R.id.txt_item_title);
            convertView.setTag(viewHolder);
        }else{
            viewHolder = (ViewHolder) convertView.getTag();
        }
        viewHolder.txt_item_title.setText(mData.get(position).getNew_title());
        return convertView;
    }

    private class ViewHolder{
        TextView txt_item_title;
    }

}
Step 3:MainActivity的实现
MainActivity.java:
public class MainActivity extends AppCompatActivity {

    private TextView txt_title;
    private FrameLayout fl_content;
    private Context mContext;
    private ArrayList<Data> datas = null;
    private FragmentManager fManager = null;
    private long exitTime = 0;


    @Override
    protected void onCreate(Bundle savedInstanceState) {
        super.onCreate(savedInstanceState);
        setContentView(R.layout.activity_main);
        mContext = MainActivity.this;
        fManager = getFragmentManager();
        bindViews();

        datas = new ArrayList<Data>();
        for (int i = 1; i <= 20; i++) {
            Data data = new Data("新闻标题" + i, i + "~新闻内容~~~~~~~~");
            datas.add(data);
        }
        NewListFragment nlFragment = new NewListFragment(fManager, datas);
        FragmentTransaction ft = fManager.beginTransaction();
        ft.replace(R.id.fl_content, nlFragment);
        ft.commit();
    }


    private void bindViews() {
        txt_title = (TextView) findViewById(R.id.txt_title);
        fl_content = (FrameLayout) findViewById(R.id.fl_content);
    }


    //点击回退键的处理:判断Fragment栈中是否有Fragment
    //没,双击退出程序,否则像是Toast提示
    //有,popbackstack弹出栈
    @Override
    public void onBackPressed() {
        if (fManager.getBackStackEntryCount() == 0) {
            if ((System.currentTimeMillis() - exitTime) > 2000) {
                Toast.makeText(getApplicationContext(), "再按一次退出程序",
                        Toast.LENGTH_SHORT).show();
                exitTime = System.currentTimeMillis();
            } else {
                super.onBackPressed();
            }
        } else {
            fManager.popBackStack();
            txt_title.setText("新闻列表");
        }
    }
}
Step 4:列表Fragment的实现:
NewListFragment.java:
package com.jay.fragmentdemo4;

import android.app.Fragment;
import android.app.FragmentManager;
import android.app.FragmentTransaction;
import android.os.Bundle;
import android.view.LayoutInflater;
import android.view.View;
import android.view.ViewGroup;
import android.widget.AdapterView;
import android.widget.ListView;
import android.widget.TextView;

import java.util.ArrayList;

/**
 * Created by Jay on 2015/9/6 0006.
 */
public class NewListFragment extends Fragment implements AdapterView.OnItemClickListener {
    private FragmentManager fManager;
    private ArrayList<Data> datas;
    private ListView list_news;

    public NewListFragment(FragmentManager fManager, ArrayList<Data> datas) {
        this.fManager = fManager;
        this.datas = datas;
    }

    @Override
    public View onCreateView(LayoutInflater inflater, ViewGroup container, Bundle savedInstanceState) {
        View view = inflater.inflate(R.layout.fg_newlist, container, false);
        list_news = (ListView) view.findViewById(R.id.list_news);
        MyAdapter myAdapter = new MyAdapter(datas, getActivity());
        list_news.setAdapter(myAdapter);
        list_news.setOnItemClickListener(this);
        return view;
    }


    @Override
    public void onItemClick(AdapterView<?> parent, View view, int position, long id) {
        FragmentTransaction fTransaction = fManager.beginTransaction();
        NewContentFragment ncFragment = new NewContentFragment();
        Bundle bd = new Bundle();
        bd.putString("content", datas.get(position).getNew_content());
        ncFragment.setArguments(bd);
        //获取Activity的控件
        TextView txt_title = (TextView) getActivity().findViewById(R.id.txt_title);
        txt_title.setText(datas.get(position).getNew_content());
        //加上Fragment替换动画
        fTransaction.setCustomAnimations(R.anim.fragment_slide_left_enter, R.anim.fragment_slide_left_exit);
        fTransaction.replace(R.id.fl_content, ncFragment);
        //调用addToBackStack将Fragment添加到栈中
        fTransaction.addToBackStack(null);
        fTransaction.commit();
    }
}
Step 5:内容Fragment的实现:
NewContentFragment.java:
/**
 * Created by Jay on 2015/9/6 0006.
 */
public class NewContentFragment extends Fragment {

    NewContentFragment() {
    }

    @Override
    public View onCreateView(LayoutInflater inflater, ViewGroup container, Bundle savedInstanceState) {
        View view = inflater.inflate(R.layout.fg_content, container, false);
        TextView txt_content = (TextView) view.findViewById(R.id.txt_content);
        //getArgument获取传递过来的Bundle对象
        txt_content.setText(getArguments().getString("content"));
        return view;
    }

}
代码很简单,就不慢慢解释了~
3.代码下载
FragmentDemo5.zip:下载 FragmentDemo5.zip
本节小结:
因为时间的关系,并没有详细的去做过多的讲解,示例代码也很简单,方便各位初学者理解! 如果要用到实际项目中还需要对此进行一番修改~!好的,本节就到这里,谢谢~
相关视频


24小时阅读榜
精品课程


共22课时
24.4万人学习

共28课时
36.3万人学习

共89课时
133.5万人学习
热门下载

集成PHP7,16种组合,超全大合集
下载

phpStudy安装所需运行库集合下载
下载


程序员工具箱 v1.0 php集成环境
下载


中文版,非常好用
下载

Notepad++ 8.9.7 Windows版官方安装包,适合 Windows 用户进行代码编辑、文本处理、语法高亮和插件扩展配置。
下载

Win64位,支持php多版本共存
下载