1. Ajax的get,post请求
jax即Asynchronous Javascript And XML(异步JavaScript和XML)在 2005年被Jesse James Garrett提出的新术语,用来描述一种使用现有技术集合的‘新’方法,包括: HTML 或 XHTML, CSS, JavaScript, DOM, XML, XSLT, 以及最重要的XMLHttpRequest。 [3] 使用Ajax技术网页应用能够快速地将增量更新呈现在用户界面上,而不需要重载(刷新)整个页面,这使得程序能够更快地回应用户的操作。
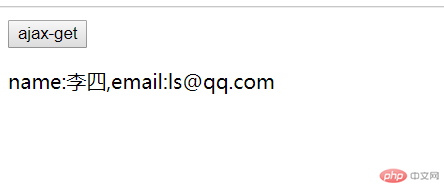
<body><button>ajax-get</button><p class="tips"></p><script>// 获得元素const btn = document.querySelector('button');const tips = document.querySelector('.tips');// btn点击事件btn.onclick = function () {// 1. 创建xhr对象const xhr = new XMLHttpRequest;// 2. 建立连接xhr.open('get', 'test1.php?id=2');xhr.responseType = 'json';// 3. 处理xhr.onload = ()=>{tips.textContent = `name:${xhr.response.name},email:${xhr.response.email}`;}xhr.onerror = ()=>{alert('error')};// 4. 发送xhr.send(null);}</script></body>
后端处理
$users = [['id'=>1,'name'=>'张三','email'=>'zs@qq.com'],['id'=>2,'name'=>'李四','email'=>'ls@qq.com'],['id'=>3,'name'=>'王五','email'=>'ww@qq.com'],];$id = $_GET['id'];$key = array_search($id,array_column($users,'id'));echo json_encode($users[$key]);
post
使用FormData传参
FormData 接口提供了一种表示表单数据的键值对 key/value 的构造方式,并且可以轻松的将数据通过XMLHttpRequest.send() 方法发送出去,本接口和此方法都相当简单直接。
前端
<body><div class="container"><p>用户登录</p><form action="" onsubmit="return false"><label for="email">邮箱:</label><input type="email" name="email" id="email" placeholder="demo@email.com" /><label for="pwd">密码:</label><input type="password" name="pwd" id="pwd" placeholder="不少于6位" /><button>提交</button><span class="tips"></span></form></div><script>// 获取元素const form = document.querySelector('.container >form');const btn = document.querySelector('.container > form button');const tips = document.querySelector('.tips');//btn.onclick = ()=>{// 通过formData获得表单数据let data = new FormData(form);// xhr// 1. 建立xhr对象const xhr = new XMLHttpRequest();// 2. 配置xhr参数xhr.open('post', 'test2.php');// 3. 处理xhr响应xhr.onload = () => {tips.textContent = xhr.response}// 4. 发送xhr请求xhr.send(data);}</script></body>
后台
$users= [['id'=>1,'name'=>'张三','email'=>'zs@qq.com','pwd'=>'123456'],['id'=>2,'name'=>'李四','email'=>'ls@qq.com','pwd'=>'123456'],['id'=>3,'name'=>'王五','email'=>'ww@qq.com','pwd'=>'123456'],];$email = $_POST['email'];$pwd = $_POST['pwd'];$res = array_filter($users, function ($user) use ($email, $pwd) {return $user['email'] === $email && $user['pwd'] === $pwd;});// 将结果做为请求响应返回到前端echo count($res) === 1 ? '验证成功' : '验证失败';
2. 选顶卡案例
点击导航标签,内容会切换
- css
<style>* {padding: 0;margin: 0;box-sizing: border-box;}:root {font-size: 10px;}a {text-decoration: none;color: #555;}a:hover {text-decoration: underline;color: red;}li {list-style: none;line-height: 1.6em;}li:hover {cursor: default;}.container {width: 30rem;height: 30rem;margin: 30em;font-size: 1.6rem;background-color: #e6e6e6;display: flex;flex-flow: column;}.container nav ul{height: 3.6rem;display: flex;}.container nav li {flex: auto;text-align: center;line-height: 3.6rem;background-color: #fff;}.container nav li.active {background-color: #e6e6e6;}.item {padding: 3rem;display: none;}.item.active {display: block;}</style>
- html
<div class="container"><nav><ul class="tab"><li class="active" data-index="1">技术文章</li><li data-index="2">网站源码</li><li data-index="3">原生手册</li></ul></nav><ul class="item active" data-index="1"><li>PHP7新特性的快速总结</li><li>PHP7新特性的快速总结</li><li>PHP7新特性的快速总结</li><li>PHP7新特性的快速总结</li><li>PHP7新特性的快速总结</li><li>PHP7新特性的快速总结</li></ul><ul class="item" data-index="2"><li>帝国cms仿婚纱摄影网站</li><li>帝国cms仿婚纱摄影网站</li><li>帝国cms仿婚纱摄影网站</li><li>帝国cms仿婚纱摄影网站</li><li>帝国cms仿婚纱摄影网站</li></ul><ul class="item" data-index="3"><li>PHP7的内核剖析</li><li>PHP7的内核剖析</li><li>PHP7的内核剖析</li><li>PHP7的内核剖析</li><li>PHP7的内核剖析</li></ul></div>
- js
// 获得元素const nav = document.querySelector('nav ul');const tabs = document.querySelectorAll('nav ul li');const items = document.querySelectorAll('ul.item');// 事件代理nav.addEventListener('click', (ev) => {let index = ev.target.dataset.index;[tabs,items].forEach((e)=>{e.forEach((li) => {// 清除activeli.classList.remove('active');})})// 设置激话ev.target.classList.add('active');[...items].filter((item)=>(item.dataset.index === index))[0].classList.add('active');})
3. 换肤案例

- css
* {padding: 0;margin: 0;box-sizing: border-box;}:root {font-size: 10px;}.container {width: 30rem;display: grid;grid-template-columns: repeat(3, 1fr);gap: 0 1rem;}.container > img {width: 100%;opacity: 0.6;border: 3px solid #fff;}.container > img:hover {width: 110%;opacity: 1;}body {background-repeat: no-repeat;background-size: cover;background-image: url('./images/1.jpg');}
- html
<div class="container"><img src="./images/1.jpg" alt="loading"><img src="./images/2.jpg" alt="loading"><img src="./images/3.jpg" alt="loading"></div>
- js
const container = document.querySelector('.container');const body = document.querySelector('body');// 事件代理container.onclick = (ev) => {let imgUrl = ev.target.src;body.style.backgroundImage = `url('${imgUrl}')`;};


