一、元素浮动造成父元素高度折叠
同一个块元素中,子级元素浮动,会造成附骥元素的高度折叠,包裹不住子级元素。
网页实际效果展示
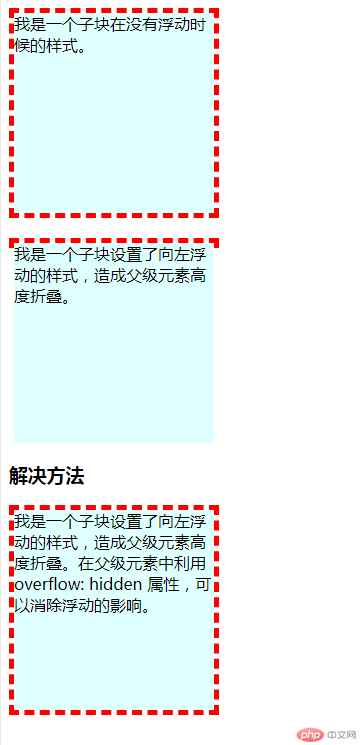
消除子元素浮动的影响实例
<!DOCTYPE html>
<html lang="en">

<head>
    <meta charset="UTF-8">
    <meta name="viewport" content="width=device-width, initial-scale=1.0">
    <meta http-equiv="X-UA-Compatible" content="ie=edge">
    <title>清除浮动的影响</title>
    <style>
        .box1 {
            width: 200px;
            border: 5px dashed red;
        }

        .box2 {
            width: inherit;
            height: 200px;
            background: lightcyan;
        }

        .box3 {
            margin-top: 20px;
            width: 200px;
            border: 5px dashed red;
        }

        .box4 {
            width: inherit;
            height: 200px;
            background: lightcyan;
            float: left;
        }

        .clear {
            clear: both;
        }

        .box5 {
            width: 200px;
            border: 5px dashed red;
            overflow: hidden;
        }

        .box6 {
            width: inherit;
            height: 200px;
            background: lightcyan;
            float: left;
        }
    </style>
</head>

<body>
    <div class="box1">
        <div class="box2">
            我是一个子块在没有浮动时候的样式。
        </div>
    </div>
    <div class="box3">
        <div class="box4">我是一个子块设置了向左浮动的样式,造成父级元素高度折叠。</div>
    </div>
    <div class="clear"></div>
    <h3>解决方法</h3>
    <div class="box5">
        <div class="box6">我是一个子块设置了向左浮动的样式,造成父级元素高度折叠。在父级元素中利用overflow: hidden 属性,可以消除浮动的影响。</div>
    </div>
</body>

</html>
运行实例 »
点击 "运行实例" 按钮查看在线实例
二、相对定位
相对定位是用 position: relative 属性设置,只是相对它原来。
网页实际效果展示
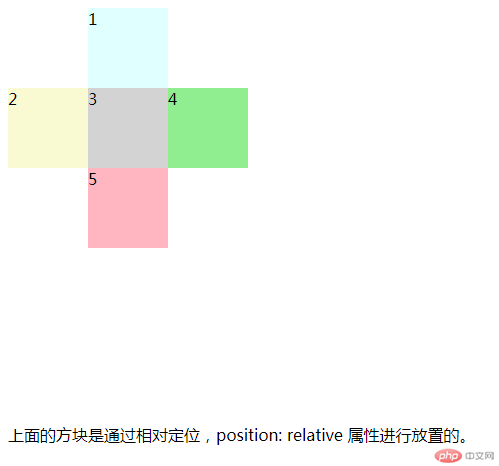
相对定位实例
<!DOCTYPE html>
<html lang="en">

<head>
    <meta charset="UTF-8">
    <meta name="viewport" content="width=device-width, initial-scale=1.0">
    <meta http-equiv="X-UA-Compatible" content="ie=edge">
    <title>相对定位</title>
    <style>
        .box1 {
            width: 80px;
            height: 80px;
            background: lightcyan;
        }

        .box2 {
            width: 80px;
            height: 80px;
            background: lightgoldenrodyellow;
        }

        .box3 {
            width: 80px;
            height: 80px;
            background: lightgray;
        }

        .box4 {
            width: 80px;
            height: 80px;
            background: lightgreen;
        }

        .box5 {
            width: 80px;
            height: 80px;
            background: lightpink;
        }

        .box1 {
            position: relative;
            left: 80px;
        }

        .box3 {
            position: relative;
            left: 80px;
            top: -80px;
        }

        .box4 {
            position: relative;
            left: 160px;
            top: -160px;
        }

        .box5 {
            position: relative;
            left: 80px;
            top: -160px;
        }
    </style>
</head>

<body>
    <div class="parent">
        <div class="box1">1</div>
        <div class="box2">2</div>
        <div class="box3">3</div>
        <div class="box4">4</div>
        <div class="box5">5</div>
    </div>
    <p>上面的方块是通过相对定位,position: relative 属性进行放置的。</p>
</body>

</html>
运行实例 »
点击 "运行实例" 按钮查看在线实例
三、绝对定位
绝对定位脱离了文档流,所有必须要有参照物。如body,如定位父级就参照定位父级。
绝对定位网页实际效果展示
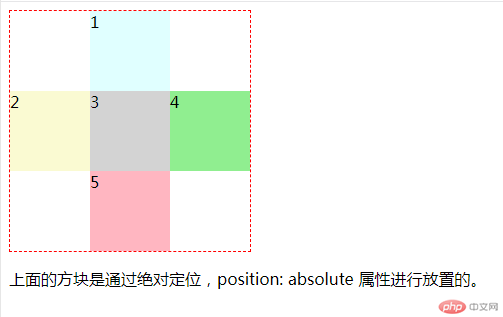
绝对定位实例
<!DOCTYPE html>
<html lang="en">

<head>
    <meta charset="UTF-8">
    <meta name="viewport" content="width=device-width, initial-scale=1.0">
    <meta http-equiv="X-UA-Compatible" content="ie=edge">
    <title>绝对定位</title>
    <style>
        .parent {
            position: relative;
            border: 1px dashed red;
            width: 240px;
            height: 240px;
        }

        .box1 {
            width: 80px;
            height: 80px;
            background: lightcyan;
        }

        .box2 {
            width: 80px;
            height: 80px;
            background: lightgoldenrodyellow;
        }

        .box3 {
            width: 80px;
            height: 80px;
            background: lightgray;
        }

        .box4 {
            width: 80px;
            height: 80px;
            background: lightgreen;
        }

        .box5 {
            width: 80px;
            height: 80px;
            background: lightpink;
        }

        .box1 {
            position: absolute;
            left: 80px;
        }

        .box2 {
            position: absolute;
            top: 80px;
        }

        .box3 {
            position: absolute;
            left: 80px;
            top: 80px;
        }

        .box4 {
            position: absolute;
            left: 160px;
            top: 80px;
        }

        .box5 {
            position: absolute;
            left: 80px;
            top: 160px;
        }
    </style>
</head>

<body>
    <div class="parent">
        <div class="box1">1</div>
        <div class="box2">2</div>
        <div class="box3">3</div>
        <div class="box4">4</div>
        <div class="box5">5</div>
    </div>
    <p>上面的方块是通过绝对定位,position: absolute 属性进行放置的。</p>
</body>

</html>
运行实例 »
点击 "运行实例" 按钮查看在线实例
四、固定定位
固定定位是将某元素固定在页面中的特定位置,随固定条的拖动,依然在固定位置显示。用position: fixed 属性设置。
固定定位网页实际效果展示
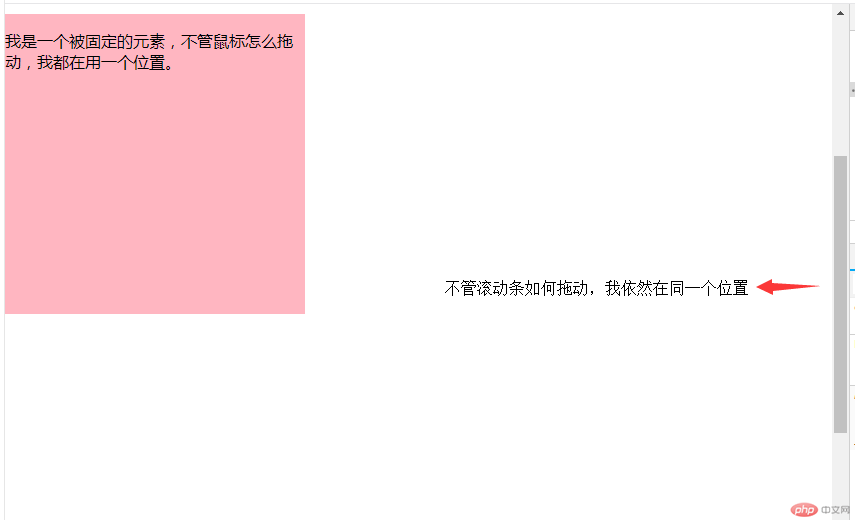
固定定位实例
<!DOCTYPE html>
<html lang="en">

<head>
    <meta charset="UTF-8">
    <meta name="viewport" content="width=device-width, initial-scale=1.0">
    <meta http-equiv="X-UA-Compatible" content="ie=edge">
    <title>固定定位</title>
    <style>
        body {
            height: 2000px;
        }

        .ads {
            width: 300px;
            height: 300px;
            background: lightpink;
            position: fixed;
            top: 10px;
            left: 0;
        }
    </style>
</head>

<body>
    <div class="ads">
        <p>我是一个被固定的元素,不管鼠标怎么拖动,我都在用一个位置。</p>
    </div>
</body>

</html>
运行实例 »
点击 "运行实例" 按钮查看在线实例
四、用绝对定位实现三列布局
利用绝对定位position:absolute 的属性设置网页成三列布局。
绝对定位三列布局网页实际效果展示
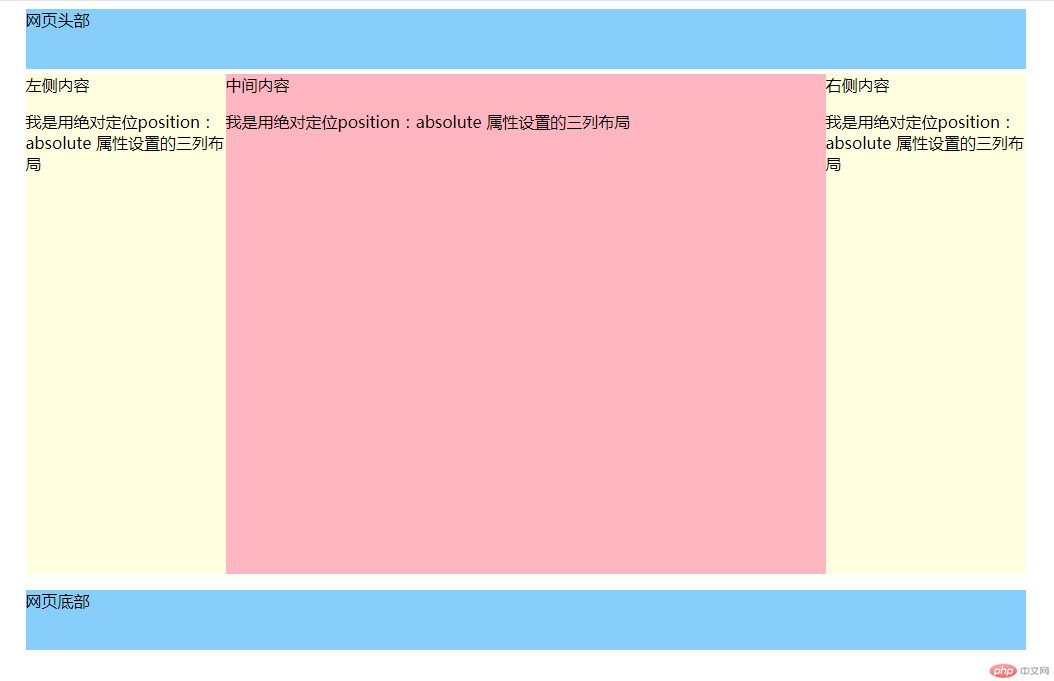
绝对定位实现三列布局实例
<!DOCTYPE html>
<html lang="en">

<head>
    <meta charset="UTF-8">
    <meta name="viewport" content="width=device-width, initial-scale=1.0">
    <meta http-equiv="X-UA-Compatible" content="ie=edge">
    <title>绝对定位实现三列布局</title>
    <style>
        .container {
            width: 1000px;
            margin: 0 auto;
        }

        .header,
        .footer {
            height: 60px;
            background: lightskyblue;
        }

        .main {
            background: lightgrey;
            margin: 5px auto;
        }

        .left {
            width: 200px;
            height: 500px;
            background: lightyellow;
        }

        .content {
            min-height: 500px;
            background: lightpink;
        }

        .right {
            width: 200px;
            height: 500px;
            background: lightyellow;
        }

        .main {
            position: relative;
        }

        .left {
            position: absolute;
            top: 0;
            left: 0;
        }

        .right {
            position: absolute;
            top: 0;
            right: 0;
        }

        .content {
            margin: 0 200px;
        }
    </style>
</head>

<body>
    <div class="container">
        <div class="header">网页头部</div>
        <div class="main">
            <div class="left">左侧内容
                <p>我是用绝对定位position:absolute 属性设置的三列布局</p>
            </div>
            <div class="content">中间内容
                <p>我是用绝对定位position:absolute 属性设置的三列布局</p>
            </div>
            <div class="right">右侧内容
                <p>我是用绝对定位position:absolute 属性设置的三列布局</p>
            </div>
        </div>
        <div class="footer">网页底部</div>
    </div>

</body>

</html>
运行实例 »
点击 "运行实例" 按钮查看在线实例
五、浮动实现三列布局
利用浮动属性 float 来实现网页成三列布局。
浮动实现三列布局实际页面展示
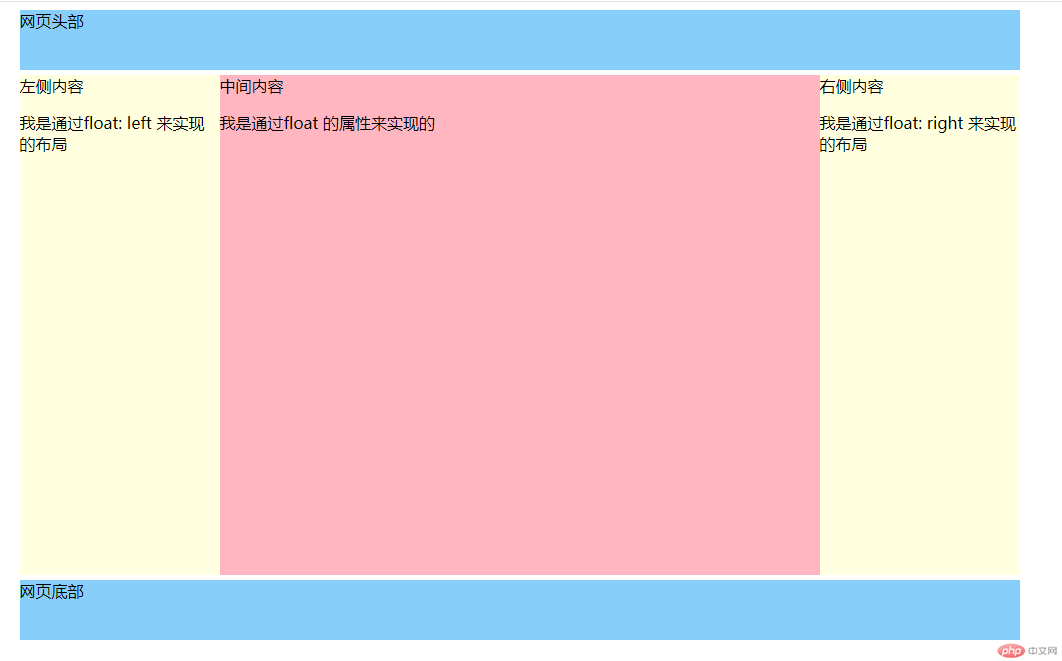
浮动实现三列布局实例
<!DOCTYPE html>
<html lang="en">

<head>
    <meta charset="UTF-8">
    <meta name="viewport" content="width=device-width, initial-scale=1.0">
    <meta http-equiv="X-UA-Compatible" content="ie=edge">
    <title>浮动实现三列布局</title>
    <style>
        .container {
            width: 1000px;
            margin: 0 auto;
        }

        .header,
        .footer {
            height: 60px;
            background: lightskyblue;
        }

        .main {
            background: lightgrey;
            margin: 5px auto;
            overflow: hidden;
        }

        .left {
            width: 200px;
            height: 500px;
            background: lightyellow;
        }

        .content {
            min-height: 500px;
            background: lightpink;
        }

        .right {
            width: 200px;
            height: 500px;
            background: lightyellow;
        }

        .left {
            float: left;
        }

        .right {
            float: right;
        }

        .content {
            float: left;
            width: 600px;
        }
    </style>
</head>

<body>
    <div class="container">
        <div class="header">网页头部</div>
        <div class="main">
            <div class="left">左侧内容
                <p>我是通过float: left 来实现的布局</p>
            </div>
            <div class="content">中间内容
                <p>我是通过float 的属性来实现的</p>
            </div>
            <div class="right">右侧内容
                <p>我是通过float: right 来实现的布局</p>
            </div>
        </div>
        <div class="footer">网页底部</div>
    </div>

</body>

</html>
运行实例 »
点击 "运行实例" 按钮查看在线实例

