一、CSS相邻兄弟选择器
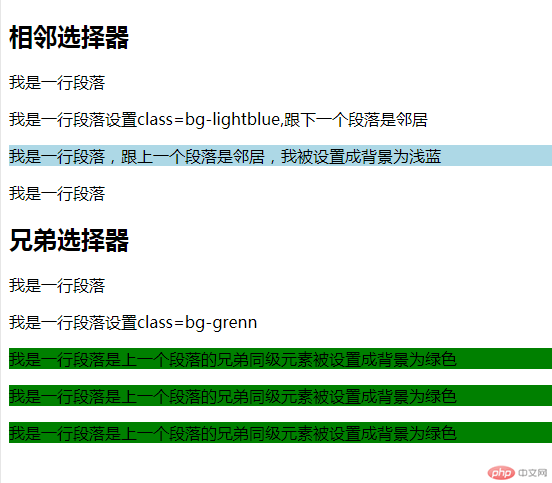
如果需要选择紧接在另一个元素后的元素,而且二者有相同的父元素,可以使用相邻兄弟选择器。
1、相邻选择器选择的是该元素的下一个元素;
2、兄弟选择器选择的是该元素后面的所有元素。
网页实际效果展示:

相邻兄弟选择器实例
<!DOCTYPE html>
<html lang="en">

<head>
    <meta charset="UTF-8">
    <meta name="viewport" content="width=device-width, initial-scale=1.0">
    <meta http-equiv="X-UA-Compatible" content="ie=edge">
    <title>Document</title>
    <style>
        .bg-lightblue+* {
            background: lightblue;
        }

        .bg-grenn~* {
            background: green;
        }
    </style>
</head>

<body>
    <div class="xl">
        <h2>相邻选择器</h2>
        <p>我是一行段落</p>
        <p class="bg-lightblue">我是一行段落设置class=bg-lightblue,跟下一个段落是邻居</p>
        <p>我是一行段落,跟上一个段落是邻居,我被设置成背景为浅蓝</p>
        <p>我是一行段落</p>
    </div>

    <h2>兄弟选择器</h2>
    <p>我是一行段落</p>
    <p class="bg-grenn">我是一行段落设置class=bg-grenn</p>
    <p>我是一行段落是上一个段落的兄弟同级元素被设置成背景为绿色</p>
    <p>我是一行段落是上一个段落的兄弟同级元素被设置成背景为绿色</p>
    <p>我是一行段落是上一个段落的兄弟同级元素被设置成背景为绿色</p>
</body>

</html>
运行实例 »
点击 "运行实例" 按钮查看在线实例
二、伪类选择器
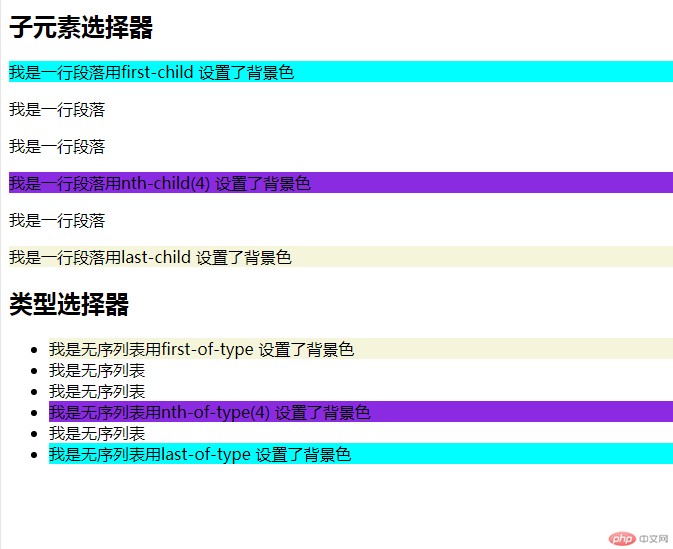
伪类选择器常用的有子元素选择器和类型选择器。
1、关注点不用,如果关注点是位置用子元素选择器;
2、即关注位置又关注类型用类型选择器。
网页实际效果展示:

伪类选择器实例
<!DOCTYPE html>
<html lang="en">

<head>
    <meta charset="UTF-8">
    <meta name="viewport" content="width=device-width, initial-scale=1.0">
    <meta http-equiv="X-UA-Compatible" content="ie=edge">
    <title>Document</title>
    <style>
        div :first-child {
            background-color: aqua;
        }

        div :last-child {
            background-color: beige;
        }

        div :nth-child(4) {
            background-color: blueviolet;
        }

        ul li:first-of-type {
            background-color: beige;
        }

        ul li:last-of-type {
            background-color: aqua;
        }

        ul li:nth-of-type(4) {
            background-color: blueviolet;
        }
    </style>
</head>

<body>
    <h2>子元素选择器</h2>
    <div>
        <p>我是一行段落用first-child 设置了背景色</p>
        <p>我是一行段落</p>
        <p>我是一行段落</p>
        <p>我是一行段落用nth-child(4) 设置了背景色</p>
        <p>我是一行段落</p>
        <p>我是一行段落用last-child 设置了背景色</p>
    </div>
    <h2>类型选择器</h2>
    <ul>
        <li>我是无序列表用first-of-type 设置了背景色</li>
        <li>我是无序列表</li>
        <li>我是无序列表</li>
        <li>我是无序列表用nth-of-type(4) 设置了背景色</li>
        <li>我是无序列表</li>
        <li>我是无序列表用last-of-type 设置了背景色</li>
    </ul>
</body>

</html>
运行实例 »
点击 "运行实例" 按钮查看在线实例
三、padding对盒子大小的影响与解决方案
网页实际效果展示

padding对盒子大小的影响与解决方案实例
<!DOCTYPE html>
<html lang="en">

<head>
    <meta charset="UTF-8">
    <meta name="viewport" content="width=device-width, initial-scale=1.0">
    <meta http-equiv="X-UA-Compatible" content="ie=edge">
    <title>padding对盒子的影响</title>
    <style>
        .box1 {
            width: 300px;
            border: 1px solid black;
            background: lightblue;
        }

        .box1 {
            padding: 50px;
            . width: 200px;
        }

        .wrap {
            width: 300px;
        }

        .box2 {
            padding: 50px;
            border: 1px solid black;
            background: lightgreen;
        }

        .box3 {
            width: 300px;
            box-sizing: border-box;
            padding: 50px;
            background: lightsalmon;
            border: 1px solid black;
        }
    </style>
</head>

<body>
    <div class="box1">
        <img src="../static/images/girl.jpg" alt="小姐姐" width="200">
    </div>
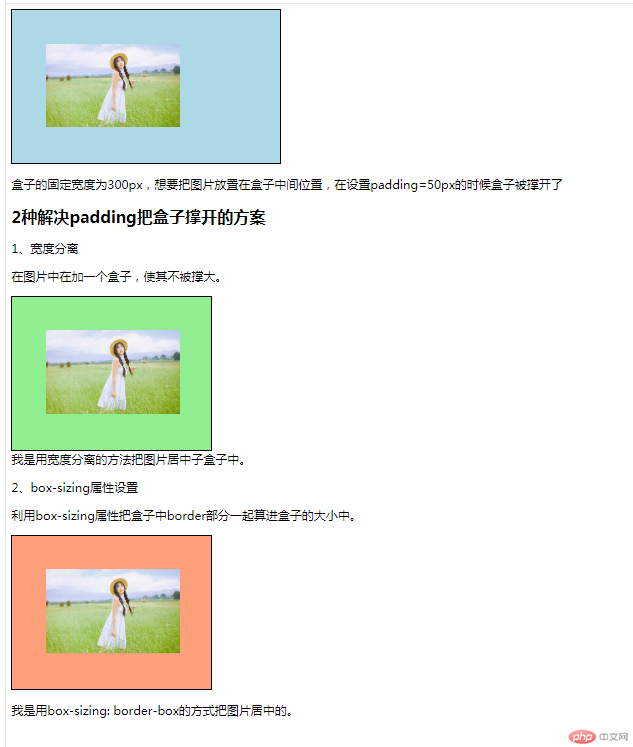
    <p>盒子的固定宽度为300px,想要把图片放置在盒子中间位置,在设置padding=50px的时候盒子被撑开了</p>
    <h2>2种解决padding把盒子撑开的方案</h2>
    <p>1、宽度分离</p>
    <p>在图片中在加一个盒子,使其不被撑大。</p>
    <div class="wrap">
        <div class="box2">
            <img src="../static/images/girl.jpg" alt="小姐姐" width="200">
        </div>
    </div>
    我是用宽度分离的方法把图片居中子盒子中。
    <p>2、box-sizing属性设置</p>
    <p>利用box-sizing属性把盒子中border部分一起算进盒子的大小中。</p>
    <div class="box3">
        <img src="../static/images/girl.jpg" alt="小姐姐" width="200">
    </div>
    <p>我是用box-sizing: border-box的方式把图片居中的。</p>
</body>

</html>
运行实例 »
点击 "运行实例" 按钮查看在线实例
四、margin中的同级塌陷, 嵌套传递与自动挤压
网页实际效果展示

margin中的同级塌陷, 嵌套传递与自动挤压实例
<!DOCTYPE html>
<html lang="en">

<head>
    <meta charset="UTF-8">
    <meta name="viewport" content="width=device-width, initial-scale=1.0">
    <meta http-equiv="X-UA-Compatible" content="ie=edge">
    <title>Document</title>
    <style>
        .box1 {
            width: 50px;
            height: 50px;
            background: lightgreen;
            margin-bottom: 30px;
        }

        .box2 {
            width: 50px;
            height: 50px;
            background: lightblue;
            margin-top: 20px;
        }

        .box3 {
            width: 100px;
            height: 100px;
            background: lightgreen;
        }

        .box4 {
            margin-top: 50px;
            width: 50px;
            height: 50px;
            background: lightblue;
        }

        .box5 {
            padding-top: 50px;
            box-sizing: border-box;
            width: 100px;
            height: 100px;
            background: lightgreen;
        }

        .box6 {
            width: 50px;
            height: 50px;
            background: lightblue;
        }

        .box7 {
            width: 50px;
            height: 50px;
            background: lightgreen;
            margin-left: auto;
        }

        .box8 {
            width: 50px;
            height: 50px;
            background: lightgreen;
            margin-right: auto;
        }

        .box9 {
            width: 50px;
            height: 50px;
            background: lightgreen;
            margin: auto;
        }
    </style>
</head>

<body>
    <h3>同级塌陷</h3>
    <div class="box1"></div>
    <div class="box2"></div>
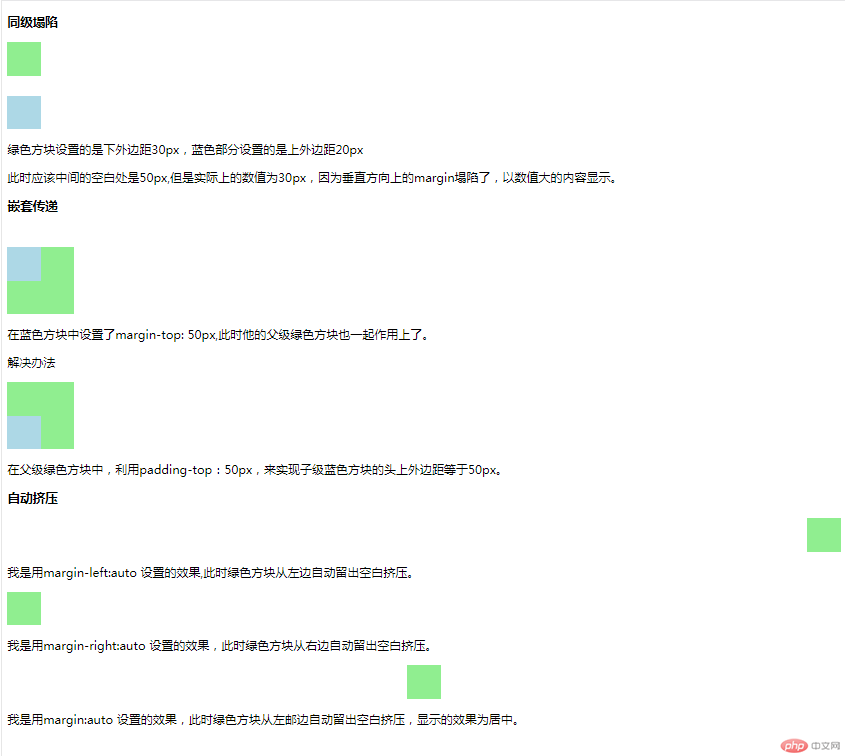
    <p>绿色方块设置的是下外边距30px,蓝色部分设置的是上外边距20px</p>
    <p>此时应该中间的空白处是50px,但是实际上的数值为30px,因为垂直方向上的margin塌陷了,以数值大的内容显示。</p>
    <h3>嵌套传递</h3>
    <div class="box3">
        <div class="box4"></div>
    </div>
    <p>在蓝色方块中设置了margin-top: 50px,此时他的父级绿色方块也一起作用上了。</p>
    <p>解决办法</p>
    <div class="box5">
        <div class="box6"></div>
    </div>
    <p>在父级绿色方块中,利用padding-top:50px,来实现子级蓝色方块的头上外边距等于50px。</p>
    <h3>自动挤压</h3>
    <div class="box7"></div>
    <p>我是用margin-left:auto 设置的效果,此时绿色方块从左边自动留出空白挤压。</p>
    <div class="box8"></div>
    <p>我是用margin-right:auto 设置的效果,此时绿色方块从右边自动留出空白挤压。</p>
    <div class="box9"></div>
    <p>我是用margin:auto 设置的效果,此时绿色方块从左邮边自动留出空白挤压,显示的效果为居中。</p>
</body>

</html>
运行实例 »
点击 "运行实例" 按钮查看在线实例

