CSS中的常用选择器介绍:
1.标签选择器 如:li{ 属性值 };
2.id选择器 如:#bg-blue{属性值};
3.类型选择器 如:.bg-green
4.属性选择器 如:li[id="bg-blue"]{添加属性值}
5.群组选择器 如:#bg-blue,.bg-green{添加属性值}
6.相邻选择器 如:#bg-blue+* {添加属性值}
7.兄弟选择器 如:#bg-blue~* {添加属性值}
8.伪类:子元素选择器 下列代码中ul+空格+:表示选择的方式+{}
如
8.1 伪类:子元素头部首位选择表示方法
8.2 伪类:子元素尾部选择器表示方法
8.3伪类:子元素任意元素选择器表示方法,括号内的数字6是从第一位开始算起。
8.4伪类:子元素选择器倒数开始选择器,括号内数字3从倒数第一位算起。
9.伪类:类型选择器 下面代码中ul li:+选择方式+{}如:
9.1伪类: 首位选择器 方式
9.2伪类: 末位选择器 方式
9.3伪类:指定位置选择器 方式
对子元素选择器:nth-child() 和类型选择器:nth-of-type()的小总结分析:
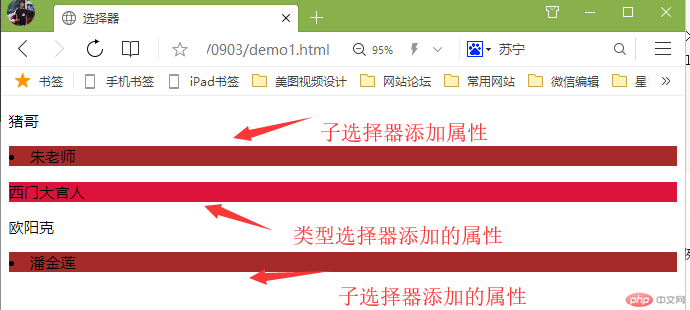
元素选择器nth-child()比较适用于html网页中当前文档内的元素添加属性;如下列代码中给div中的li标签的元素加属性
类型nth-of-type()更加精细到选择html页面中的相同类型的元素给予属性的加持!如下html文档中类型选择器就能更加精准的选择div里有2个p标签的类型元素,给予属性更改,更灵活的使用改变网页效果!
实例
<!DOCTYPE html>
<html lang="en">

<head>
    <meta charset="UTF-8">
    <meta name="viewport" content="width=device-width, initial-scale=1.0">
    <meta http-equiv="X-UA-Compatible" content="ie=edge">
    <title>选择器</title>

    <!-- 类型选择器,给div里包含了2个p标签类型的元素第二个p标签改变属性值 -->
    <style>
        p:nth-of-type(2) {
            background-color: crimson;
        }
    </style>
</head>

<body>
    <!-- <ul>
        <li class="bg-green">1</li>
        <li id="bg-blue">2</li>
        <li class="bg-green">3</li>
        <li class="bg-green">4</li>
        <li>5</li>
        <li>6</li>
        <li>7</li>
        <li>8</li>
        <li>9</li>
        <li>10</li>
    </ul> -->

    <div>
        <p>猪哥</p>
        <li>朱老师</li>
        <p>西门大官人</p>
    </div>

    <div>
        <p>欧阳克</p>
        <li>潘金莲</li>
    </div>
</body>

</html>
运行实例 »
点击 "运行实例" 按钮查看在线实例
演示:padding 对盒子大小的影响与解决方案!
在下面html文档中,div包含了一张像素为200px的图片,如果设置图片的内边距各50像素,那么div盒子的右边距及下边距被撑开了多50px.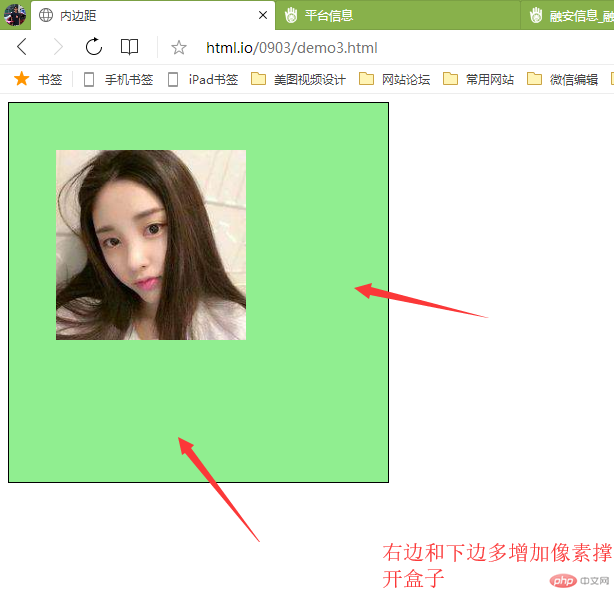
实例
<!DOCTYPE html>
<html lang="en">

<head>
    <meta charset="UTF-8">
    <meta name="viewport" content="width=device-width, initial-scale=1.0">
    <meta http-equiv="X-UA-Compatible" content="ie=edge">
    <!-- <link rel="stylesheet" href="../0903/static/css/style3.css"> -->
    <title>内边距</title>
</head>
<style>
    .box1 {
        width: 300px;
        height: 300px;
        border: 1px solid black;
        background-color: lightgreen;
    }

    .box1 {
        padding: 50px;
    }
</style>

<body>
    <div class="box1">
        <img src="../0903/static/images/girl.jpg" alt="小姐姐" width="200px">
    </div>

    <!-- 宽度分类
    <div class="wrap">
        <div class="box2">
            <img src="../0903/static/images/girl.jpg" alt="小姐姐" width="200px">
        </div>
    </div> -->

    <!-- <div class="box3">
        <img src="../0903/static/images/girl.jpg" alt="小姐姐" width="200px">
    </div> -->
</body>

</html>
运行实例 »
点击 "运行实例" 按钮查看在线实例
下面两个方法可以解决这个内边距撑开的问题!
下列html文档中,两个div标签中各包含了一张图素,属性像素为200px的元素.
第一个div
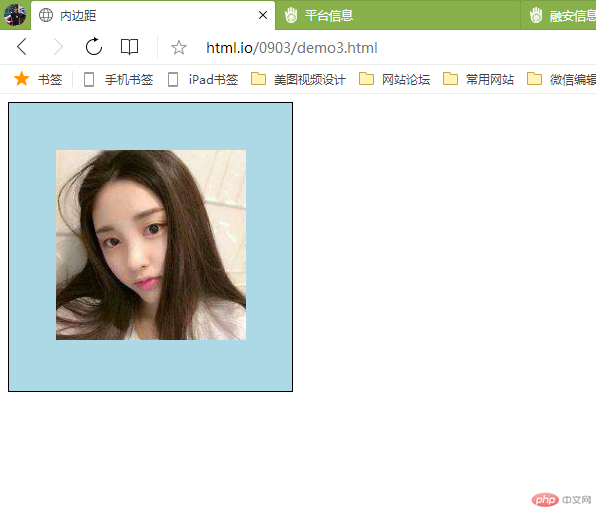
class="wrap",和包含了div class=“box“d的图片我们可以用宽度分离法,把图片元素居中在第一个设置了宽高的div标签容器中;如下代码:
实例
<!DOCTYPE html>
<html lang="en">

<head>
    <meta charset="UTF-8">
    <meta name="viewport" content="width=device-width, initial-scale=1.0">
    <meta http-equiv="X-UA-Compatible" content="ie=edge">
    <!-- <link rel="stylesheet" href="../0903/static/css/style3.css"> -->
    <title>内边距</title>
</head>
<style>
    .wrap {
        width: 300px;
        ;
    }

    .box2 {
        padding: 50px;
        background-color: lightblue;
        border: 1px solid black;
    }
</style>

<body>
    <!-- <div class="box1">
        <img src="../0903/static/images/girl.jpg" alt="小姐姐" width="200px">
    </div> -->
    <!-- 宽度分离-->
    <div class="wrap">
        <div class="box2">
            <img src="../0903/static/images/girl.jpg" alt="小姐姐" width="200px">
        </div>
    </div>

    <!-- <div class="box3">
        <img src="../0903/static/images/girl.jpg" alt="小姐姐" width="200px">
    </div> -->
</body>

</html>
运行实例 »
点击 "运行实例" 按钮查看在线实例
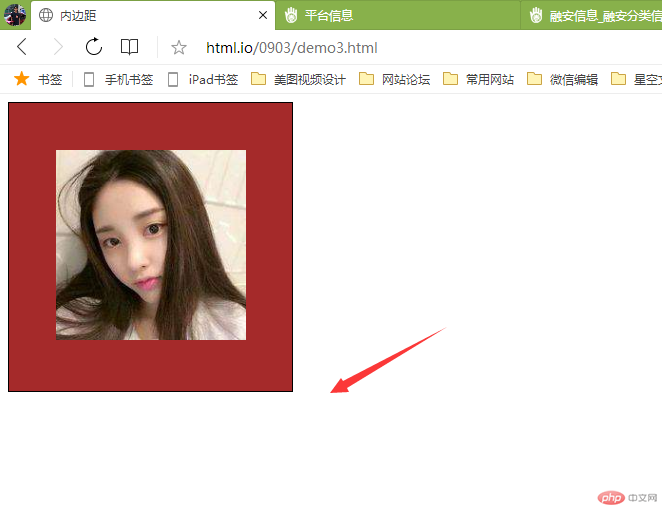
第二种方法可以使用调整 box-sizing,把图片的像素设置好后,设置box-sizing定位绝对值像素,这个像素是能让图片可以上下左右居中的数字,即可!如下代码
实例
<!DOCTYPE html>
<html lang="en">

<head>
    <meta charset="UTF-8">
    <meta name="viewport" content="width=device-width, initial-scale=1.0">
    <meta http-equiv="X-UA-Compatible" content="ie=edge">
    <!-- <link rel="stylesheet" href="../0903/static/css/style3.css"> -->
    <title>内边距</title>
</head>
<style>
        .box3 {
        width: 300px;
        box-sizing: border-box;
        padding: 50px;
        background-color: brown;
        border: 1px solid black;
</style>

<body>


    <div class="box3">
        <img src="../0903/static/images/girl.jpg" alt="小姐姐" width="200px">
    </div>
</body>

</html>
运行实例 »
点击 "运行实例" 按钮查看在线实例
三.margin中的同级塌陷, 嵌套传递与自动挤压, 并提出解决方案或应用场景
html文档中会出现margi同级塌陷的情况如下代码所示
实例
<!DOCTYPE html>
<html lang="en">

<head>
    <meta charset="UTF-8">
    <meta name="viewport" content="width=device-width, initial-scale=1.0">
    <meta http-equiv="X-UA-Compatible" content="ie=edge">

    <title>外边距</title>
</head>

<style>
    .box1 {
        width: 100px;
        height: 100px;
        background-color: lightblue;
        margin-bottom: 30px;
    }

    .box2 {
        width: 100px;
        height: 100px;
        background-color: lightcoral;
        margin-top: 100px;
    }
</style>

<body>
    <!-- 三各特点:1.同级塌陷 -->
    <div class="box1"></div>
    <div class="box2"></div>

    <!-- 2.嵌套传递 -->

    <!-- <div class="box3">
        <div class="box4"></div>
    </div> -->
    <!-- 3自动挤压 -->
    <!--
    <div class="box5">
    </div> -->
</body>

</html>
运行实例 »点击 "运行实例" 按钮查看在线实例
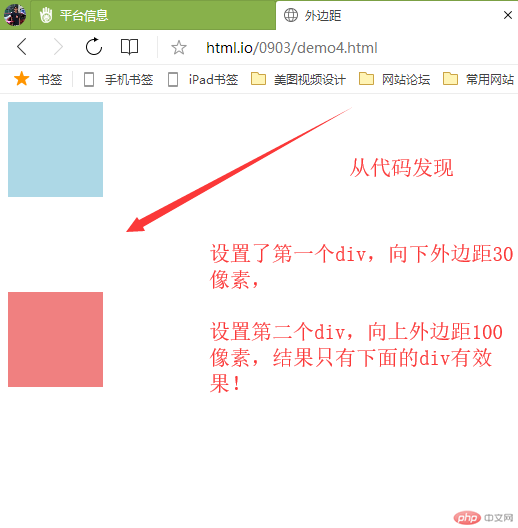
当两个盒子同级时;垂直方向,谁大按谁的像素显示!所以在设置排版要注意
html文档中会出现margi嵌套传递情况,如下代码!
实例
<!DOCTYPE html>
<html lang="en">

<head>
    <meta charset="UTF-8">
    <meta name="viewport" content="width=device-width, initial-scale=1.0">
    <meta http-equiv="X-UA-Compatible" content="ie=edge">

    <title>外边距</title>
</head>

<style>
    .box3 {
        width: 200px;
        height: 200px;
        background-color: lightblue;
    }

    .box4 {
        width: 100px;
        height: 100px;
        background-color: lightcoral;
        margin-top: 100px;
    }
</style>

<body>
    <!-- 三各特点:1.同级塌陷
    <div class="box1"></div>
    <div class="box2"></div> -->

    <!-- 2.嵌套传递 -->

    <div class="box3">
        <div class="box4"></div>
    </div>
    <!-- 3自动挤压 -->
    <!--
    <div class="box5">
    </div> -->
</body>

</html>
运行实例 »
点击 "运行实例" 按钮查看在线实例
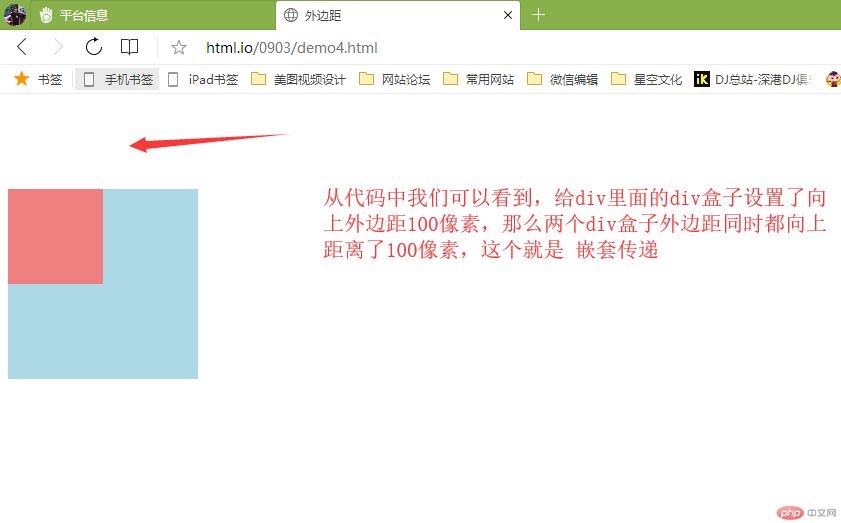
这种方法可以解决,看如下代码和图片
实例
<!DOCTYPE html>
<html lang="en">

<head>
    <meta charset="UTF-8">
    <meta name="viewport" content="width=device-width, initial-scale=1.0">
    <meta http-equiv="X-UA-Compatible" content="ie=edge">

    <title>外边距</title>
</head>

<style>
    .box3 {
        width: 200px;
        height: 200px;
        background-color: lightblue;
    }

    .box4 {
        width: 100px;
        height: 100px;
        background-color: lightcoral;
    }

    .box4 {
        /* margin-top: 50px; */
    }

    .box3 {
        padding-top: 50px;
        height: 150px;
    }
</style>

<body>
    <!-- 三各特点:1.同级塌陷
    <div class="box1"></div>
    <div class="box2"></div> -->

    <!-- 2.嵌套传递 -->

    <div class="box3">
        <div class="box4"></div>
    </div>
    <!-- 3自动挤压 -->
    <!--
    <div class="box5">
    </div> -->
</body>

</html>
运行实例 »
点击 "运行实例" 按钮查看在线实例
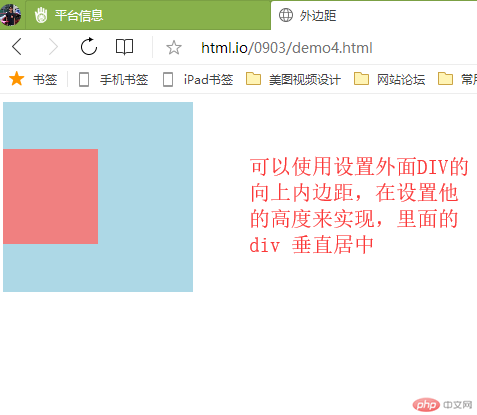
html文档margin自动挤压情况,如下代码,
实例
<!DOCTYPE html>
<html lang="en">

<head>
    <meta charset="UTF-8">
    <meta name="viewport" content="width=device-width, initial-scale=1.0">
    <meta http-equiv="X-UA-Compatible" content="ie=edge">

    <title>外边距</title>
</head>

<style>
    .box5 {
        width: 150px;
        height: 150px;
        background-color: lightblue;
    }

    .box5 {
        margin-left: auto;
    }
</style>

<body>

    <!-- 3自动挤压 -->

    <div class="box5">
    </div>
</body>

</html>
运行实例 »
点击 "运行实例" 按钮查看在线实例

下面我们可以设置,元素外边距左右自动调整像素。元素即可互相抵消垂直居中在页面中。如下代码
实例
<!DOCTYPE html>
<html lang="en">

<head>
    <meta charset="UTF-8">
    <meta name="viewport" content="width=device-width, initial-scale=1.0">
    <meta http-equiv="X-UA-Compatible" content="ie=edge">

    <title>外边距</title>
</head>

<style>
    .box5 {
        width: 150px;
        height: 150px;
        background-color: lightblue;
    }

    .box5 {
        margin: 0 auto;
    }
</style>

<body>

    <!-- 3自动挤压 -->

    <div class="box5">
    </div>
</body>

</html>
运行实例 »
点击 "运行实例" 按钮查看在线实例

最后,作业有点乱都是按我个人的观点学习认为理解的,希望老师多多指导。谢谢


