什麼是彈性(Flex)佈局 ? 15分鐘弄懂Flex佈局
- 不言原創
- 2018-09-21 15:10:5719068瀏覽
在網頁佈局的學習中,我們常常會遇到彈性(Flex)佈局,那麼彈性(Flex)佈局究竟是什麼樣子的呢?相信你學完了這篇文章就會明白Flex(彈性)佈局的真正的意思了。
建議手冊:CSS線上手冊
#什麼是Flexbox ?
Flexbox 是 flexible box 的簡稱(註:意思是「靈活的盒子容器」),是 CSS3 引入的新的佈局模式。它決定了元素如何在頁面上排列,使它們能在不同的螢幕尺寸和裝置下可預測地展現出來。
它之所以被稱為 Flexbox ,是因為它能夠擴展和收縮 flex 容器內的元素,以最大限度地填充可用空間。與先前佈局方式(如table 佈局和浮動元素內嵌塊元素)相比,Flexbox 是更強大的方式:
1、在不同方向排列元素
#2、重新排列元素的顯示順序
3、更改元素的對齊方式
4、動態地將元素裝入容器
影片教學推薦:
flex佈局影片教學推薦:2020最新5個flex彈性佈局影片教學
什麼情況不建議使用Flexbox ?
雖然Flexbox 非常適合縮放,對齊和重新排序元素,但以下情況應該盡量避免使用Flexbox 佈局:
1、整體頁面佈局
2、完全支援舊瀏覽器的網站
瀏覽器支援Flexbox 的情況:

舊版瀏覽器,如IE 11或更低版本,不支援或僅部分支援Flexbox 。如果你想要安全的使用頁面正常呈現,你應該退回到其他的 CSS 佈局方式,例如結合float 的 display: inline-block 或 display: table 等。但是,如果您只針對現代瀏覽器,那麼 Flexbox 絕對值得一試。
術語
在Flexbox 模型中,有三個核心概念:
– flex 項(愚人碼頭注:也稱為flex 子元素),需要佈局的元素
– flex 容器,其包含flex 項
– 排列方向(direction),這決定了flex 項的佈局方向(註:更多的文章叫做主軸)
最好的學習方式是從經驗和例子中學習,所以讓我們開始吧!
Level 1 — 基礎
1)建立一個flex 容器
CSS 程式碼:
.flex-container {display: flex;}程式碼如下:
HTML:
<div class="flex-container">
<div class="flex-item">1</div>
<div class="flex-item">2</div>
</div>
CSS:
.flex-container {
  display: flex;
}
/* 以下为辅助样式 */
.flex-container{
  background-color: #F0f0f0;
}
.flex-container .flex-item{
  padding:20px;
  background-color: #B1FF84;
}
.flex-container .flex-item:first-child{
  background-color: #F5DE25;
}
.flex-container .flex-item:last-child{
  background-color: #90D9F7;
}
效果如下:

要建立一個flex 容器,您只需要將一個display: flex 屬性加入到一個元素上。預設情況下,所有的直接子元素都被認為是 flex 項,並從左到右依序排列在一行中。如果 flex 項的寬度總和大於容器,那麼 flex 項將按比例縮小,直到它們適應 flex 容器寬度。
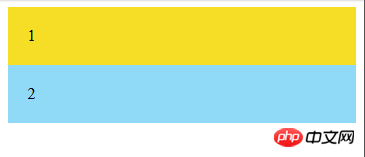
2)將flex 項排成一列
CSS 程式碼:
.flex-container {display: flex;flex-direction: column;}程式碼如下:
# #HTML:<div class="flex-container"> <div class="flex-item">1</div> <div class="flex-item">2</div> </div>CSS:
.flex-container {
display: flex;
flex-direction: column;
}
/* 以下为辅助样式 */
.flex-container{
background-color: #F0f0f0;
}
.flex-container .flex-item{
padding:20px;
background-color: #B1FF84;
}
.flex-container .flex-item:first-child{
background-color: #F5DE25;
}
.flex-container .flex-item:last-child{
background-color: #90D9F7;
}效果如下:
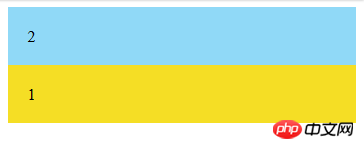
讓 flex 項以相反的順序排列。
CSS 程式碼:.flex-container {display: flex;flex-direction: column-reverse;}
程式碼如下:
HTML:<div class="flex-container"> <div class="flex-item">1</div> <div class="flex-item">2</div> </div>
CSS:
.flex-container {
display: flex;
flex-direction: column-reverse;
}
/* 以下为辅助样式 */
.flex-container{
background-color: #F0f0f0;
}
.flex-container .flex-item{
padding:20px;
background-color: #B1FF84;
}
.flex-container .flex-item:first-child{
background-color: #F5DE25;
}
.flex-container .flex-item:last-child{
background-color: #90D9F7;
}
效果如下:
##Level 2 — 新手
1)向右對齊的flex 項
.flex-container {display: flex;justify-content: flex-end;}###回想一下,每個Flexbox 模型都有flex 方向(主軸)。 justify-content 用於指定 flex 項在 flex 方向(direction)上的對齊位置。在上面的例子中,justify-content:flex-end 表示 flex 項在水平方向上靠 flex 容器的末端對齊。這就是為什麼他們被放在了右邊。 #########程式碼如下:############HTML:###<div class="flex-container"> <div class="flex-item">1</div> <div class="flex-item">2</div> </div>###CSS:###
.flex-container {
display: flex;
justify-content: flex-end;
}
/* 以下为辅助样式 */
.flex-container{
background-color: #F0f0f0;
}
.flex-container .flex-item{
padding:20px;
background-color: #B1FF84;
}
.flex-container .flex-item:first-child{
background-color: #F5DE25;
}
.flex-container .flex-item:last-child{
background-color: #90D9F7;
}###效果如下:###
相关文章推荐:
1.flex多列布局有哪些?flex四种多列布局的介绍
2.弹性盒子布局flex是什么
3.flex布局实现网易云播放器界面的布局
相关视频推荐:
1.CSS视频教程-玉女心经版
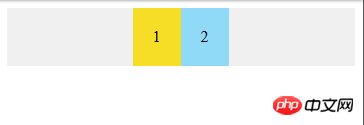
2)居中对齐的 flex 项
CSS 代码:
.flex-container {display: flex;justify-content: center;}代码如下:
HTML:
<div class="flex-container">
<div class="flex-item">1</div>
<div class="flex-item">2</div>
</div>
CSS:
.flex-container {
  display: flex;
  justify-content: center;
}
/* 以下为辅助样式 */
.flex-container{
  background-color: #F0f0f0;
}
.flex-container .flex-item{
  padding:20px;
  background-color: #B1FF84;
}
.flex-container .flex-item:first-child{
  background-color: #F5DE25;
}
.flex-container .flex-item:last-child{
  background-color: #90D9F7;
}
效果如下:
3)铺开的 flex 项
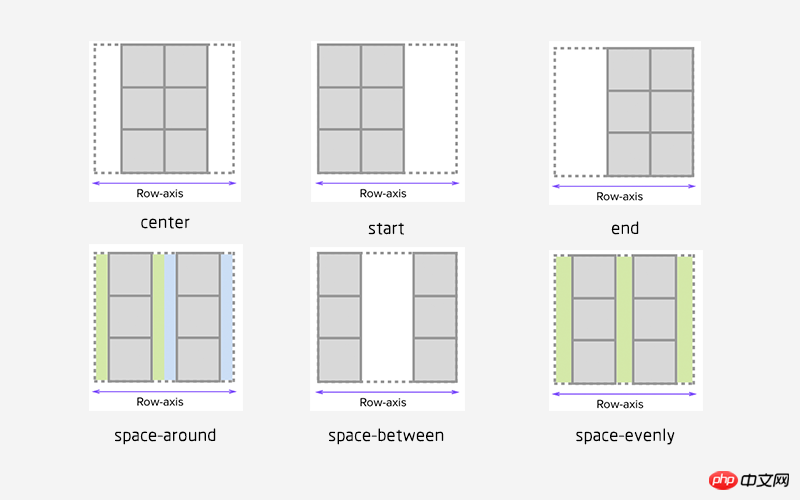
您可以通过使用以下 justify-content 属性的三个间距值之一来指定容器中 flex 项之间应显示多少空间:
space-evenly : flex 容器起始边缘和第一个 flex 项之间的间距和每个相邻 flex 项之间的间距是相等。(愚人码头注:该属性以前很少看到,原因是以前浏览器不支持,chrome 也是 60 版本之后才支持。延伸一下,align-content: space-evenly 也是这个逻辑,建议在 chrome 60 下查看 这个demo 。 )
space-between : 任何两个相邻 flex 项之间的间距是相同的,但不一定等于第一个/最后一个 flex 项与 flex 容器边缘之间的间距;起始边缘和第一个项目之间的间距和末端边缘和最后一个项目之间的间距是相等的。
space-around : flex 容器中的每个 flex 项的每一侧间距都是相等的。请注意,这意味着两个相邻 flex 项之间的空间将是第一个/最后一个 flex 项与其最近边缘之间的空间的两倍。
注:网上找了一张图片能更好的解释 justify-content 属性值的表现,如图:
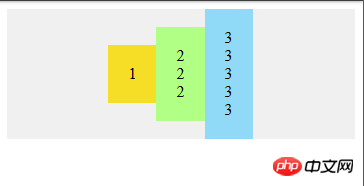
4)flex 项在交叉轴上的对齐
CSS 代码:
.flex-container {display: flex;justify-content: center;align-items: center;}通常,我们想沿着 flex 方向(主轴)排列 flex 项,还可以在垂直于它的方向(交叉轴)上对齐 flex 项。通过设置 justify-content:center和align-items:center,可以使 flex 项水平和垂直放置在 flex 容器的中心。
代码如下:
HTML:
<div class="flex-container">
<div class="flex-item">1</div>
<div class="flex-item">2 <br />2<br />2</div>
<div class="flex-item">3 <br />3<br /> 3<br /> 3<br /> 3</div>
</div>
CSS:
.flex-container {
  display: flex;
  justify-content: center;
  align-items: center;
}
/* 以下为辅助样式 */
.flex-container{
  background-color: #F0f0f0;
}
.flex-container .flex-item{
  padding:20px;
  background-color: #B1FF84;
}
.flex-container .flex-item:first-child{
  background-color: #F5DE25;
}
.flex-container .flex-item:last-child{
  background-color: #90D9F7;
}
效果如下:
5)对齐某个特定的 flex 项
CSS 代码:
.flex-container {display: flex;align-items: center;}
.flex-bottom {align-self: flex-end;}
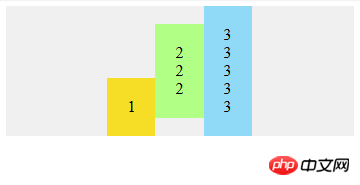
可以在某个特定的 flex 项上使用 align-self CSS 属性,来使该特定的 flex 项与容器中的其他 flex 项进行对齐。
代码如下:
HTML:
<div class="flex-container">
<div class="flex-item flex-bottom">1</div>
<div class="flex-item">2 <br />2<br />2</div>
<div class="flex-item">3 <br />3<br /> 3<br /> 3<br /> 3</div>
</div>
CSS:
.flex-container {
  display: flex;
  justify-content: center;
  align-items: center;
}
.flex-bottom {
  align-self: flex-end;
}
/* 以下为辅助样式 */
.flex-container{
  background-color: #F0f0f0;
}
.flex-container .flex-item{
  padding:20px;
  background-color: #B1FF84;
}
.flex-container .flex-item:first-child{
  background-color: #F5DE25;
}
.flex-container .flex-item:last-child{
  background-color: #90D9F7;
}
效果如下:
Level 3 — 中级
1)允许 flex 项多行/列排列
CSS 代码:
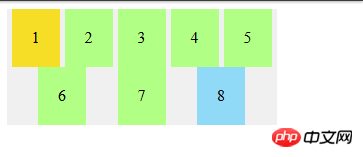
.flex-container {display: flex;flex-wrap: wrap;}默认情况下, flex 项不允许多行/列排列,如果 flex 容器尺寸对于所有 flex 项来说不够大,那么flex 项将被调整大小以适应单行或列排列。
通过添加 flex-wrap: wrap ,可以将溢出容器的 flex 项将被排列到另一行/列中。
代码如下:
HTML:
<div class="flex-container">
  <div class="flex-item">1</div>
  <div class="flex-item">2</div>
  <div class="flex-item">3</div>
  <div class="flex-item">4</div>
  <div class="flex-item">5</div>
  <div class="flex-item">6</div>
  <div class="flex-item">7</div>
<div class="flex-item">8</div>
</div>
CSS:
.flex-container {
  display: flex;
  justify-content: space-evenly;
  flex-wrap: wrap;
}
/* 以下为辅助样式 */
.flex-container{
  width:270px;
  background-color: #F0f0f0;
}
.flex-container .flex-item{
  padding:20px;
  background-color: #B1FF84;
}
.flex-container .flex-item:first-child{
  background-color: #F5DE25;
}
.flex-container .flex-item:last-child{
  background-color: #90D9F7;
}
效果如下:
2)flex 项反向多行/列排列
CSS 代码:
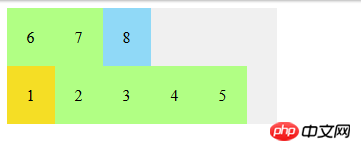
.flex-container {display: flex;flex-wrap: wrap-reverse;}flex-wrap:wrap-reverse 仍然使 flex 项以多行/列排列,但是它们从 flex 容器的末尾开始排列的。
代码如下:
HTML:
<div class="flex-container">
  <div class="flex-item">1</div>
  <div class="flex-item">2</div>
  <div class="flex-item">3</div>
  <div class="flex-item">4</div>
  <div class="flex-item">5</div>
  <div class="flex-item">6</div>
  <div class="flex-item">7</div>
  <div class="flex-item">8</div>
</div>
CSS:
.flex-container {
  display: flex;
  flex-wrap: wrap-reverse;
}
/* 以下为辅助样式 */
.flex-container{
  width:270px;
  background-color: #F0f0f0;
}
.flex-container .flex-item{
  padding:20px;
  background-color: #B1FF84;
}
.flex-container .flex-item:first-child{
  background-color: #F5DE25;
}
.flex-container .flex-item:last-child{
  background-color: #90D9F7;
}
效果如下:
3)多行/列排列的 flex 项在交叉轴上的对齐方式
CSS 代码:
.flex-container {display: flex;flex-wrap: wrap;align-content: flex-start;}默认情况下,当 flex 容器的交叉轴(cross axis)上存在多余空间时,您可以在 flex 容器上设置 align-content,以控制 flex 项在交叉轴(cross axis)上的对齐方式。可能的值是 flex-start,flex-end,center,space-between,space-around ,space-evenly 和 stretch(默认)。
代码如下:
HTML:
<div class="flex-container">
  <div class="flex-item">1</div>
  <div class="flex-item">2</div>
  <div class="flex-item">3</div>
  <div class="flex-item">4</div>
  <div class="flex-item">5</div>
  <div class="flex-item">6</div>
  <div class="flex-item">7</div>
  <div class="flex-item">8</div>
</div>
CSS:
.flex-container {
  display: flex;
  flex-wrap: wrap;
  justify-content: space-evenly;
  align-content: space-evenly;
}
/* 以下为辅助样式 */
.flex-container{
  width:270px;
  height:200px;
  background-color: #F0f0f0;
}
.flex-container .flex-item{
  padding:20px;
  height:20px;
  background-color: #B1FF84;
}
.flex-container .flex-item:first-child{
  background-color: #F5DE25;
}
.flex-container .flex-item:last-child{
  background-color: #90D9F7;
}
效果如下:
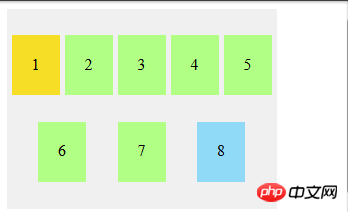
Level 4 — 高级
1)拉伸 flex 项
CSS 代码:
.flex-container {display: flex;}
.flex-item.nth-of-type(1){flex-grow: 1;}
.flex-item.nth-of-type(2) {flex-grow: 2;}
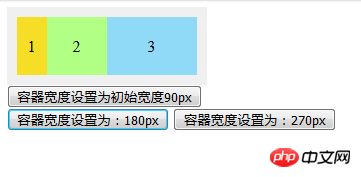
flex-grow 只有在 flex 容器中有剩余空间时才会生效。flex 项的 flex-grow 属性指定该 flex 项相对于其他 flex 项将拉伸多少,以填充 flex 容器。默认值为1。当设置为 0 时,该 flex 项将不会被拉伸去填补剩余空间。在这个例子中,两个项的比例是 1:2,意思是在被拉伸时,第一个 flex 项将占用 1/3,而第二个 flex 项将占据余下的空间。
注:这里特别要注意的是 flex-grow 控制的是 flex 项的拉伸比例,而不是占据 flex 容器的空间比例。
代码如下:
HTML:
<div class="flex-container">
  <div class="flex-item flex-item1">1</div>
  <div class="flex-item flex-item2">2</div>
  <div class="flex-item flex-item3">3</div>
</div>
<button class="w90">容器宽度设置为初始宽度90px</button>
<button class="w180">容器宽度设置为:180px</button>
<button class="w270">容器宽度设置为:270px</button>
CSS:
.flex-container {
  display: flex;
}
.flex-item1{flex-grow: 0;}
.flex-item2{flex-grow: 1;}
.flex-item3{flex-grow: 2;}
/* 以下为辅助样式 */
.flex-container{
  width:90px;
  padding:10px;
  background-color: #F0f0f0;
}
.flex-container .flex-item{
  padding:20px 0;
  text-align: center;
  width:30px;
  background-color: #B1FF84;
}
.flex-container .flex-item:first-child{
  background-color: #F5DE25;
}
.flex-container .flex-item:last-child{
  background-color: #90D9F7;
}
JS:
var $flexContainer=$(".flex-container")
$(".w90").on("click",function(){
  $flexContainer.width("90px")
})
$(".w180").on("click",function(){
  $flexContainer.width("180px")
})
$(".w270").on("click",function(){
  $flexContainer.width("270px")
})
效果如下:
2)收缩元素
CSS 代码:
.flex-container {display: flex;}
.flex-item:nth-of-type(1) {flex-shrink: 1;}
.flex-item:nth-of-type(2) {flex-shrink: 2;}
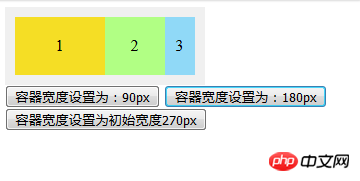
flex-shrink 只有在 flex 容器空间不足时才会生效。它指定 flex 项相对于其他 flex 项将缩小多少,以使 flex 项不会溢出 flex 容器。 默认值为 1。当设置为0时,该 flex 项将不会被收缩。在这个例子中,比例是1:2,意思是在收缩时,第一项将收缩 1/3 ,而第二个项目将被收缩 2/3 。
注: flex-shrink 和 flex-grow 正好相反
代码如下:
HTML:
<div class="flex-container">
  <div class="flex-item flex-item1">1</div>
  <div class="flex-item flex-item2">2</div>
  <div class="flex-item flex-item3">3</div>
</div>
<button class="w90">容器宽度设置为:90px</button>
<button class="w180">容器宽度设置为:180px</button>
<button class="w270">容器宽度设置为初始宽度270px</button>
CSS:
.flex-container {
  display: flex;
}
.flex-item1{flex-shrink: 0;}
.flex-item2{flex-shrink: 1;}
.flex-item3{flex-shrink: 2;}
/* 以下为辅助样式 */

.flex-container{
  width:270px;
  padding:10px;
  background-color: #F0f0f0;
}
.flex-container .flex-item{
  padding:20px 0;
  text-align: center;
  width:90px;
  background-color: #B1FF84;
}
.flex-container .flex-item:first-child{
  background-color: #F5DE25;
}
.flex-container .flex-item:last-child{
  background-color: #90D9F7;
}
JS:
var $flexContainer=$(".flex-container")
$(".w90").on("click",function(){
  $flexContainer.width("90px")
})
$(".w180").on("click",function(){
  $flexContainer.width("180px")
})
$(".w270").on("click",function(){
  $flexContainer.width("270px")
})
效果如下:
3)设置元素的大小
CSS 代码:
.flex-container {display: flex;}
.flex-item.nth-of-type(1) {flex-basis: 200px;}
.flex-item.nth-of-type(2) {flex-basis: 10%;}
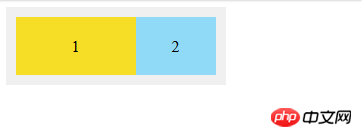
您可以使用 flex-basis 定制 flex 项尺寸来代替元素的初始大小。默认情况下,其值为 flex-basis: auto,这意味该尺寸着从非 Flexbox CSS规则计算的。您还可以将其设置为某个绝对值或相对于 flex 容器百分比的值;例如 flex-basis:200px 和flex-basis:10%。
代码如下:
HTML:
<div class="flex-container">
  <div class="flex-item flex-item1">1</div>
  <div class="flex-item flex-item2">2</div>
</div>
CSS:
.flex-container {
  display: flex;
}
.flex-item1{flex: 1 0 90px;}
.flex-item2{flex: 2 0 10%;}
/* 以下为辅助样式 */
.flex-container{
  width:200px;
  padding:10px;
  background-color: #F0f0f0;
}
.flex-container .flex-item{
  padding:20px 0;
  text-align: center;
  background-color: #B1FF84;
}
.flex-container .flex-item:first-child{
  background-color: #F5DE25;
}
.flex-container .flex-item:last-child{
  background-color: #90D9F7;
}
效果如下:
4)将 flex-grow, flex-shrink, 和 flex-basis 放在一起
CSS 代码:
.flex-container {display: flex;}
.flex-item:nth-of-type(1) {flex: 1 0 100px;}
.flex-item:nth-of-type(2) {flex: 2 0 10%;}
flex 是 flex-grow,flex-shrink 和 flex-based 的缩写。在这个例子中,第一个 flex 项设置为flex-grow: 1,flex-shrink: 0,flex-basis: 100px,第二个 flex 项设置为flex-grow: 2,flex-shrink: 0,flex-basis: 10%。
代码如下:
HTML:
<div class="flex-container">
  <div class="flex-item flex-item1">1</div>
  <div class="flex-item flex-item2">2</div>
</div>
CSS:
.flex-container {
  display: flex;
}
.flex-item1{flex: 1 0 90px;}
.flex-item2{flex: 2 0 10%;}
/* 以下为辅助样式 */
.flex-container{
  width:200px;
  padding:10px;
  background-color: #F0f0f0;
}
.flex-container .flex-item{
  padding:20px 0;
  text-align: center;
  background-color: #B1FF84;
}
.flex-container .flex-item:first-child{
  background-color: #F5DE25;
}
.flex-container .flex-item:last-child{
  background-color: #90D9F7;
}
效果如下:
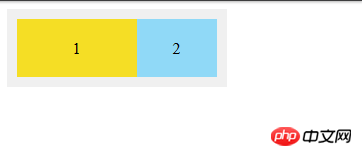
分析一下上面的这个例子,由于在 flex 容器(200px)中存在剩余空间 (90px),只有 flex-grow 才能起作用,flew-shrink 被忽略。第一个 flex 项的flex-grow 为 1,第2个 flex 项的flex-grow 为 2,所以第1个 flex 项拉伸 30px,第2个 flex 项拉伸 60px。
相关视频教程:
flex布局视频教程推荐:2018最新5个flex弹性布局视频教程
以上是什麼是彈性(Flex)佈局 ? 15分鐘弄懂Flex佈局的詳細內容。更多資訊請關注PHP中文網其他相關文章!

