
캔버스를 사용하여 이미지 모자이크를 구현하는 방법

- 不言원래의
- 2018-06-14 11:15:153876검색
이 글은 캔버스에 이미지 모자이크를 구현하기 위한 샘플 코드에 대한 관련 정보를 주로 소개합니다. 내용이 꽤 좋아서 지금 공유하고 참고하겠습니다.
1. 네이티브 캔버스 구현에 사용되는 API
1) getContext(contextID) ---캔버스에 그리기 위한 환경을 반환합니다
Canvas.getContext('2d') // 返回一个 CanvasRenderingContext2D 对象,使用它可以绘制到 Canvas 元素中
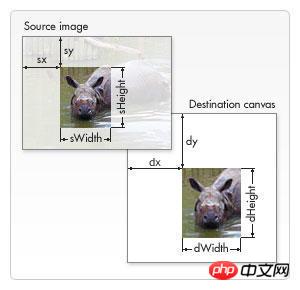
2) drawImage
drawImage(imgObj, x, y)  // 按原图大小绘制, x、y为图片在画布中的位置坐标
drawImage(imgObj, x, y, width, height) // 按指定宽高绘制
drawImage(imgObj, sourceX, sourceY, sourceWidth, sourceHeight, destX, destY, destWidth, destHeight) // 从原来图片上某一个位置开始(sourceX,sourceY),指定长宽进行剪切(sourceWidth,sourceHeight),然后将剪切的内容放到位置为(destX,destY),宽度为(destWidth),高度为(destHeight)的位置上
3) getImageData( x, y , width, height) --- 직사각형 영역의 이미지 정보 가져오기
ctx.getImageData(0, 0, 10, 10) // 获取左上角坐标为(0, 0),宽高为区域内的图像信息
// 返回ImageData: { width: 10, height: 10, data: Uint8ClampedArray[400] }
4) startPath() --- 경로 시작 또는 현재 경로 재설정 5) ret(x, y, width, height) -- -직사각형 그리기
6) lineWidth ---현재 선의 너비 설정 또는 반환
7) fillStyle ---그림을 채우는 데 사용되는 색상, 그라데이션 또는 모드 설정 또는 반환
ctx.fillStyle = color|gradient|pattern
8) 스트로크 스타일 - -- 획에 사용되는 색상, 그라데이션 또는 패턴을 설정하거나 반환합니다.
9) globalAlpha --- 그림의 현재 투명도 값을 설정하거나 반환합니다.
10) fill() --- 현재 이미지(경로)를 채웁니다. 기본 색상은 검정색입니다
【참고】경로가 닫혀 있지 않은 경우 fill() 메서드는 경로의 끝점에서 시작점까지 선을 추가하여 경로를 닫은 다음 경로를 채웁니다.
11) 스트로크() --- 실제로 moveTo() 및 lineTo() 메서드에 의해 정의된 경로를 그립니다. 기본 색상은 검정색
12) toDataURL(type, EncoderOptions) ---이미지 내보내기, type은 이미지 유형, EncoderOptions 이미지 품질, [0, 1]
Canvas.toDataURL("image/png", 1)2는 fabric.js
을 단순화합니다. 캔버스 쓰기 라이브러리, 캔버스에 누락된 개체 모델 제공
fabric.js가 할 수 있는 작업
1) 캔버스에 그래픽을 만들고 채웁니다(그림, 텍스트, 일반 그래픽 및 그래픽을 형성하는 복잡한 경로 포함)
2) 그라데이션 색상으로 그래픽 채우기
3) 그래픽 결합(조합 그래픽, 그래픽 텍스트, 그림 등 포함)
4) 그래픽 애니메이션 설정 사용자 상호 작용 설정
5) JSON, SVG 데이터 등 생성
3 . 구현에 사용된 fabric.js API 사용
1) 캔버스 선언
let canvas =new fabric.Canvas('canvas') {
   width: 200,
   height: 200
}
그림 삽입
let imgInstance = new fabric.Image(imgElement,{
  left: 0,
  top: 0,
  width: 100,
  height: 100,
  angle: 0
}
3) 배경 이미지 설정 setBackgroundImage
canvas.setBackgroundImage(imgInstance)
4) renderAll() redraw
5) on() 사용자 상호 작용
canvas.on('mouse:down', function(options) {
   console.log(options.e.clientX, options.e.clientY)
})

// 监听事件
/*
   mouse:down :鼠标按下时
   mouse:move :鼠标移动时
   mouse:up :鼠标抬起时
   after:render :画布重绘后
   object:selected:对象被选中
   object:moving:对象移动
   object:rotating:对象被旋转
   object:added:对象被加入
   object:removed对象被移除
*/
6) getPointer ()
7) setWidth(), setHeight() 캔버스의 너비와 높이 설정
8) 직사각형 그리기
let rect = new fabric.Rect({
 left: 0,
 top: 0,
 width: 100,
 height: 100
})
add(obj) 그래픽 추가
canvas.add(rect)
10) Remove(obj) 그래픽 제거
11) set() Set object content
12) toDataURL(obj)
4. 네이티브 캔버스 구현 코드
<template>
<p class="container">
<p class="operations">
<ul>
<li @click="mosaic">马赛克</li>
<li @click="addText">添加文字</li>
<li @click="tailor">裁剪</li>
<li @click="rotate">旋转</li>
<li @click="exportImg">导出图片</li>
</ul>
</p>
<canvas ref="imgContent" class="img-wrap">
你的浏览器太low
</canvas>
</div>
</template>
<script>
export default {
data () {
return {
context: '',
canvas: '',
isMasic: false,
isText: false,
isTailor: false,
isTranslate: false,
squareEdgeLength: 20,
angle: 0,
img: ''
}
},
mounted () {
this.initData()
},
methods: {
initData () {
let imgContent = this.$refs.imgContent
this.canvas = imgContent
this.context = imgContent.getContext('2d')
let Img = new Image()
this.image = Img
Img.crossOrigin = "Anonymous"
Img.src = 'http://oia85104s.bkt.clouddn.com/PictureUnlock_193139.pictureunlock.jpg'
this.canvas.setAttribute('width', Img.width)
this.canvas.setAttribute('height', Img.height)
let self = this
Img.onload = () => {
let beginX, beginY, endX, endY
self.context.drawImage(Img, 0, 0)
self.context.save()
self.canvas.addEventListener('mousedown', e => {
beginX = e.offsetX
beginY = e.offsetY
self.canvas.addEventListener('mouseup', e => {
endX = e.offsetX
endY = e.offsetY
if (self.isMasic) {
self.makeGrid(beginX, beginY, endX - beginX, endY - beginY)
return
}
if (self.isTailor) {
self.context.drawImage(Img, beginX, beginY, endX - beginX, endY - beginY, 0, 0, endX - beginX, endY - beginY)
return
}
})
})
}
},
drawRect (x, y, width, height, fillStyle, lineWidth, strokeStyle, globalAlpha) {
this.context.beginPath()
this.context.rect(x, y, width, height)
this.context.lineWidth = lineWidth
this.context.strokeStyle = strokeStyle
fillStyle && (this.context.fillStyle = fillStyle)
globalAlpha && (this.context.globalAlpha = globalAlpha)
this.context.fill()
this.context.stroke()
},
// 打马赛克
mosaic () {
let self = this
this.resetClickStatus()
this.isMasic = true
},
makeGrid (beginX, beginY, rectWidth, rectHight) {
const row = Math.round(rectWidth / this.squareEdgeLength) + 1
const column = Math.round(rectHight / this.squareEdgeLength) + 1
for (let i = 0; i < row * column; i++) {
let x = (i % row) * this.squareEdgeLength + beginX
let y = parseInt(i / row) * this.squareEdgeLength + beginY
this.setColor(x, y)
}
},
setColor (x, y) {
const imgData = this.context.getImageData(x, y, this.squareEdgeLength, this.squareEdgeLength).data
let r = 0, g = 0, b = 0
console.log(this.context.getImageData(x, y, this.squareEdgeLength, this.squareEdgeLength), JSON.stringify(imgData))
for (let i = 0; i < imgData.length; i += 4) {
r += imgData[i]
g += imgData[i + 1]
b += imgData[i + 2]
}
r = Math.round(r / (imgData.length / 4))
g = Math.round(g / (imgData.length / 4))
b = Math.round(b / (imgData.length / 4))
this.drawRect(x, y, this.squareEdgeLength, this.squareEdgeLength, `rgb(${r}, ${g}, ${b})`, 2, `rgb(${r}, ${g}, ${b})`)
},
// 添加文字
addText () {
this.resetClickStatus()
this.isText = true
console.log('添加文字')
},
// 裁剪
tailor () {
this.resetClickStatus()
this.isTailor = true
console.log('裁剪')
} ,
// 旋转
rotate () {
// if (this.angle === 360) {
// this.angle = 90
// } else {
// this.angle += 90
// }
// if ([90, 270].includes(this.angle)) {
// this.canvas.setAttribute('width', this.image.height)
// this.canvas.setAttribute('height', this.image.width)
// } else {
// this.canvas.setAttribute('width', this.image.width)
// this.canvas.setAttribute('height', this.image.height)
// }
const x = this.image.width / 2
const y = this.image.height / 2
this.context.clearRect(0,0, this.canvas.width, this.canvas.height) // 清理画布内容
this.context.translate(x, y)
this.context.rotate(90 * Math.PI / 180)
this.context.translate(-x, -y)
this.context.drawImage(this.image, 0, 0)
},
resetClickStatus () {
this.isMasic = false
this.isText = false
this.isTailor = false
this.isTranslate = false
},
exportImg () {
this.resetClickStatus()
const exportUrl = this.canvas.toDataURL("image/jpeg")
let a = document.createElement('a')
a.setAttribute('download', '')
a.href = exportUrl
document.body.appendChild(a)
a.click()
}
}
}
</script>
<style scoped lang="less">
.operations {
width: 1200px;
margin: 0 auto;
ul {
display: flex;
align-items: center;
margin-bottom: 30px;
li {
list-style: none;
margin-right: 20px;
cursor: pointer;
}
}
}
.img-wrap {
display: block;
margin: 0 auto;
}
</style>위 내용은 모두의 학습에 도움이 되기를 바랍니다. . 더 많은 관련 내용을 보시려면 PHP 중국어 넷을 주목해주세요!
위 내용은 캔버스를 사용하여 이미지 모자이크를 구현하는 방법의 상세 내용입니다. 자세한 내용은 PHP 중국어 웹사이트의 기타 관련 기사를 참조하세요!