로그인 페이지에 인증 코드 파일을 소개하고 표시하는 방법
이전 장에서는 간단한 인증코드를 만드는 방법을 소개했고, 인증코드의 php 파일을 다음과 같이 정의했습니다. captcha.php
이제 인증코드 파일을 소개하는 방법에 대해 알아보겠습니다.

여기 인증코드는 이렇습니다.
login.html 파일의 코드는 다음과 같습니다.
<div class="form-group">
    <div class="field">
        <input type="text" class="input input-big" name="code" placeholder="填写右侧的验证码" data-validate="required:请填写右侧的验证码" />
       <img src="images/passcode.jpg" alt="" width="100" height="32" class="passcode" style="height:43px;cursor:pointer;" onclick="this.src=this.src+'?'">

    </div>
</div>
여기서 이 코드를 일부 수정하고 인증 코드 파일을 도입해야 합니다. 수정된 코드는 다음과 같습니다
<div class="form-group">
   <div class="field">
      <input type="text" class="input input-big" name="code" placeholder="填写验证码" data-validate="required:请填验证码" />
      <a style="float:right; padding:5px;" href="javascript:;" onclick="document.getElementById('captcha_img').src='captcha.php?r='+Math.random()">
         <img id="captcha_img" class="passcode" border='1' src='captcha.php?r=echo rand(); ?>' style="width:100px; height:42px" />
      </a>
   </div>
</div>
그런 다음 몇 가지를 만듭니다. CSS 스타일 수정. 여기서는 javascript의 HTML DOM Document 객체가 사용되며, captcha.php의 인증코드로 생성된 이미지가 참조됩니다.
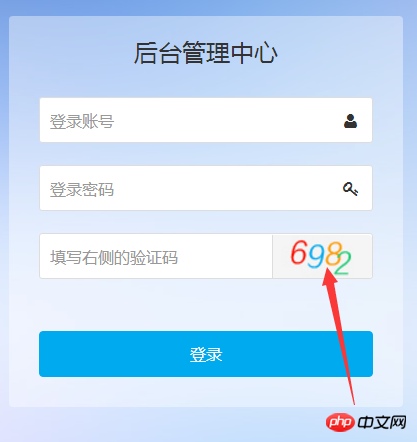
코드 실행 후 얻은 효과:

<div class="form-group">
<div class="field">
<input type="text" class="input input-big" name="code" placeholder="填写验证码" data-validate="required:请填验证码" />
<a style="float:right; padding:5px;" href="javascript:;" onclick="document.getElementById('captcha_img').src='captcha.php?r='+Math.random()">
<img id="captcha_img" class="passcode" border='1' src='captcha.php?r=echo rand(); ?>' style="width:100px; height:42px" />
</a>
</div>
</div>
