


php editor Zimo will introduce to you today how to set a password and add a watermark in PPT. By setting a password, you can protect the security of the PPT content and avoid unauthorized access; adding a watermark can not only enhance the professional feel of the PPT, but also prevent others from maliciously copying the content. Next, we will explain in detail how to set passwords and add watermarks to PPT to make your presentations more secure and professional!
Today, let’s talk about three methods to protect PPT: setting an opening password, permission password, and adding watermark.
Set open password
If you don’t want the PPT to be opened and viewed at will, we can set an opening password.
1. Open PPT, find [File] in the toolbar, click and select [Information], see [Protect Presentation] on the right, and click [Encrypt with Password] in the list below.
 .
.
2. After clicking [Encrypt with Password], a dialog box for entering the password will appear. Enter the password in the blank space to set the password for opening

.
Set permission password
If the PPT does not want to be changed at will, but it can be viewed, then we can set a permission password. After setting this password, the other party cannot edit or copy and paste.
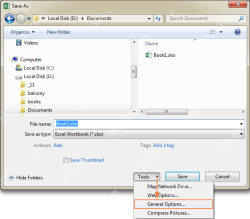
1. After completing the PPT production, also find [File] in the toolbar, select [Save As], the save path page will appear on the right, select the folder to save, you will see the save dialog box, click [Tools]-[General Options] at the bottom of the dialog box.
 .
.
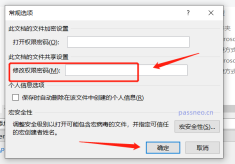
2. When you see the [General Options] dialog box, enter the set password in the second line of "Modify Permission Password" and press OK. The next time you open the PPT, you will not be able to edit it. The "open permission password" in the first line is actually the opening password mentioned above, and can also be set at the same time.
.
Add watermark
In addition to the above two methods, we can also add watermarks to PPT to limit ownership and further protect PPT. 1. Open PPT, click [View], and select - [Slide Master] in the toolbar below.
 .
.
2. At this time, you can see a new slide list appearing on the left, click the mouse on the first slide.
 .
.
3. Return to the toolbar above and click [Text Box] below [Insert].
 .
.
4. Enter the watermark content you want to add in the text box, or you can add a picture.
 .
.
5. After editing is completed, click [Slide Master]-[Close Master View] on the toolbar above.
 .
.
6. After completing the above steps, you have completed adding the watermark. As you can see, every PPT has a watermark. Every time you create a new slide in the future, a watermark will be automatically added.

.
When you set the opening password and permission password, you must remember the password firmly or save it, because there is no way to retrieve the password from PPT.
If you really forget it accidentally, you can only use tool software to solve it, but the operation is also very simple.
For example, Pepsi Niu PPT password recovery tool
Just select the [Retrieve Password] function and follow the prompts on the PPT import tool.
Tool link:Pepsi Niu PPT password recovery tool

Then, wait for the password to be retrieved.

The above is the detailed content of How to set password and add watermark to PPT. For more information, please follow other related articles on the PHP Chinese website!

 How to find and highlight duplicates in ExcelApr 24, 2025 am 10:42 AM
This tutorial shows you how to automatically highlight duplicate entries in Excel. We'll cover shading duplicate cells, entire rows, or consecutive duplicates using conditional formatting and a powerful add-in. Last week, we looked at using formulas
 How to identify duplicates in Excel: find, highlight, count, filterApr 24, 2025 am 10:06 AM
The tutorial explains how to search for duplicates in Excel. You will learn a few formulas to identify duplicate values or find duplicate rows with or without first occurrences. You will also learn how to count instances of each duplicate
 How to lock cells in Excel and unlock certain cells on a protected sheetApr 24, 2025 am 09:43 AM
This tutorial explains how to safeguard specific Excel cells from accidental modification or unauthorized editing. It covers locking individual cells, unlocking cells on a protected sheet (with or without a password), and identifying locked/unlocked
 How to protect worksheets and unprotect Excel sheet without passwordApr 24, 2025 am 09:27 AM
This tutorial demonstrates how to safeguard Excel spreadsheets with or without passwords, and how to recover access if a password is forgotten. Protecting your worksheets, especially when sharing them externally, is crucial to prevent unauthorized mo
 Don't Ignore the Power of F4 in Microsoft ExcelApr 24, 2025 am 06:07 AM
A must-have for Excel experts: the wonderful use of the F4 key, a secret weapon to improve efficiency! This article will reveal the powerful functions of the F4 key in Microsoft Excel under Windows system, helping you quickly master this shortcut key to improve productivity. 1. Switching formula reference type Reference types in Excel include relative references, absolute references, and mixed references. The F4 keys can be conveniently switched between these types, especially when creating formulas. Suppose you need to calculate the price of seven products and add a 20% tax. In cell E2, you may enter the following formula: =SUM(D2 (D2*A2)) After pressing Enter, the price containing 20% tax can be calculated. But,
 Count unique and distinct values in Excel with formula or pivot tableApr 23, 2025 am 11:21 AM
This tutorial shows you how to count unique and distinct values in Excel using formulas and PivotTables. We'll cover counting unique names, text, numbers, and case-sensitive values, as well as handling blank cells. The key difference between "u
 COUNT and COUNTA functions to count cells in ExcelApr 23, 2025 am 10:46 AM
This tutorial provides a concise overview of Excel's COUNT and COUNTA functions, illustrating their use with practical examples. You'll also learn how to leverage COUNTIF and COUNTIFS for counting cells based on specific criteria. Excel excels at nu
 The PIVOTBY Function vs PivotTables: Which Should You Use in Excel?Apr 23, 2025 am 01:07 AM
Excel's PIVOTBY Function vs. PivotTables: A Detailed Comparison Excel offers two powerful tools for data summarization and reorganization: the PIVOTBY function and PivotTables. Both group and aggregate data for detailed analysis, but their usage dif


Hot AI Tools

Undresser.AI Undress
AI-powered app for creating realistic nude photos

AI Clothes Remover
Online AI tool for removing clothes from photos.

Undress AI Tool
Undress images for free

Clothoff.io
AI clothes remover

Video Face Swap
Swap faces in any video effortlessly with our completely free AI face swap tool!

Hot Article
Hot Tools

VSCode Windows 64-bit Download
A free and powerful IDE editor launched by Microsoft

Atom editor mac version download
The most popular open source editor

EditPlus Chinese cracked version
Small size, syntax highlighting, does not support code prompt function

Dreamweaver CS6
Visual web development tools

SublimeText3 English version
Recommended: Win version, supports code prompts!

