


我们将改变学习路线,不再像 Laravel 4 教程那样先构建登录系统。在本篇教程中,我们将一起构建 Pages 的管理功能,尝试 Laravel 的路由和 PHP 的命名空间。
1. 路由
Laravel 中的路由,跟其他 PHP 框架一样,作用是把各种请求分流到各个控制器。
在 `learnlaravel5/app/Http/routes.php` 的末尾添加以下代码:
Route::group(['prefix' => 'admin', 'namespace' => 'Admin'], function()
{
Route::get('/', 'AdminHomeController@index');
});
这表示创建了一个路由组。
1. `'prefix' => 'admin'` 表示这个路由组的 url 前缀是 /admin,也就是说中间那一行代码 `Route::get('/'` 对应的链接不是 http://fuck.io:88/ 而是 http://fuck.io:88/admin ,如果这段代码是 `Route::get('fuck'` 的话,那么 URL 就应该是 http://fuck.io:88/admin/fuck 。
2. `'namespace' => 'Admin'` 表示下面的 `AdminHomeController@index` 不是在 `\App\Http\Controllers\AdminHomeController@index` 而是在 `\App\Http\Controllers\Admin\AdminHomeController@index`,加上了一个命名空间的前缀。
如果你用过 Laravel 4,会发现 Laravel 5 的命名空间规划比较怪异,这其实是一个非常大的进步。Laravel 4 其实已经全面引入了命名空间这个强大的特性,但是为了“降低学习成本”,把 路由、控制器、模型 的默认命名空间全部设置成了顶级命名空间,这个举动反而让很多人比较轻易地“上手”了 Laravel,但是在用了一段时间以后,还需要翻越一堵高墙,那就是命名空间,而且有了前面的“容易上手”的印象作为铺垫,后期的学习会更加困难。Laravel 5 把命名空间全部隔开,控制器在 `\App\Http\Controllers`,模型在 `\App`,让我们在刚上手的时候就体验命名空间分离的感觉,总体上其实是会降低学习成本的。
2. 控制器
我们可以使用 Artisan 非常方便地构建控制器:
php artisan make:controller Admin/AdminHomeController
得到 `learnlaravel5/app/Http/Controllers/Admin/AdminHomeController.php` 文件。
在 `class AdminHomeController extends Controller {` 上面增加一行:
use App\Page;
修改 index() 的代码如下:
public function index()
{
return view('AdminHome')->withPages(Page::all());
}
控制器中文文档:http://laravel-china.org/docs/5.0/controllers
控制器中涉及到了许多的命名空间知识,可以参考 PHP 命名空间 解惑。
3. 视图
新建 `learnlaravel5/resources/views/AdminHome.blade.php`:
@extends('app')

@section('content')
<div class="container">
 <div class="row">
  <div class="col-md-10 col-md-offset-1">
   <div class="panel panel-default">
    <div class="panel-heading">后台首页</div>

    <div class="panel-body">

    <a href="{{ URL('admin/pages/create') }}" class="btn btn-lg btn-primary">新增</a>

     @foreach ($pages as $page)
      <hr>
      <div class="page">
       <h4 id="page-title">{{ $page->title }}</h4>
       <div class="content">
        <p>
         {{ $page->body }}
        </p>
       </div>
      </div>
      <a href="{{ URL('admin/pages/'.$page->id.'/edit') }}" class="btn btn-success">编辑</a>

      <form action="{{ URL('admin/pages/'.$page->id) }}" method="POST" style="display: inline;">
       <input name="_method" type="hidden" value="DELETE">
       <input type="hidden" name="_token" value="{{ csrf_token() }}">
       <button type="submit" class="btn btn-danger">删除</button>
      </form>
     @endforeach

    </div>
   </div>
  </div>
 </div>
</div>
@endsection
视图的基本用法在此不再赘述,请阅读中文文档:http://laravel-china.org/docs/5.0/views
访问 http://fuck.io:88/admin 得到如下页面:
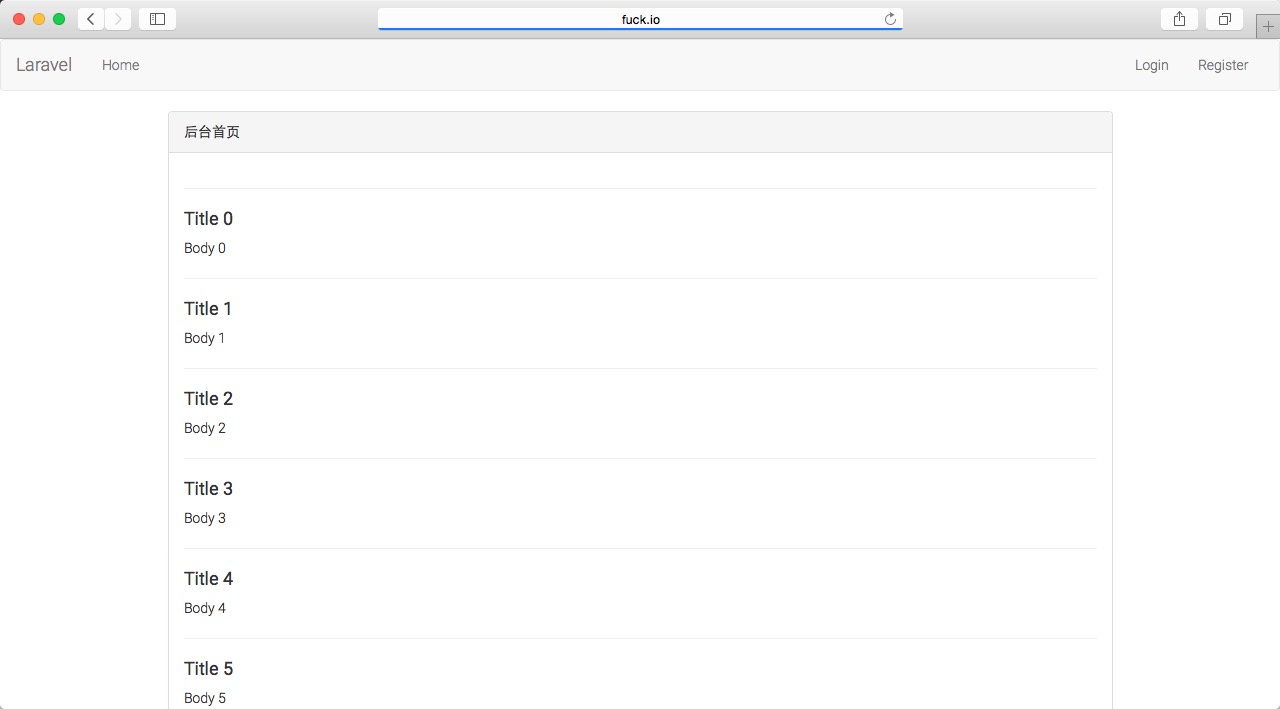
至此,包含 路由 》 控制器 》 模型 》 视图 的整个流程都已经完成。
4. 完成 Pages 管理功能
接下来,我将记录下我实现 Pages 管理功能的过程,不再做过多的阐述。大家有问题可以直接在本文下面留言,我会及时回复。
4.1 修改路由 learnlaravel5/app/Http/routes.php
Route::group(['prefix' => 'admin', 'namespace' => 'Admin'], function()
{
Route::get('/', 'AdminHomeController@index');
Route::resource('pages', 'PagesController');
});
此处增加了一条“资源控制器”,中文文档地址:http://laravel-china.org/docs/5.0/controllers#restful-resource-controllers
4.2 创建 learnlaravel5/app/Http/Controllers/Admin/PagesController.php
运行:
php artisan make:controller Admin/PagesController
4.3 修改 learnlaravel5/app/Http/Controllers/Admin/PagesController.php 为:
<?php namespace App\Http\Controllers\Admin;
use App\Http\Requests;
use App\Http\Controllers\Controller;
use Illuminate\Http\Request;
use App\Page;
use Redirect, Input, Auth;
class PagesController extends Controller {
/**
* Show the form for creating a new resource.
*
* @return Response
*/
public function create()
{
return view('admin.pages.create');
}
/**
* Store a newly created resource in storage.
*
* @return Response
*/
public function store(Request $request)
{
$this->validate($request, [
'title' => 'required|unique:pages|max:255',
'body' => 'required',
]);
$page = new Page;
$page->title = Input::get('title');
$page->body = Input::get('body');
$page->user_id = 1;//Auth::user()->id;
if ($page->save()) {
return Redirect::to('admin');
} else {
return Redirect::back()->withInput()->withErrors('保存失败!');
}
}
/**
* Show the form for editing the specified resource.
*
* @param int $id
* @return Response
*/
public function edit($id)
{
return view('admin.pages.edit')->withPage(Page::find($id));
}
/**
* Update the specified resource in storage.
*
* @param int $id
* @return Response
*/
public function update(Request $request,$id)
{
$this->validate($request, [
'title' => 'required|unique:pages,title,'.$id.'|max:255',
'body' => 'required',
]);
$page = Page::find($id);
$page->title = Input::get('title');
$page->body = Input::get('body');
$page->user_id = 1;//Auth::user()->id;
if ($page->save()) {
return Redirect::to('admin');
} else {
return Redirect::back()->withInput()->withErrors('保存失败!');
}
}
/**
* Remove the specified resource from storage.
*
* @param int $id
* @return Response
*/
public function destroy($id)
{
$page = Page::find($id);
$page->delete();
return Redirect::to('admin');
}
}
4.4 创建视图文件
首先在 learnlaravel5/resources/views 下创建 admin/pages 两级文件夹。
然后创建 learnlaravel5/resources/views/admin/pages/create.blade.php:
@extends('app')

@section('content')
<div class="container">
 <div class="row">
  <div class="col-md-10 col-md-offset-1">
   <div class="panel panel-default">
    <div class="panel-heading">新增 Page</div>

    <div class="panel-body">

     @if (count($errors) > 0)
      <div class="alert alert-danger">
       <strong>Whoops!</strong> There were some problems with your input.<br><br>
       <ul>
        @foreach ($errors->all() as $error)
         <li>{{ $error }}</li>
        @endforeach
       </ul>
      </div>
     @endif

     <form action="{{ URL('admin/pages') }}" method="POST">
      <input type="hidden" name="_token" value="{{ csrf_token() }}">
      <input type="text" name="title" class="form-control" required="required">
      <br>
      <textarea name="body" rows="10" class="form-control" required="required"></textarea>
      <br>
      <button class="btn btn-lg btn-info">新增 Page</button>
     </form>

    </div>
   </div>
  </div>
 </div>
</div>
@endsection
之后创建 learnlaravel5/resources/views/admin/pages/edit.blade.php:
@extends('app')

@section('content')
<div class="container">
 <div class="row">
  <div class="col-md-10 col-md-offset-1">
   <div class="panel panel-default">
    <div class="panel-heading">编辑 Page</div>

    <div class="panel-body">

     @if (count($errors) > 0)
      <div class="alert alert-danger">
       <strong>Whoops!</strong> There were some problems with your input.<br><br>
       <ul>
        @foreach ($errors->all() as $error)
         <li>{{ $error }}</li>
        @endforeach
       </ul>
      </div>
     @endif

     <form action="{{ URL('admin/pages/'.$page->id) }}" method="POST">
      <input name="_method" type="hidden" value="PUT">
      <input type="hidden" name="_token" value="{{ csrf_token() }}">
      <input type="text" name="title" class="form-control" required="required" value="{{ $page->title }}">
      <br>
      <textarea name="body" rows="10" class="form-control" required="required">{{ $page->body }}</textarea>
      <br>
      <button class="btn btn-lg btn-info">编辑 Page</button>
     </form>

    </div>
   </div>
  </div>
 </div>
</div>
@endsection
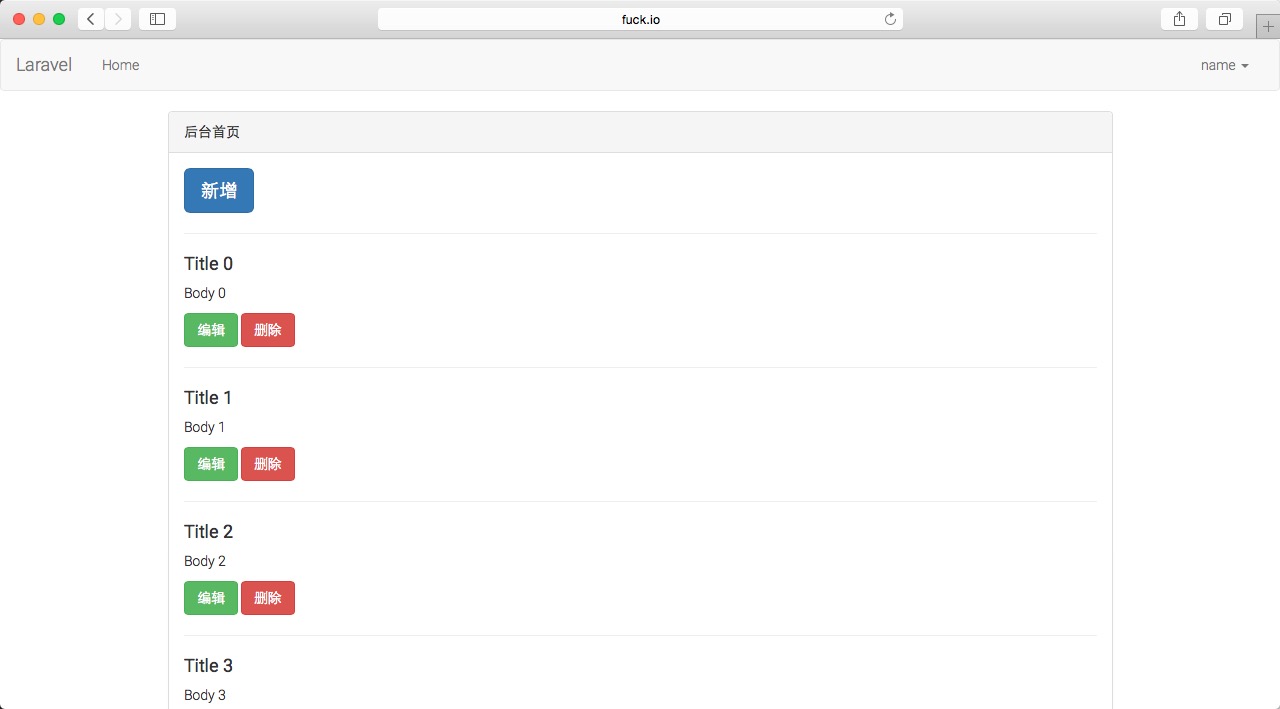
4.5 查看结果
后台首页 http://fuck.io:88/admin :
新增 Page http://fuck.io:88/admin/pages/create :

编辑 Page http://fuck.io:88/admin/pages/1/edit :
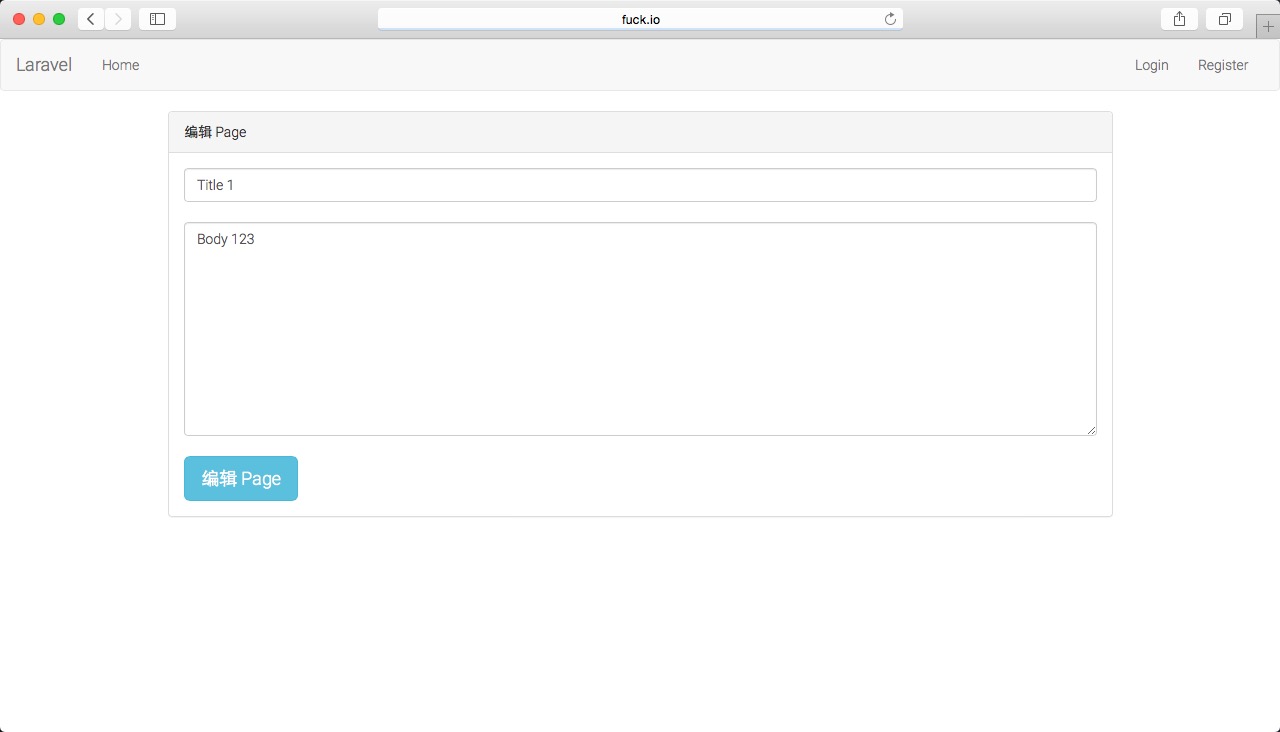
页面上的新增、编辑、删除的功能均已经完成,并且加入了表单验证,Pages 管理功能完成!
以上所述就是本文的全部内容了,希望对大家熟悉Laravel5框架能够有所帮助。

 Optimize PHP Code: Reducing Memory Usage & Execution TimeMay 10, 2025 am 12:04 AM
TooptimizePHPcodeforreducedmemoryusageandexecutiontime,followthesesteps:1)Usereferencesinsteadofcopyinglargedatastructurestoreducememoryconsumption.2)LeveragePHP'sbuilt-infunctionslikearray_mapforfasterexecution.3)Implementcachingmechanisms,suchasAPC
 PHP Email: Step-by-Step Sending GuideMay 09, 2025 am 12:14 AM
PHPisusedforsendingemailsduetoitsintegrationwithservermailservicesandexternalSMTPproviders,automatingnotificationsandmarketingcampaigns.1)SetupyourPHPenvironmentwithawebserverandPHP,ensuringthemailfunctionisenabled.2)UseabasicscriptwithPHP'smailfunct
 How to Send Email via PHP: Examples & CodeMay 09, 2025 am 12:13 AM
The best way to send emails is to use the PHPMailer library. 1) Using the mail() function is simple but unreliable, which may cause emails to enter spam or cannot be delivered. 2) PHPMailer provides better control and reliability, and supports HTML mail, attachments and SMTP authentication. 3) Make sure SMTP settings are configured correctly and encryption (such as STARTTLS or SSL/TLS) is used to enhance security. 4) For large amounts of emails, consider using a mail queue system to optimize performance.
 Advanced PHP Email: Custom Headers & FeaturesMay 09, 2025 am 12:13 AM
CustomheadersandadvancedfeaturesinPHPemailenhancefunctionalityandreliability.1)Customheadersaddmetadatafortrackingandcategorization.2)HTMLemailsallowformattingandinteractivity.3)AttachmentscanbesentusinglibrarieslikePHPMailer.4)SMTPauthenticationimpr
 Guide to Sending Emails with PHP & SMTPMay 09, 2025 am 12:06 AM
Sending mail using PHP and SMTP can be achieved through the PHPMailer library. 1) Install and configure PHPMailer, 2) Set SMTP server details, 3) Define the email content, 4) Send emails and handle errors. Use this method to ensure the reliability and security of emails.
 What is the best way to send an email using PHP?May 08, 2025 am 12:21 AM
ThebestapproachforsendingemailsinPHPisusingthePHPMailerlibraryduetoitsreliability,featurerichness,andeaseofuse.PHPMailersupportsSMTP,providesdetailederrorhandling,allowssendingHTMLandplaintextemails,supportsattachments,andenhancessecurity.Foroptimalu
 Best Practices for Dependency Injection in PHPMay 08, 2025 am 12:21 AM
The reason for using Dependency Injection (DI) is that it promotes loose coupling, testability, and maintainability of the code. 1) Use constructor to inject dependencies, 2) Avoid using service locators, 3) Use dependency injection containers to manage dependencies, 4) Improve testability through injecting dependencies, 5) Avoid over-injection dependencies, 6) Consider the impact of DI on performance.
 PHP performance tuning tips and tricksMay 08, 2025 am 12:20 AM
PHPperformancetuningiscrucialbecauseitenhancesspeedandefficiency,whicharevitalforwebapplications.1)CachingwithAPCureducesdatabaseloadandimprovesresponsetimes.2)Optimizingdatabasequeriesbyselectingnecessarycolumnsandusingindexingspeedsupdataretrieval.


Hot AI Tools

Undresser.AI Undress
AI-powered app for creating realistic nude photos

AI Clothes Remover
Online AI tool for removing clothes from photos.

Undress AI Tool
Undress images for free

Clothoff.io
AI clothes remover

Video Face Swap
Swap faces in any video effortlessly with our completely free AI face swap tool!

Hot Article
Hot Tools

Atom editor mac version download
The most popular open source editor

SublimeText3 Linux new version
SublimeText3 Linux latest version

mPDF
mPDF is a PHP library that can generate PDF files from UTF-8 encoded HTML. The original author, Ian Back, wrote mPDF to output PDF files "on the fly" from his website and handle different languages. It is slower than original scripts like HTML2FPDF and produces larger files when using Unicode fonts, but supports CSS styles etc. and has a lot of enhancements. Supports almost all languages, including RTL (Arabic and Hebrew) and CJK (Chinese, Japanese and Korean). Supports nested block-level elements (such as P, DIV),

MinGW - Minimalist GNU for Windows
This project is in the process of being migrated to osdn.net/projects/mingw, you can continue to follow us there. MinGW: A native Windows port of the GNU Compiler Collection (GCC), freely distributable import libraries and header files for building native Windows applications; includes extensions to the MSVC runtime to support C99 functionality. All MinGW software can run on 64-bit Windows platforms.

SublimeText3 English version
Recommended: Win version, supports code prompts!

