

 Software TutorialOffice SoftwareI Build Great Looking Certificates in Microsoft Word, and So Can You
Creating professional certificates doesn't require complex design software. Microsoft Word, a readily available tool, allows you to design sleek certificates in minutes. This guide shows you how.
Why Choose Microsoft Word?
While dedicated design programs exist, Word offers accessibility, affordability, and familiarity. It's likely already installed on your computer. You can create certificates from scratch or use free templates. Word's design capabilities rival dedicated software, offering font choices, customizable shapes and colors, and image insertion. Its seamless integration with other Microsoft Office tools, like Excel, enables data import and mail merge for mass personalization. Best of all, if you have a Microsoft 365 subscription, it's a cost-effective solution. Even without a subscription, the free online version works perfectly.
How to Create a Certificate in Word
Creating a certificate is as easy as writing a document. Start with a blank document (File > New > Blank Document) or a template (discussed later).

First, set the page to landscape orientation (Layout > Orientation > Landscape).

Adjust margins (Margins > Normal or Narrow).

Add a border (Design > Page Borders), choosing a style appropriate for your certificate's formality.

Add text boxes for the title (e.g., "Certificate of Achievement"), recipient's name, date, and other details. Use a large, bold font (36-48 point) for the title, and center it for a professional look.

Add body text explaining the award and identifying the recipient (e.g., "This certificate is awarded to [Recipient's Name] in recognition of [achievement]"). Leave placeholders for personalized details.

Insert a logo (Insert > Pictures) for a professional touch. Position it strategically.

Add signature lines (Insert > Shapes > Line) with labels ("Signature," "Date").

Review for errors and print or save as a PDF.
Using Word Certificate Templates
Templates save time and offer design inspiration. Access them via File > New, searching for "certificate." Choose a template and customize colors, fonts, images, and text. Many free templates are also available online.


Creating Multiple Certificates with Mail Merge
Word's mail merge feature automates creating many certificates. Design your certificate with placeholders for variable data. Create an Excel spreadsheet with recipient details (name, award, date, etc.).


Start the mail merge wizard (Mailings > Start Mail Merge > Step by Step Mail Merge Wizard). Choose "Letters," select "Use the Current Document," and select recipients from your Excel file.


Insert merge fields (Mailings > Insert Merge Field) to link placeholders to your Excel data.


Preview and complete the merge to generate individual certificates.
Is Using Word Worth It?
For simple certificates, Word is ideal. While more complex designs might benefit from specialized software, Word's versatility allows for creating professional certificates with sufficient time and skill. For straightforward recognition needs, Word provides a simple and effective solution.
The above is the detailed content of I Build Great Looking Certificates in Microsoft Word, and So Can You. For more information, please follow other related articles on the PHP Chinese website!

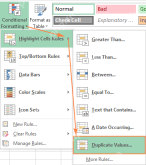 How to find and highlight duplicates in ExcelApr 24, 2025 am 10:42 AM
This tutorial shows you how to automatically highlight duplicate entries in Excel. We'll cover shading duplicate cells, entire rows, or consecutive duplicates using conditional formatting and a powerful add-in. Last week, we looked at using formulas
 How to identify duplicates in Excel: find, highlight, count, filterApr 24, 2025 am 10:06 AM
The tutorial explains how to search for duplicates in Excel. You will learn a few formulas to identify duplicate values or find duplicate rows with or without first occurrences. You will also learn how to count instances of each duplicate
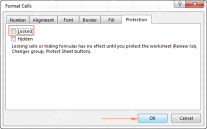 How to lock cells in Excel and unlock certain cells on a protected sheetApr 24, 2025 am 09:43 AM
This tutorial explains how to safeguard specific Excel cells from accidental modification or unauthorized editing. It covers locking individual cells, unlocking cells on a protected sheet (with or without a password), and identifying locked/unlocked
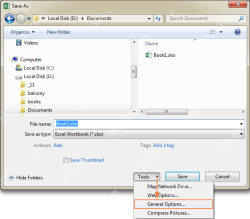 How to protect worksheets and unprotect Excel sheet without passwordApr 24, 2025 am 09:27 AM
This tutorial demonstrates how to safeguard Excel spreadsheets with or without passwords, and how to recover access if a password is forgotten. Protecting your worksheets, especially when sharing them externally, is crucial to prevent unauthorized mo
 Don't Ignore the Power of F4 in Microsoft ExcelApr 24, 2025 am 06:07 AM
A must-have for Excel experts: the wonderful use of the F4 key, a secret weapon to improve efficiency! This article will reveal the powerful functions of the F4 key in Microsoft Excel under Windows system, helping you quickly master this shortcut key to improve productivity. 1. Switching formula reference type Reference types in Excel include relative references, absolute references, and mixed references. The F4 keys can be conveniently switched between these types, especially when creating formulas. Suppose you need to calculate the price of seven products and add a 20% tax. In cell E2, you may enter the following formula: =SUM(D2 (D2*A2)) After pressing Enter, the price containing 20% tax can be calculated. But,
 Count unique and distinct values in Excel with formula or pivot tableApr 23, 2025 am 11:21 AM
This tutorial shows you how to count unique and distinct values in Excel using formulas and PivotTables. We'll cover counting unique names, text, numbers, and case-sensitive values, as well as handling blank cells. The key difference between "u
 COUNT and COUNTA functions to count cells in ExcelApr 23, 2025 am 10:46 AM
This tutorial provides a concise overview of Excel's COUNT and COUNTA functions, illustrating their use with practical examples. You'll also learn how to leverage COUNTIF and COUNTIFS for counting cells based on specific criteria. Excel excels at nu
 The PIVOTBY Function vs PivotTables: Which Should You Use in Excel?Apr 23, 2025 am 01:07 AM
Excel's PIVOTBY Function vs. PivotTables: A Detailed Comparison Excel offers two powerful tools for data summarization and reorganization: the PIVOTBY function and PivotTables. Both group and aggregate data for detailed analysis, but their usage dif


Hot AI Tools

Undresser.AI Undress
AI-powered app for creating realistic nude photos

AI Clothes Remover
Online AI tool for removing clothes from photos.

Undress AI Tool
Undress images for free

Clothoff.io
AI clothes remover

Video Face Swap
Swap faces in any video effortlessly with our completely free AI face swap tool!

Hot Article
Hot Tools

Notepad++7.3.1
Easy-to-use and free code editor

Atom editor mac version download
The most popular open source editor

MinGW - Minimalist GNU for Windows
This project is in the process of being migrated to osdn.net/projects/mingw, you can continue to follow us there. MinGW: A native Windows port of the GNU Compiler Collection (GCC), freely distributable import libraries and header files for building native Windows applications; includes extensions to the MSVC runtime to support C99 functionality. All MinGW software can run on 64-bit Windows platforms.

Zend Studio 13.0.1
Powerful PHP integrated development environment

WebStorm Mac version
Useful JavaScript development tools

