





曾经突发奇想,将已淘汰的安卓手机赋予新生,开发了一个适用于弱网络环境的智能就餐登记安卓程序。饭堂使用了几天后,效果不错,但发现登记数据难以导出和统计。于是在周六早上,我迅速开发了一个简单的windows程序,没想到如此快就完成了,现在与大家分享一下这个过程。
首先,我使用的是SQLite数据库,程序只需直接连接SQLite即可。要实现直接连接,可以引用SQLite的组件【https://www.php.cn/link/78b9508436357acbab1aabb76e12739f:
public class MyConnDB : SQLiteConnection
{
    public TableQuery<card_log> Card_log { get { return this.Table<card_log>(); } }
    public TableQuery<card_no> Card_no { get { return this.Table<card_no>(); } }
    public MyConnDB(string dbPath) : base(dbPath)
    {
        // CreateTable<card_log>(); // 创建数据表
    }
}</card_log></card_no></card_no></card_log></card_log>
连接到数据库后,展示数据就变得简单了。由于需要关联两张表并进行统计,代码如下:
dbPath = $"{Environment.CurrentDirectory}\DB.db"; // 引用SQLite的数据文件
using (var db = new MyConnDB(dbPath))
{
    var Card_no = db.Card_no.ToList();
    var Card_log = db.Card_log.ToList();
    var Card_totle = db.Card_log.GroupBy(p => p.IDCardNo)
        .Select(group => new { IDCardNo = group.Key, Count = group.Count() })
        .ToList();
    var result = from c in Card_log
                 join p in Card_no on c.IDCardNo equals p.IDCardNo
                 join t in Card_totle on c.IDCardNo equals t.IDCardNo
                 select new { 卡号 = c.IDCardNo, 姓名 = p.UName, 刷卡日期 = c.Itime, 累计刷卡数 = t.Count, 记录时间 = c.VCreatedTime };
    this.label1.Text = $"{DateTime.Now.ToLongDateString()}, 查到{Card_log.Count}条记录";
    this.dataGridView1.DataSource = result.ToList();
}
数据成功显示在dataGridView中,接下来我们需要实现数据导出到Excel的功能。原本打算使用之前介绍的EPPlus【EPPlus秘籍之Excel导出之图表导出】,但考虑到这是Winform程序,用户可能已经安装了OFFICE,所以直接从网上找了一个导出代码,测试通过后就采用了:
/// <summary>
/// 导出Excel
/// </summary>
/// <param name="fileName">文件路径
/// <param name="myDGV">控件DataGridView
private void ExportExcels(string fileName, DataGridView myDGV)
{
    string saveFileName = "";
    SaveFileDialog saveDialog = new SaveFileDialog();
    saveDialog.DefaultExt = "xls";
    saveDialog.Filter = "Excel文件|*.xls";
    saveDialog.FileName = fileName;
    saveDialog.ShowDialog();
    saveFileName = saveDialog.FileName;
    if (saveFileName.IndexOf(":") <p>这样,SQLite数据的展示和导出功能就完成了。最后,再分享一个dataGridView自动添加序号的功能:</p><div class="aritcle_card flexRow artxards">
											<div class="artcardd flexRow">
												<a class="aritcle_card_img" rel="nofollow" href="/xiazai/skill11387" title="GitHub操作助手"><img
														src="https://img.php.cn/upload/skill/001/246/273/6adaf20dee630206.jpg" alt="GitHub操作助手" onerror="this.onerror='';this.src='/static/lhimages/moren/morentu.png'" ></a>
												<div class="aritcle_card_info flexColumn">
													<a rel="nofollow" href="/xiazai/skill11387" title="GitHub操作助手" class="overflowclass">GitHub操作助手</a>
													<p class="overflowclass">用大白话操作当前项目的 Git/GitHub——配置 GitHub(装 gh CLI + 登录 + 建仓库)、备份、拉取下载、查询历史、回滚代码、管理分支。当用户用日常语言表达 git 意图时触发(例如"git备份一下""git下载项目""git拉下来""git看看我改了啥""git回退到上一个版本""git新建个分支搞新功能""git合并到主分支""git</p>
												</div>
												<a rel="nofollow" href="/xiazai/skill11387" title="GitHub操作助手" class="aritcle_card_btn flexRow flexcenter"><b></b><span>下载</span>
												</a>
											</div>
										</div><pre class="brush:php;toolbar:false;">private void dataGridView1_RowPostPaint(object sender, DataGridViewRowPostPaintEventArgs e)
{
    this.dataGridView1.TopLeftHeaderCell.Value = "序号";
    Rectangle rectangle = new Rectangle(e.RowBounds.Location.X, e.RowBounds.Location.Y, this.dataGridView1.RowHeadersWidth - 4, e.RowBounds.Height);
    TextRenderer.DrawText(e.Graphics, (e.RowIndex + 1).ToString(),
        this.dataGridView1.RowHeadersDefaultCellStyle.Font,
        rectangle,
        this.dataGridView1.RowHeadersDefaultCellStyle.ForeColor,
        TextFormatFlags.VerticalCenter | TextFormatFlags.Right);
}
就这样完成了整个开发过程。下面是界面图,刚好花了40分钟。
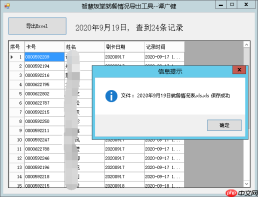
界面比较简单-完-


