HTML FlexBox弹性盒布局知识讲解
首先我们想一下,为什么会有flex弹性布局?原因其实很简单,实现同样的一个页面布局,用原始的html+css布局技术可能要写100行代码去实现,在效率和时间上都是浪费,随着技术的不断进步,所以有了flex弹性布局,它可能需要10行代码就可以布局完成
1.讲到这里我们接下来先看两个例子,用html+css的定位和浮动分别写个例子
用浮动做布局示例代码:
<!DOCTYPE html><html lang="en"><head><meta charset="UTF-8" /><meta name="viewport" content="width=device-width, initial-scale=1.0" /><title>基于html+css浮动的二列布局</title><style>* {/* 初始化 */padding: 0;margin: 0;box-sizing: border-box;}aside,main {/* 设定侧边栏和主体的背景颜色和最小高度 */background-color: #dedede;min-height: 700px;}header,footer {/* 设定页眉页脚的背景颜色和高度 */background-color: cadetblue;height: 50px;}.wrap {/* 给侧边栏和主体的父元素添加宽高 边框 */width: 1000px;border: 1px solid #000;/* 添加溢出隐藏 防止父元素高度塌陷 */overflow: hidden;margin: 10px auto;}aside {/* 侧边栏左浮动 */width: 200px;float: left;}main {/* 主体部分右浮动 */width: 790px;float: right;}</style></head><body><header>页眉</header><div class="wrap"><aside>侧边栏</aside><main>主体内容区</main></div><footer>页脚</footer></body></html>
效果: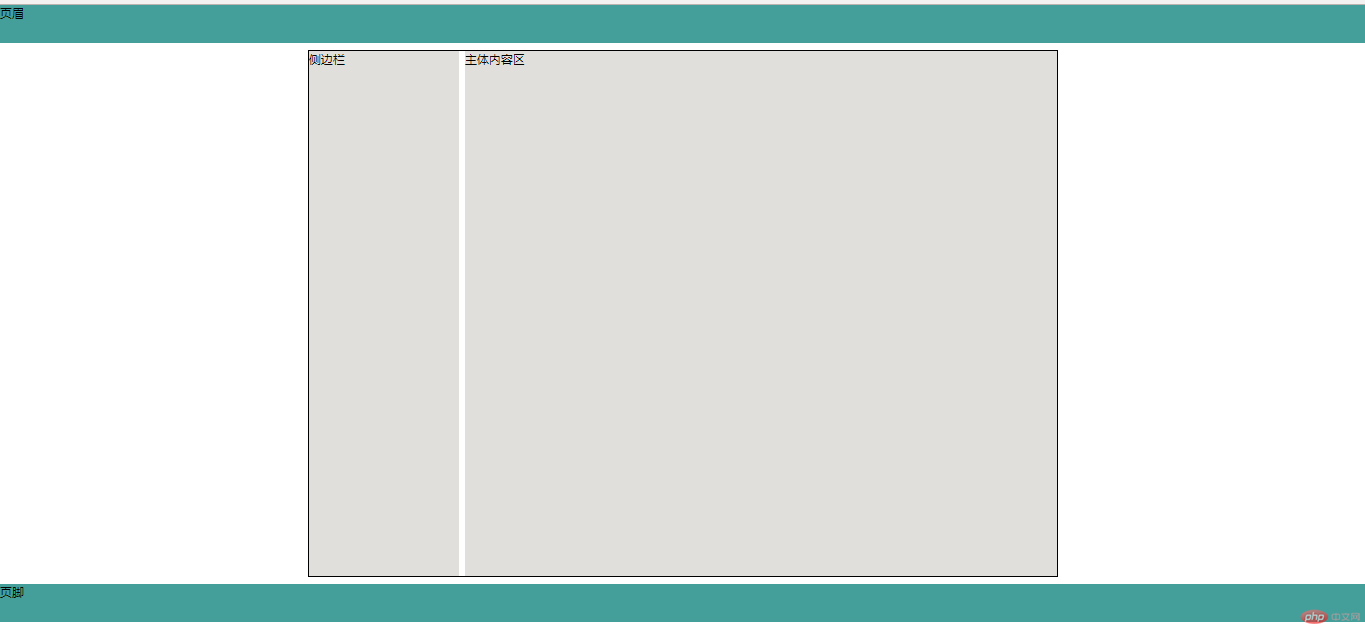
用定位做布局示例代码:
<!DOCTYPE html><html lang="en"><head><meta charset="UTF-8" /><meta name="viewport" content="width=device-width, initial-scale=1.0" /><title>基于html+css定位的二列布局</title><style>* {/* 初始化 */padding: 0;margin: 0;box-sizing: border-box;}aside,main {background-color: #dedede;min-height: 700px;}header,footer {background-color: cadetblue;height: 50px;}.wrap {width: 1000px;border: 1px solid #000;min-height: 700px;margin: 10px auto;/* 定位父级 :给侧边栏和主体部分的父级定位*/position: relative;}aside {width: 200px;/* 设定最小高度为父元素的高度 */min-height: inherit;/* 绝对定位 */position: absolute;}main {width: 790px;/* 设定最小高度为父元素的高度 */min-height: inherit;/* 绝对定位 */position: absolute;/* 主体靠右 所以right=0 top=0 简写一下 */right: 0;}</style></head><body><header>页眉</header><div class="wrap"><aside>侧边栏</aside><main>主体内容区</main></div><footer>页脚</footer></body></html>
效果: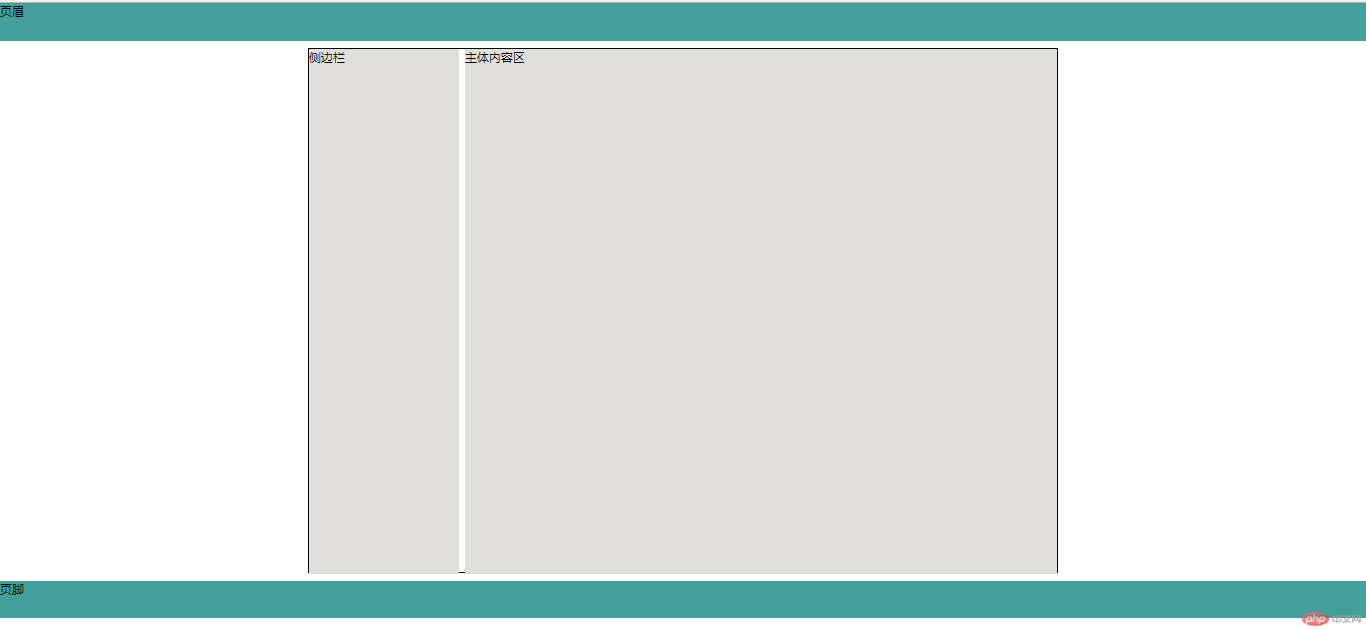
附例:内容的多栏显示做法
代码:
<!DOCTYPE html><html lang="en"><head><meta charset="UTF-8" /><meta name="viewport" content="width=device-width, initial-scale=1.0" /><title>内容的多栏/列显示</title><style>/* 初始化 */* {padding: 0;margin: 0;box-sizing: border-box;}/* 表示HTML */:root {font-size: 16px;color: #555;}div {border: 1px solid #000;padding: 1rem;/* 宽度显示60个字 */width: 60rem;margin: 30px auto;}div {/* 分列显示 例分3列显示*/column-count: 3;/* 设置分割线 *//* column-rule-style: solid;/* 设置分割线宽度 *//* column-rule-width: 1px; *//* 设置分割线颜色 *//* column-rule-color: red; *//* 以上三种的简写方式 类似边框写法 */column-rule: 1px solid red;}</style></head><body><div>新华社北京6月22日电中国-阿拉伯国家政党对话会特别会议22日以视频会议方式召开。中共中央总书记、国家主席习近平向会议致贺信。习近平表示,值此中国-阿拉伯国家政党对话会特别会议开幕之际,我代表中国共产党,并以我个人的名义,向会议的召开表示热烈的祝贺,向出席会议的阿拉伯国家政党领导人表示诚挚的问候。习近平指出,中阿友谊源远流长,历久弥新。中阿两大民族在古丝绸之路上出入相友,在共建“一带一路”中携手相伴,共同致力于实现国家富强、民族复兴梦想。面对突如其来的新冠肺炎疫情,中阿守望相助、共克时艰,谱写了共建中阿命运共同体的新篇章。患难见真情。经过携手抗疫的洗礼,中阿战略伙伴关系基础更加牢固,人民友谊更加深厚,合作前景更加光明。习近平强调,此次疫情再次表明,人类是休戚与共的命运共同体。中国共产党和中国政府始终坚持人民至上、生命至上,全力以赴救治生命,疫情防控取得重大战略成果;始终本着公开、透明、负责任态度,积极参与和推动国际抗疫合作,始终力所能及支持和帮助国际社会抗疫斗争。中方愿同包括广大阿拉伯国家在内的国际社会加强团结合作,支持世界卫生组织发挥领导作用,共同推动构建人类卫生健康共同体。习近平表示,中阿政党对话会是中国共产党与阿拉伯国家政党交流合作的重要平台。面对疫情带来的新形势新挑战,中国共产党愿同阿拉伯各国政党一道,发挥好中阿政党对话会的平台作用,继续加强战略沟通,深化疫情防控常态化形势下治国理政经验交流,相互尊重,互学互鉴,为构建新时代中阿命运共同体、实现中阿两大民族伟大复兴而不懈努力。预祝会议取得圆满成功。中国-阿拉伯国家政党对话会特别会议由中共中央对外联络部主办。会议为期3天,主题为“携手共建新时代中阿命运共同体”。毛里塔尼亚总统加祖瓦尼,巴勒斯坦法塔赫主席、总统阿巴斯,叙利亚复兴党总书记、总统巴沙尔,摩洛哥公正与发展党总书记、首相奥斯曼尼等6位阿拉伯国家领导人向会议致辞,阿拉伯国家60余位主要政党领导人参加。阿方领导人表示,完全赞同习近平总书记对阿中战略伙伴关系的积极评价;高度赞赏中国党和政府在抗疫斗争中始终坚持“人民至上”的执政理念,并秉持人类命运共同体理念,积极参与和推动国际抗疫合作;感谢中方一贯支持阿拉伯国家捍卫主权和独立,认为香港、新疆等事务是中国内政,反对外部势力干涉中国内政;愿同中国共产党一道,加强战略沟通和理念互鉴,携手共建新时代阿中命运共同体。</div></body></html>
效果: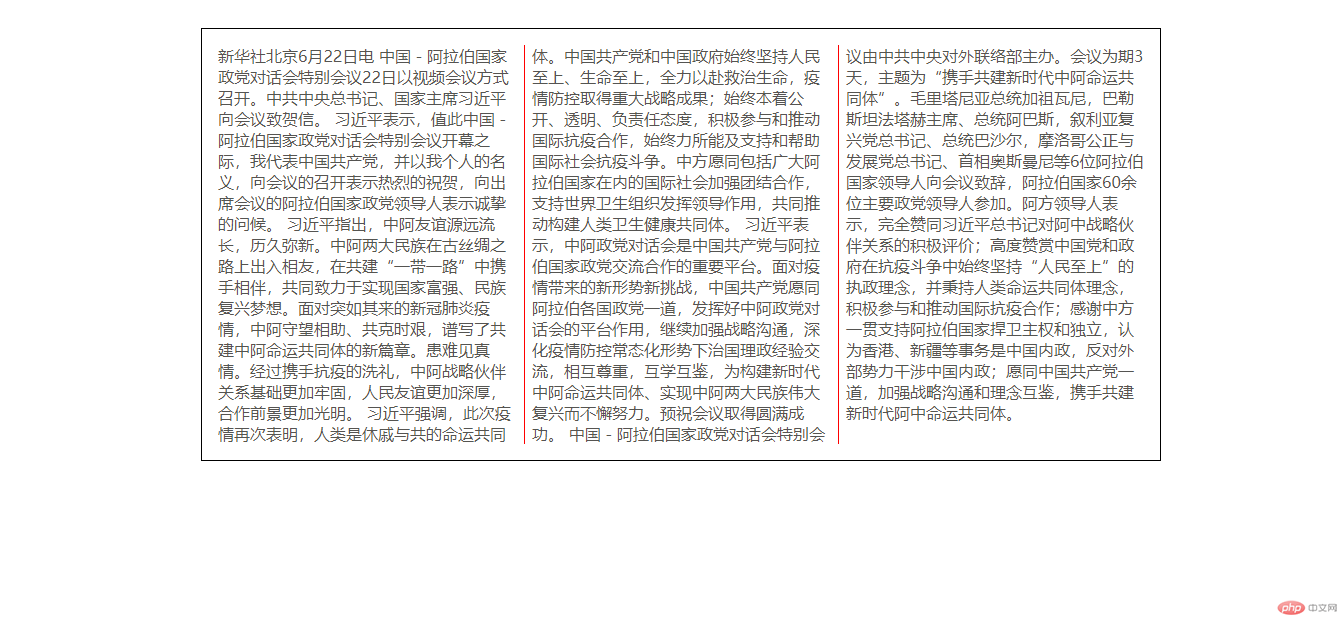
这个案例适用于内容的分列多栏显示,并不适用于布局,因为用作布局的话会有很多问题,这里我们就简单讲一下,有了解就可以
以上两个小示例我们可以看到都可以实现布局,但是代码可能就比较多了,这只是简单的写一下,复杂的布局用原始的html+css定位和浮动技术可能就有点太low了,好,那我们接下来就慢慢的学习一下flex弹性布局的知识吧!
注:在学习弹性布局的时候我们建议用火狐浏览器查看demo,火狐浏览器更直观的感受弹性布局
1.FlexBox弹性盒布局快速预览知识点1:将容器转为弹性容器 display: flex;知识点2:自动计算每个弹性项目在弹性容器中的平均宽度 flex: auto;知识点3:我们也可以给每个弹性项目设置不同的宽高知识点4:一旦将父元素转为弹性容器,内部的“子元素”就会自动成为: 弹性项目,这些项目之前不管什么标签,通通转为行内块 就是在“主轴”上排列
代码:
<!DOCTYPE html><html lang="en"><head><meta charset="UTF-8" /><meta name="viewport" content="width=device-width, initial-scale=1.0" /><title>FlexBox弹性盒布局快速预览</title><style>.container {width: 300px;/* 如果这个容器中的内容要使用flexBox布局, 第一步就是必须将这个容器转为弹性盒子 *//* 弹性容器 */display: flex;}.container > .item {/* 一旦将父元素转为弹性容器,内部的“子元素”就会自动成为: 弹性项目 *//* 不管这个项目标签之前是什么类型,统统转为“行内块” *//* 行内:全部在一排显示 *//* 块: 可以设置宽和高 *//* 自动计算每个弹性项目在弹性容器中的平均宽度 */flex: auto;/* 我们也可以给弹性项目设置宽高 *//* width: 60px; *//* height: 60px; */}</style></head><body><div class="container"><div class="item">1</div><span class="item">2</span><a class="item">3</a><a class="item">4</a><a class="item">5</a><a class="item">6</a></div></body></html>
效果: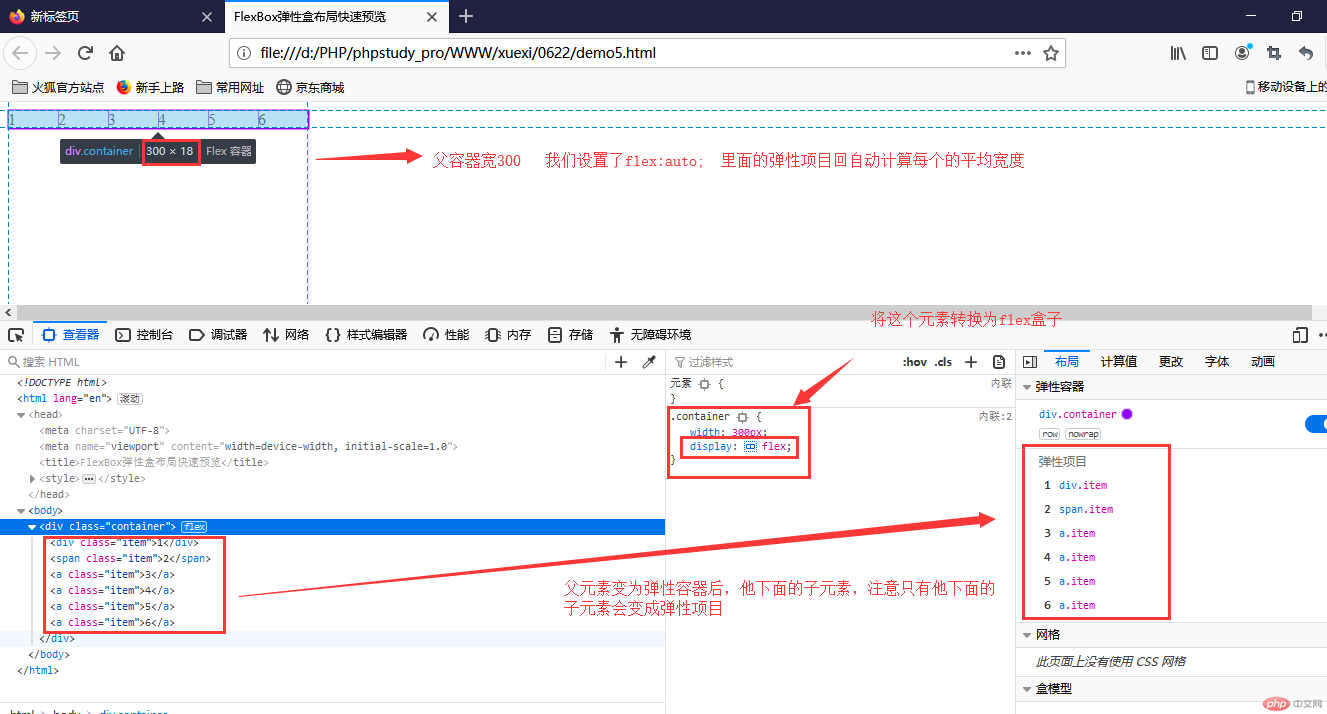
2.FlexBox弹性盒多行容器知识点1:将容器转为多行容器 flex-wrap: wrap;知识点2:当在一行上的弹性项目排列超出弹性容器的宽度会换行显示
代码:
<!DOCTYPE html><html lang="en"><head><meta charset="UTF-8" /><meta name="viewport" content="width=device-width, initial-scale=1.0" /><title>FlexBox弹性盒多行容器</title><style>.container {width: 300px;/* 弹性容器 */display: flex;}.container > .item {width: 60px;width: 50px;width: 120px;}/* 转为多行容器 换行显示 */.container {flex-wrap: wrap;}</style></head><body><div class="container"><div class="item">1</div><div class="item">2</div><div class="item">3</div><div class="item">4</div><div class="item">5</div></div></body></html>
效果: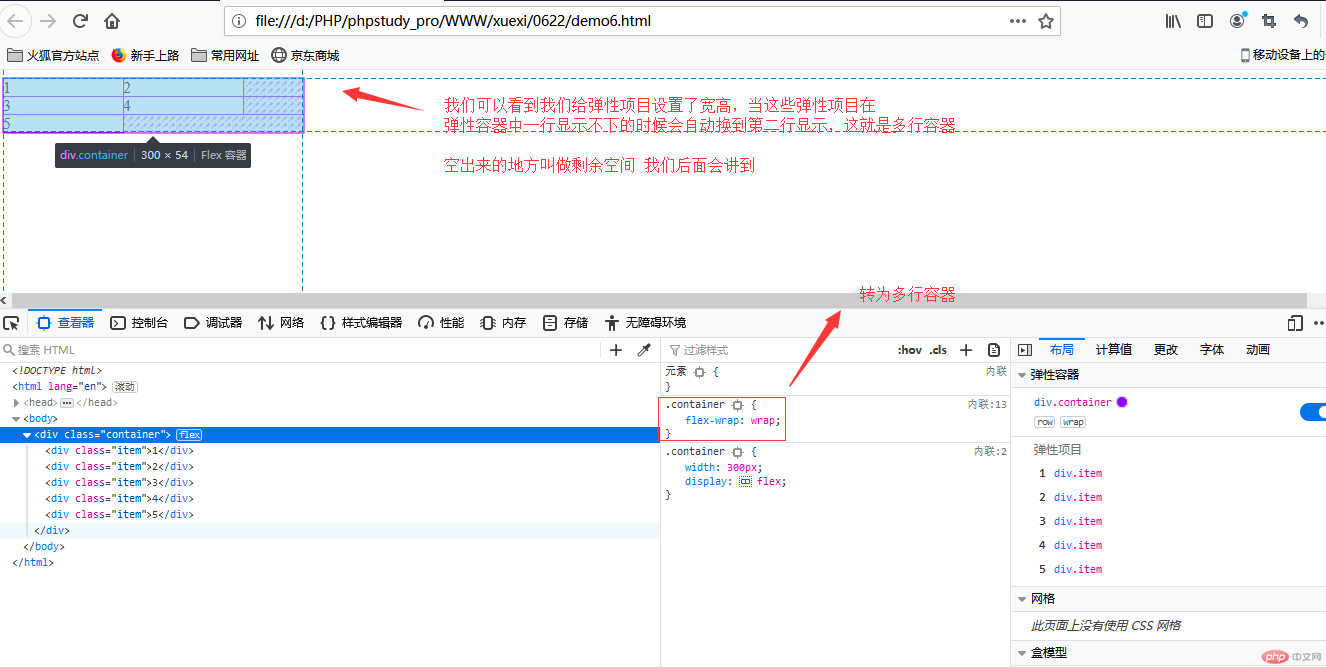
3.单行容器中的项目对齐方式知识点1:理解项目两边和项目之间不同的对齐方式
代码:
<!DOCTYPE html><html lang="en"><head><meta charset="UTF-8" /><meta name="viewport" content="width=device-width, initial-scale=1.0" /><title>单行容器中的项目对齐方式</title><style>.container {width: 300px;display: flex;/* justify-content: 控制所有项目在主轴上的对齐方式; *//* 本质是:设置容器中的剩余空间在所有 “项目之间”的分配方案 *//* 1. 容器剩余空间在所有项目“二边”的如何分配 ,将全部项目视为一个整体*//* 将剩余空间分配到结尾*/justify-content: flex-start;/* 将剩余空间分配给开头 *//* justify-content: flex-end; *//* 将剩余空间给两端平均分配 *//* justify-content: center; *//* 2. 容器剩余空间在所有项目“之间”的如何分配 ,将项目视为一个个独立的个体*//* 在所有项目之间平均分配 *//* justify-content: space-between; *//* 分散对齐: 剩余空间在所有项目二侧平均分配 *//* justify-content: space-around; *//* justify-content: space-evenly; */}.container > .item {width: 60px;}</style></head><body><div class="container"><div class="item">1</div><div class="item">2</div><div class="item">3</div></div></body></html>
效果: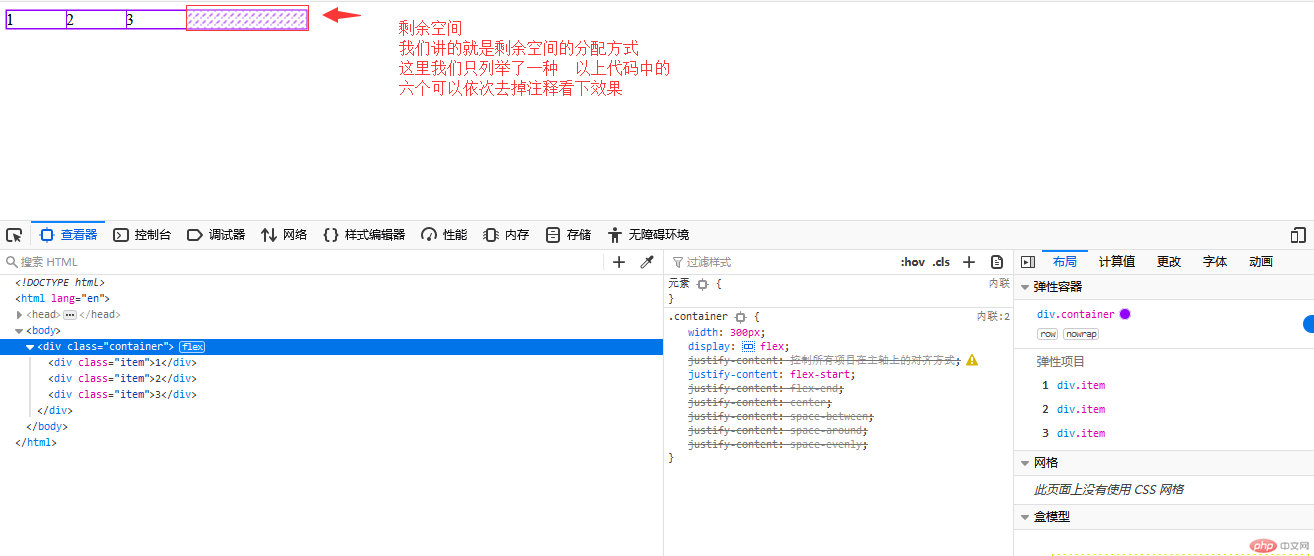
4.多行容器中的项目对齐方式
代码:
<!DOCTYPE html><html lang="en"><head><meta charset="UTF-8" /><meta name="viewport" content="width=device-width, initial-scale=1.0" /><title>多行容器中的项目对齐方式</title><style>.container {width: 300px;display: flex;/* 多行容器 */flex-wrap: wrap;height: 150px;/* align-content: 设置多行容器中的项目排列; *//* 1. 容器剩余空间在所有项目“二边”的如何分配 ,将全部项目视为一个整体*/align-content: stretch;align-content: flex-start;align-content: flex-end;align-content: center;/* 2. 容器剩余空间在所有项目“之间”的如何分配 ,将项目视为一个个独立的个体*/align-content: space-between;align-content: space-around;align-content: space-evenly;}.container > .item {width: 60px;}</style></head><body><div class="container"><div class="item">1</div><div class="item">2</div><div class="item">3</div><div class="item">4</div><div class="item">5</div><div class="item">6</div><div class="item">7</div><div class="item">8</div></div></body></html>
效果: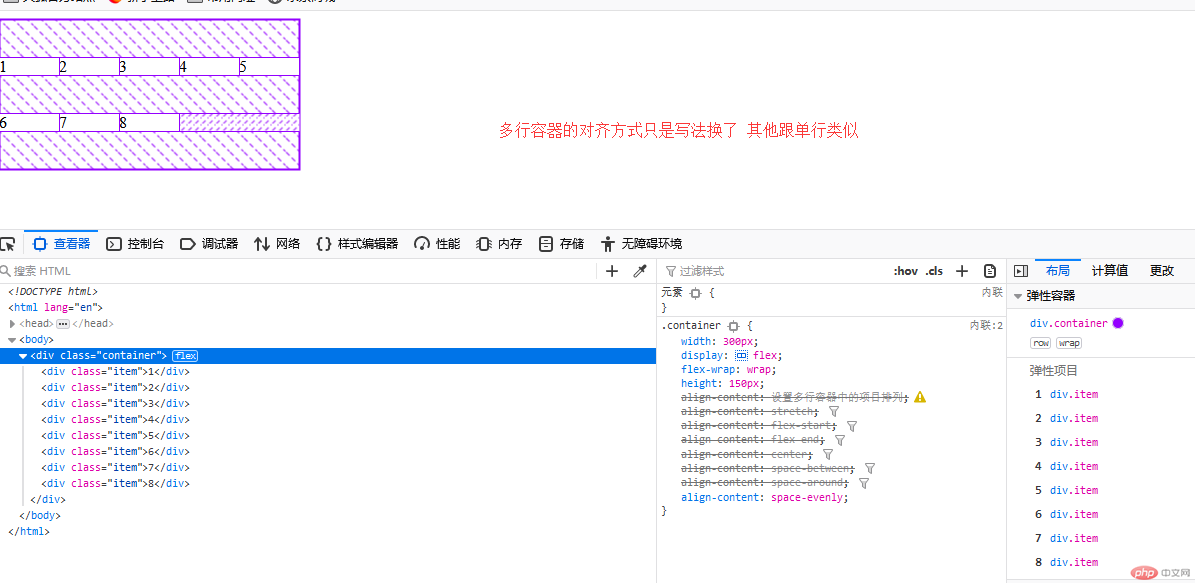
5.主轴为垂直方向时的项目排列知识点:改变主轴的排列方向 为垂直排列 flex-direction: column;
代码:
<!DOCTYPE html><html lang="en"><head><meta charset="UTF-8" /><meta name="viewport" content="width=device-width, initial-scale=1.0" /><title>主轴为垂直方向时的项目排列</title><style>.container {width: 300px;height: 150px;display: flex;/* 主轴方向:默认为行 */flex-direction: row;/* 改变主轴的排列方向 为垂直 */flex-direction: column;/* 项目二边分配 */justify-content: flex-start;justify-content: flex-end;justify-content: center;/* 项目之间分配 */justify-content: space-between;justify-content: space-around;justify-content: space-evenly;}</style></head><body><div class="container"><div class="item">1</div><div class="item">2</div><div class="item">3</div></div></body></html>
效果: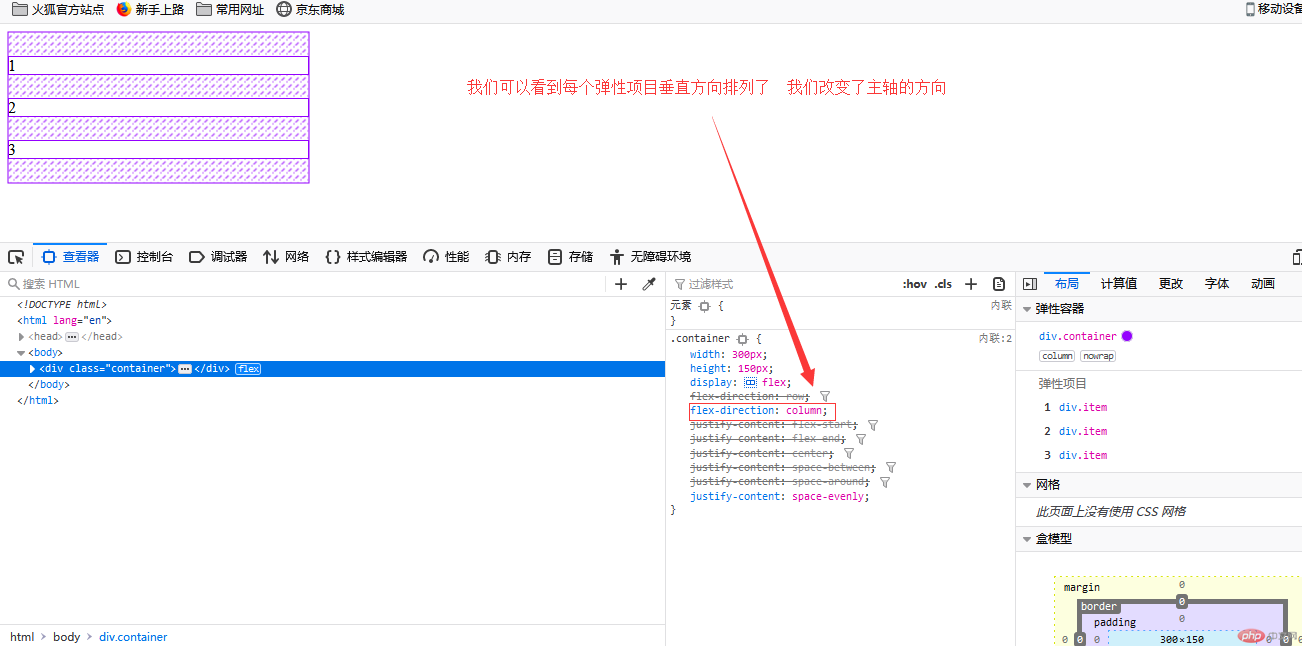
6.项目在交叉轴上的排列知识点:项目在交叉轴上默认是自动伸缩的
代码:
<!DOCTYPE html><html lang="en"><head><meta charset="UTF-8" /><meta name="viewport" content="width=device-width, initial-scale=1.0" /><title>项目在交叉轴上的排列</title><style>.container {width: 300px;height: 200px;display: flex;/* 项目在交叉轴上默认是自动伸缩的 */align-items: stretch;align-items: flex-start;align-items: flex-end;align-items: center;}.container > .item {width: 60px;}</style></head><body><div class="container"><div class="item">1</div><div class="item">2</div><div class="item">3</div></div></body></html>
效果: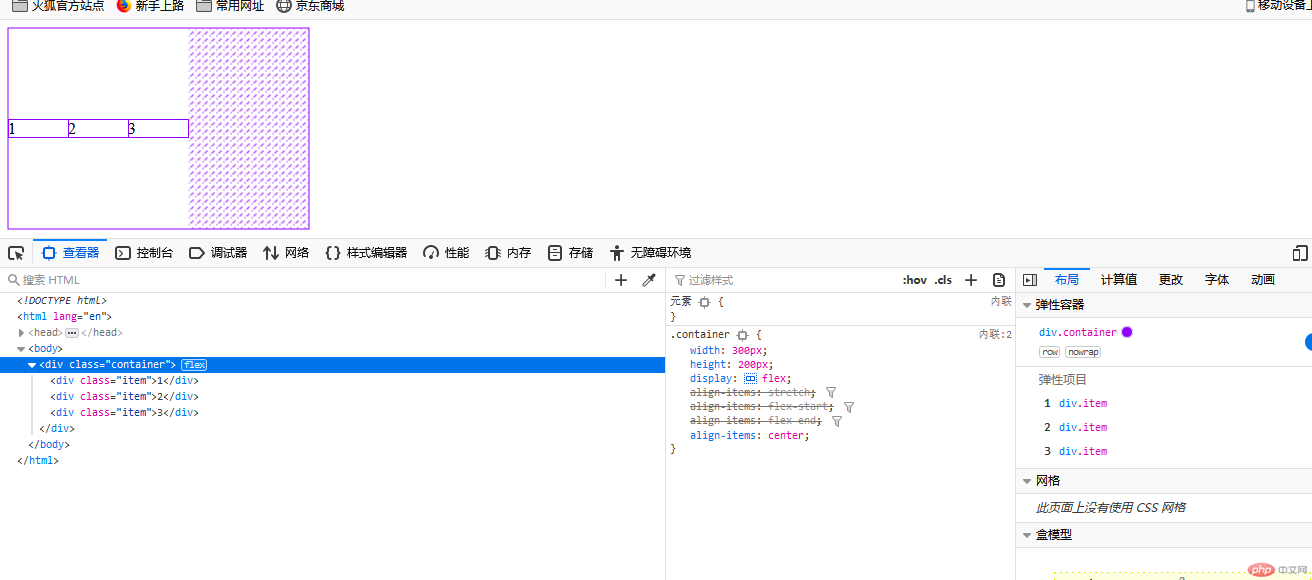
7.flex容器属性实战: 快速撸一个主导航
代码:
<!DOCTYPE html><html lang="en"><head><meta charset="UTF-8" /><meta name="viewport" content="width=device-width, initial-scale=1.0" /><title>flex容器属性实战: 快速撸一个主导航</title><style>/* 初始化 */* {padding: 0;margin: 0;box-sizing: border-box;}a {text-decoration: none;color: #ccc;}nav {height: 40px;background-color: #333;padding: 0 50px;/* 转为弹性盒布局 */display: flex;}nav a {height: inherit;line-height: 40px;padding: 0 15px;}nav a:hover {background-color: lightpink;color: white;}/* 登录/注册放在最右边 */nav a:last-of-type {margin-left: auto;}</style></head><body><header><nav><a href="">首页</a><a href="">京东物流</a><a href="">购物问答</a><a href="">调研问卷</a><a href="">登录/注册</a></nav></header></body></html>
效果: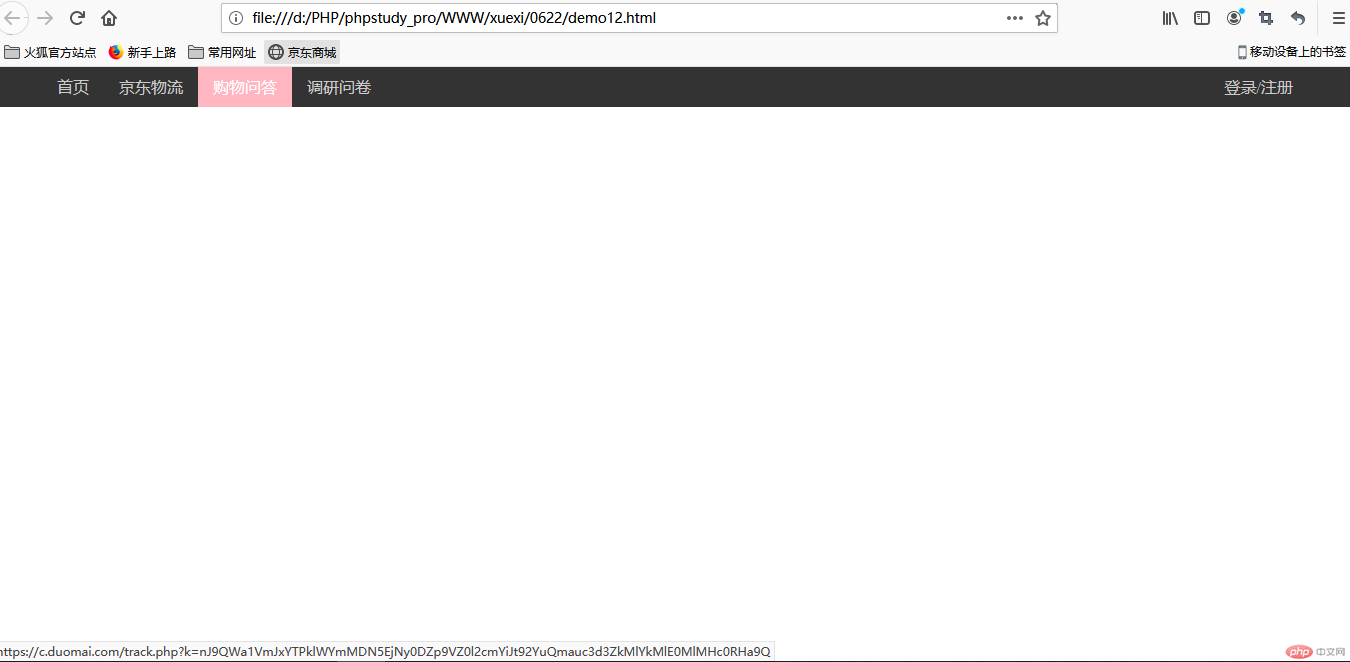
怎么样感觉,是不是简单的几行代码就实现了这么炫酷的效果,这就是flex弹性布局的优点
8.项目属性: order控制项目顺序知识点:order 默认是0 数值越大越靠后
示例代码:
<!DOCTYPE html><html lang="en"><head><meta charset="UTF-8" /><meta name="viewport" content="width=device-width, initial-scale=1.0" /><title>项目属性: order控制项目顺序</title><style>.container {width: 300px;display: flex;}.container > .item {width: 60px;}.container > .item:first-of-type {/* order: 默认是0 */order: 3;}.container > .item:last-of-type {/* order: 默认是0 */order: 5;}</style></head><body><div class="container"><div class="item">1</div><div class="item">2</div><div class="item">3</div></div></body></html>
效果: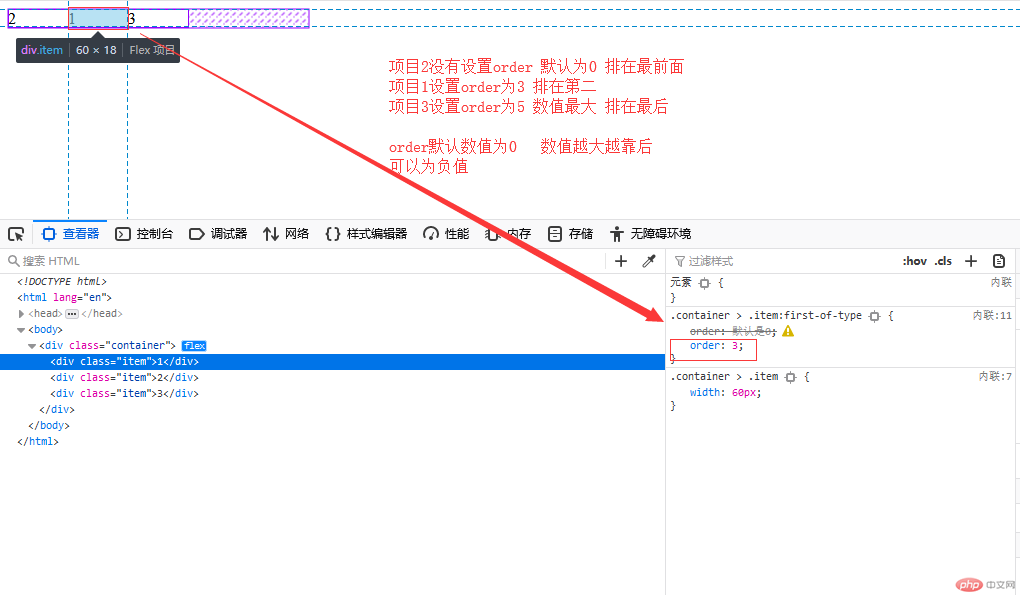
9.order小案例,调整元素顺序,比如小相册注:这个有js代码控制 大体意思就是 点击当前图片的上下按钮可以根据order属性去改变当前图片在这些图片中的位置
<!DOCTYPE html><html lang="en"><head><meta charset="UTF-8" /><meta name="viewport" content="width=device-width, initial-scale=1.0" /><title>order小案例,调整元素顺序,比如小相册</title><style>.container {width: 300px;display: flex;flex-direction: column;}.container > .item {border: 1px solid #000;padding: 10px;display: flex;position: relative;}.container > .item > div {display: flex;}</style></head><body><div class="container"><div class="item">images-1.jpg<div><button onclick="up(this)">上</button><button onclick="down(this)">下</button></div></div><div class="item">images-2.jpg<div><button onclick="up(this)">上</button><button onclick="down(this)">下</button></div></div><div class="item">images-3.jpg<div><button onclick="up(this)">上</button><button onclick="down(this)">下</button></div></div></div><script>let up = (ele) => (ele.offsetParent.style.order -= 1);let down = (ele) => (ele.offsetParent.style.order += 1);</script></body></html>
效果: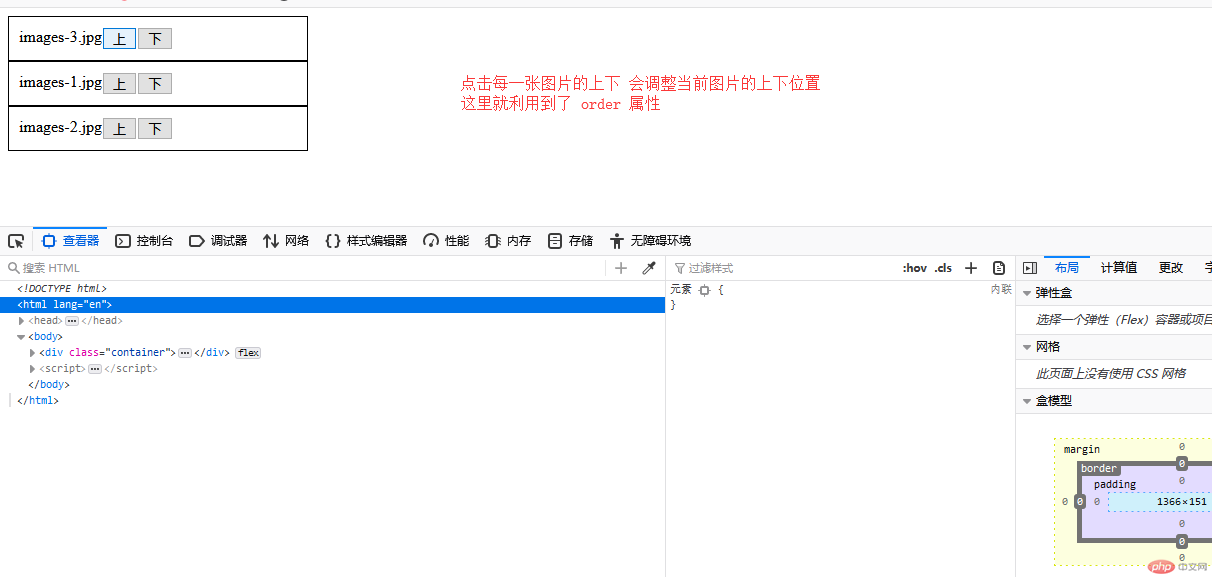
小结:
1.理解学到的弹性容器属性:flex-wrap justify-content align-items align-content flex-direction
2.理解学到的弹性项目属性:order
3.把这些属性结合到实例中自己动手试试,收获会很大
4.还有一部分项目属性,后面我们会更新

