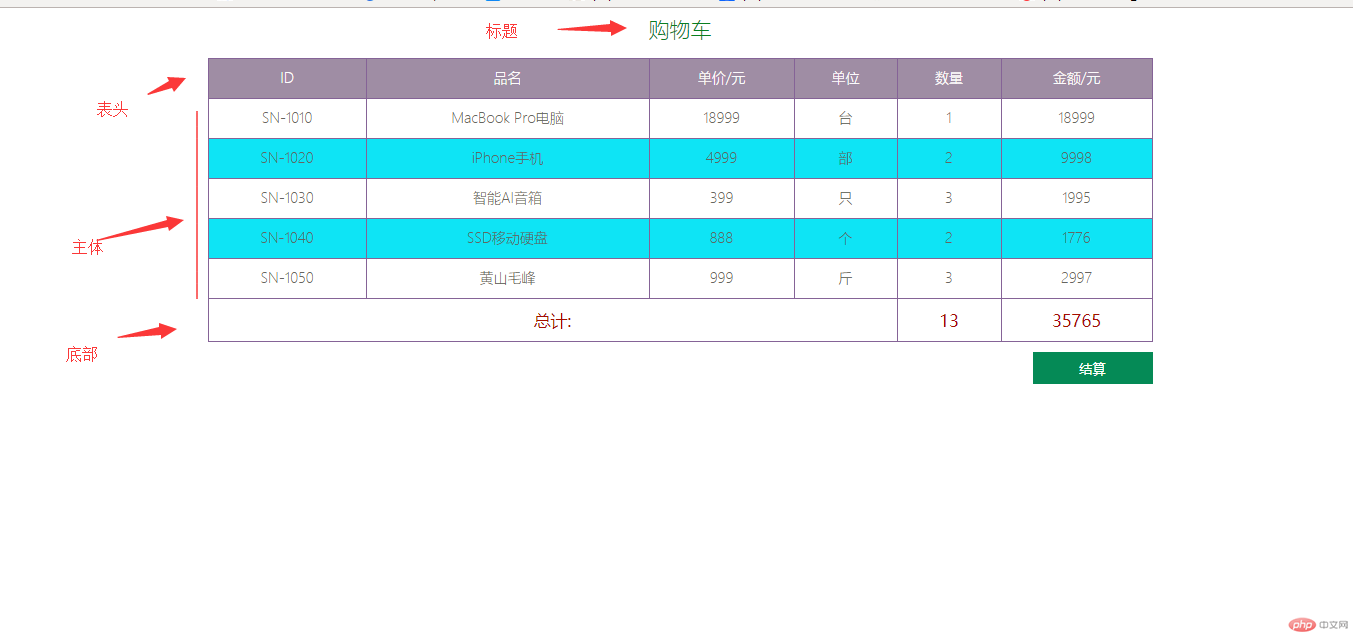
一、HTML-结合css编写一个漂亮的表格
注:重点知识都在代码中标注出来了,记得看代码注释
代码:
<!DOCTYPE html><html lang="en"><head><meta charset="UTF-8" /><meta name="viewport" content="width=device-width, initial-scale=1.0" /><title>表格实战-购物车</title><style>html {font-size: 14px;}table {/* 将单元格之间的间隙去掉 */border-collapse: collapse;width: 70%;/* 外边距左右自动居中 */margin: auto;color: #666;/* 字体粗细设置 */font-weight: lighter;/* 文本居中显示 */text-align: center;}/* 表格线直接添加到单元格上面 */table thead th,table td {border: 1px solid #8066a0;border-color: #8066a0;/* 设置内边距 */padding: 10px;}/* 标题样式 */table caption {font-size: 1.5rem;margin-bottom: 15px;color: green;}table th {font-weight: lighter;color: white;}table thead tr:first-of-type {background-color: rgb(157, 145, 172);}/* 隔行变色 */table tbody tr:nth-of-type(even) {background-color: rgb(78, 224, 243);}/* 鼠标悬停效果 */table tbody tr:hover {background-color: pink;color: white;}/* 底部样式 */table tfoot td {color: rgb(146, 5, 5);font-size: 1.2rem;font-weight: bolder;}/* 结算按钮 */body div:last-of-type {width: 70%;margin: 10px auto;}body div:first-of-type button {/* 靠右浮动 */float: right;width: 120px;height: 32px;background-color: seagreen;color: white;/* 去掉边框 */border: none;/* 设置鼠标样式 */cursor: pointer;}body div:first-of-type button:hover {background-color: coral;font-size: 1.1rem;}</style></head><body><!-- 表格结构 --><table><!-- 标题 --><caption>购物车</caption><!-- 表头 --><thead><tr><th>ID</th><th>品名</th><th>单价/元</th><th>单位</th><th>数量</th><th>金额/元</th></tr></thead><!-- 主体 --><tbody><tr><td>SN-1010</td><td>MacBook Pro电脑</td><td>18999</td><td>台</td><td>1</td><td>18999</td></tr><tr><td>SN-1020</td><td>iPhone手机</td><td>4999</td><td>部</td><td>2</td><td>9998</td></tr><tr><td>SN-1030</td><td>智能AI音箱</td><td>399</td><td>只</td><td>3</td><td>1995</td></tr><tr><td>SN-1040</td><td>SSD移动硬盘</td><td>888</td><td>个</td><td>2</td><td>1776</td></tr><tr><td>SN-1050</td><td>黄山毛峰</td><td>999</td><td>斤</td><td>3</td><td>2997</td></tr></tbody><!-- 底部 --><tfoot><tr><td colspan="4">总计:</td><td>13</td><td>35765</td></tr></tfoot></table><!-- 结算按钮 --><div><button>结算</button></div></body></html>
运行效果:
二、HTML-结合css编写一个漂亮的表单
注:重点表单知识都在代码中标注出来了,记得看代码注释
代码:
<!DOCTYPE html><html lang="en"><head><meta charset="UTF-8" /><meta name="viewport" content="width=device-width, initial-scale=1.0" /><title>表单元素</title><style>body {color: #555;}h3 {text-align: center;font-family: cursive;color: royalblue;}form {width: 450px;margin: 30px auto;border-top: 2px solid #aaa;}form fieldset {border: 1px solid rgb(70, 203, 212);background-color: lightcyan;box-shadow: 3px 3px 4px rgb(45, 211, 147);border-radius: 10px;margin: 20px;}form fieldset legend {background-color: rgb(178, 231, 201);border-radius: 10px;color: seagreen;padding: 5px 15px;}form div {margin: 5px;}form p {text-align: center;}form .btn {width: 80px;height: 30px;border: none;background-color: seagreen;color: #ddd;}form .btn:hover {background-color: coral;color: white;cursor: pointer;}input:focus {background-color: rgb(226, 226, 175);}.sty {width: 200px;height: 20px;border-radius: 3px;border: 0;padding-left: 4px;}</style></head><body><h3>用户注册</h3><form action="" method="POST"><!-- 控件组 --><fieldset><legend>基本信息(必填)</legend><div><label for="name">账号:</label><inputtype="text"id="name"name="name"placeholder="6-15字符"autofocusrequiredclass="sty"/></div><!-- type=text 文本 --><div><label for="email">邮箱:</label><inputtype="email"id="email"name="email"placeholder="123@qq.com"requiredclass="sty"/></div><!-- type=email 输入的信息会进行是否是邮箱验证 --><div><label for="password">密码:</label><inputtype="password"id="password"name="password"requiredplaceholder="不少于六位且数字+字母"id="pwd"class="sty"/></div><div><label for="password2">确认:</label><inputtype="password"id="password2"name="password2"requiredplaceholder="与以上密码一致"class="sty"/></div><!-- type=password 输入的信息是不显示的 安全 常用于输入密码 --></fieldset><fieldset><legend>扩展信息(选填)</legend><div><label for="birthday">生日:</label><input type="date" id="birthday" name="birthday" class="sty" /></div><!-- type=date 选择时间 --><!-- 单选按钮 name值必须一样--><div><label for="male">性别:</label><inputtype="radio"id="male"value="male"name="male"checked/><label for="male">男</label><input type="radio" id="female" value="female" name="male" /><labelfor="female">女</label></div><!-- 复选框 name通常以array[]形式传给后台 便于后台处理--><div><label for="">爱好:</label><input type="checkbox" name="hobby[]" value="game" /><label for="">打游戏</label><input type="checkbox" name="hobby[]" value="yinyue" /><label for="">音乐</label></div><div><!-- 选项列表 --><label for="brand">手机:</label><inputtype="search"list="phone"name="brand"id="brand"class="sty"/><datalist id="phone"><option value="apple">苹果</option><option value="huawei">华为</option><option value="mi">小米</option></datalist></div></fieldset><fieldset><legend>其他信息(选填)</legend><!-- 文件域 --><div><label for="pic">上传头像:</label><input type="file" /></div><!-- 多行文本框 --><div><label for="pic">简历:</label><textareaname=""id=""cols="30"rows="5"placeholder="不超过100字"></textarea></div></fieldset><!-- 隐藏域, 例如用户的Id, 注册,登录的时间。。。。 --><input type="hidden" name="user_id" value="123" /><p><!-- 两种提交按钮 --><input type="submit" value="提交" class="btn" /><button class="btn">提交</button></p></form></body></html>
运行效果:
小结:
1.理解表格的标题元素,表头,主体,底部
2.理解表单元素都有哪些,每个的写法和作用 如:文本框,密码框,邮箱验证,输入日期,单选按钮,复选框,选项列表,下拉列表,文件域,隐藏域,多行文本框
3.结合以上学习内容动手写两个表单,表格的demo更容易记忆,好记性不如烂笔头,动手实践才是真理

