1. 实例演示:<iframe>标签的使用
实例
<!DOCTYPE html>
<html lang="en">

<head>
    <meta charset="UTF-8">
    <meta name="viewport" content="width=device-width, initial-scale=1.0">
    <meta http-equiv="X-UA-Compatible" content="ie=edge">
    <title>ifame标签</title>
    <style>
        h1 {
            color: red;
        }

        ul a {
            margin-right: 20px;
            font-size: 20px;
        }

        .cars:hover {
            background: aquamarine;
        }

        iframe {}
    </style>
</head>

<body>

    <h1>
        喜欢的车
    </h1>

    <ul style="float:left">
        <li class="cars"><a href="http://img2***gtn.bdimg.com/it/u=2570820766,4102602110&fm=26&gp=0.jpg" target="name">布加迪</a></li>
        <li class="cars"><a href="https://ss0.bdstatic.com/70cFvHSh_Q1YnxGkpoWK1HF6hhy/it/u=3962885627,4182652745&fm=26&gp=0.jpg" target="name">劳斯莱斯</a></li>
        <li class="cars"><a href="https://ss2.bdstatic.com/70cFvnSh_Q1YnxGkpoWK1HF6hhy/it/u=3813928612,1857039470&fm=26&gp=0.jpg" target="name">宾利</a></li>
        <li class="cars"><a href="https://ss3.bdstatic.com/70cFv8Sh_Q1YnxGkpoWK1HF6hhy/it/u=1062863292,3710552611&fm=26&gp=0.jpg" target="name">法拉利</a></li>
        <li class="cars"><a href="https://ss0.bdstatic.com/70cFvHSh_Q1YnxGkpoWK1HF6hhy/it/u=2400155958,2180780176&fm=26&gp=0.jpg" target="name">保时捷</a></li>
    </ul>

    <iframe src="https://ss1.bdstatic.com/70cFuXSh_Q1YnxGkpoWK1HF6hhy/it/u=3003022758,1135496081&fm=26&gp=0.jpg" frameborder="0" name="name" width="500" height="400"></iframe>

</body>

</html>
运行实例 »
点击 "运行实例" 按钮查看在线实例
2. 实例演示: css样式设置的优先级
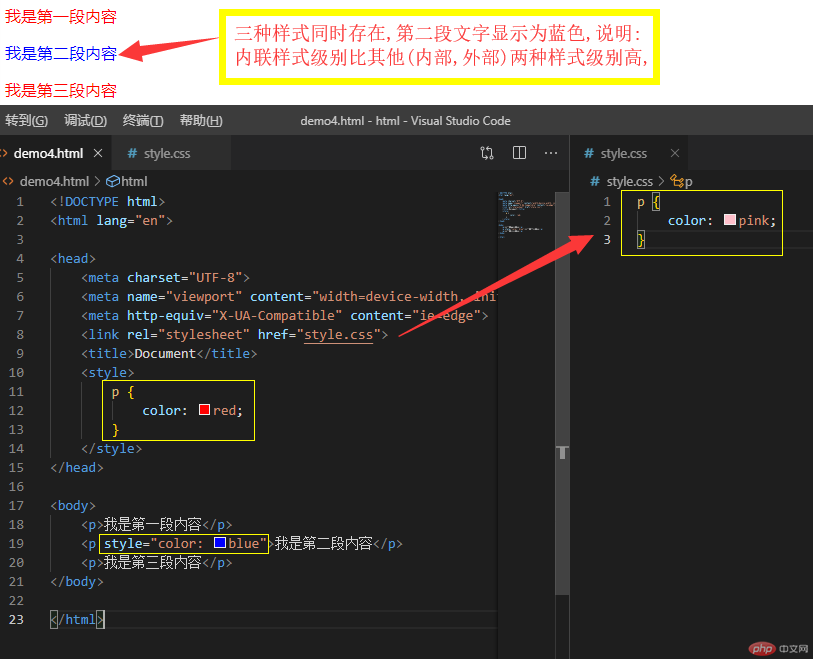
实例
<!DOCTYPE html>
<html lang="en">

<head>
    <meta charset="UTF-8">
    <meta name="viewport" content="width=device-width, initial-scale=1.0">
    <meta http-equiv="X-UA-Compatible" content="ie=edge">
    <link rel="stylesheet" href="style.css">
    <title>Document</title>
    <style>
        p {
            color: red;
        }
    </style>
</head>

<body>
    <p>我是第一段内容</p>
    <p style="color: blue">我是第二段内容</p>
    <p>我是第三段内容</p>
</body>

</html>
运行实例 »
点击 "运行实例" 按钮查看在线实例
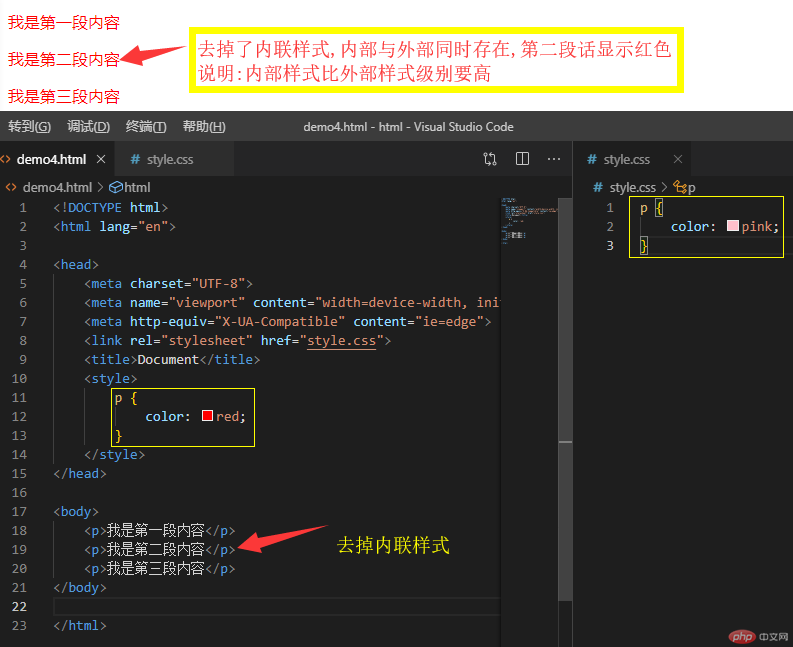
实例
<!DOCTYPE html>
<html lang="en">

<head>
    <meta charset="UTF-8">
    <meta name="viewport" content="width=device-width, initial-scale=1.0">
    <meta http-equiv="X-UA-Compatible" content="ie=edge">
    <link rel="stylesheet" href="style.css">
    <title>Document</title>
    <style>
        p {
            color: red;
        }
    </style>
</head>

<body>
    <p>我是第一段内容</p>
    <p>我是第二段内容</p>
    <p>我是第三段内容</p>
</body>

</html>
运行实例 »
点击 "运行实例" 按钮查看在线实例
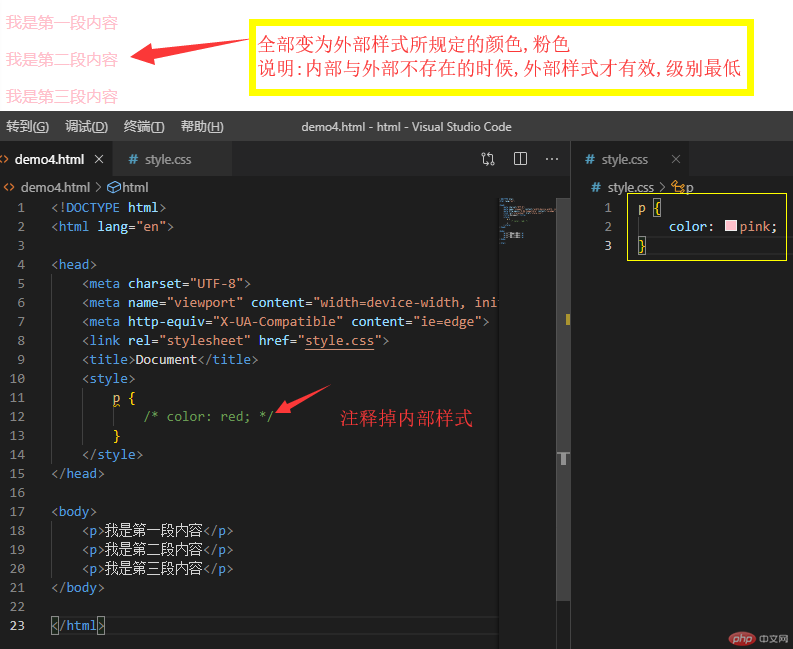
实例
<!DOCTYPE html>
<html lang="en">

<head>
    <meta charset="UTF-8">
    <meta name="viewport" content="width=device-width, initial-scale=1.0">
    <meta http-equiv="X-UA-Compatible" content="ie=edge">
    <link rel="stylesheet" href="style.css">
    <title>Document</title>
    <style>
        p {
            /* color: red; */
        }
    </style>
</head>

<body>
    <p>我是第一段内容</p>
    <p>我是第二段内容</p>
    <p>我是第三段内容</p>
</body>

</html>
运行实例 »
点击 "运行实例" 按钮查看在线实例
总结: css样式设置的优先级如下↓↓↓↓↓↓
内联样式 > 内部样式 > 外部样式
3:选择器优先级
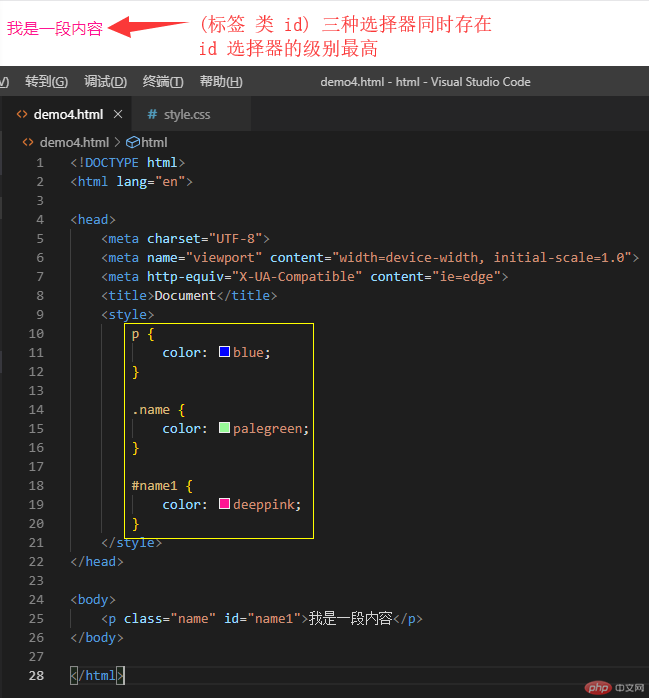
实例
<!DOCTYPE html>
<html lang="en">

<head>
    <meta charset="UTF-8">
    <meta name="viewport" content="width=device-width, initial-scale=1.0">
    <meta http-equiv="X-UA-Compatible" content="ie=edge">
    <title>Document</title>
    <style>
        p {
            color: blue;
        }

        .name {
            color: palegreen;
        }

        #name1 {
            color: deeppink;
        }
    </style>
</head>

<body>
    <p class="name" id="name1">我是一段内容</p>
</body>

</html>
运行实例 »
点击 "运行实例" 按钮查看在线实例
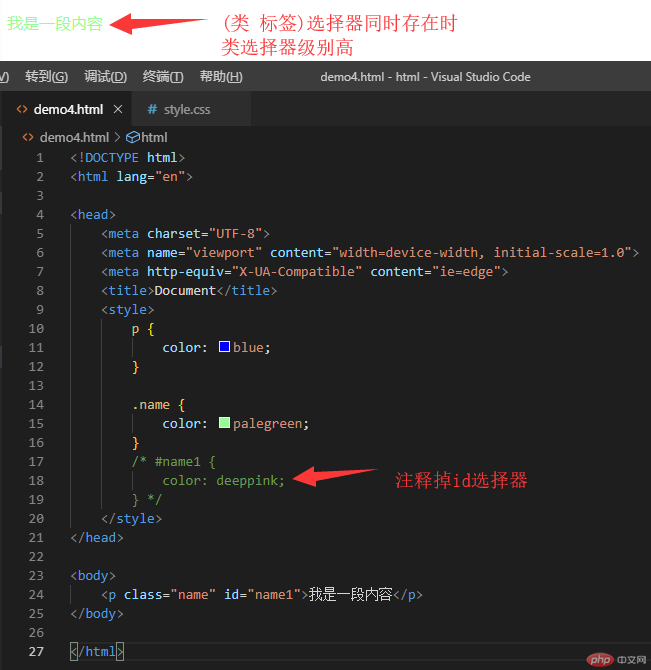
实例
<!DOCTYPE html>
<html lang="en">

<head>
    <meta charset="UTF-8">
    <meta name="viewport" content="width=device-width, initial-scale=1.0">
    <meta http-equiv="X-UA-Compatible" content="ie=edge">
    <title>Document</title>
    <style>
        p {
            color: blue;
        }

        .name {
            color: palegreen;
        }
        /* #name1 {
            color: deeppink;
        } */
    </style>
</head>

<body>
    <p class="name" id="name1">我是一段内容</p>
</body>

</html>
运行实例 »
点击 "运行实例" 按钮查看在线实例
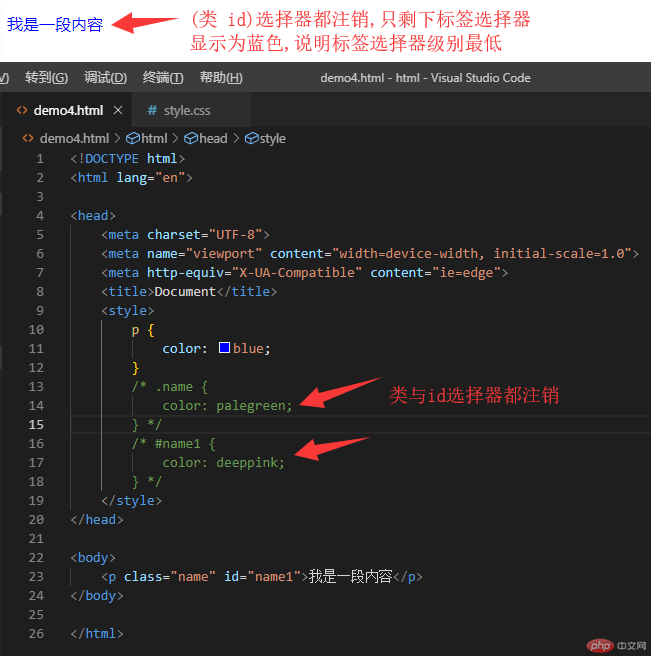
实例
<!DOCTYPE html>
<html lang="en">

<head>
    <meta charset="UTF-8">
    <meta name="viewport" content="width=device-width, initial-scale=1.0">
    <meta http-equiv="X-UA-Compatible" content="ie=edge">
    <title>Document</title>
    <style>
        p {
            color: blue;
        }
        /* .name {
            color: palegreen;
        } */
        /* #name1 {
            color: deeppink;
        } */
    </style>
</head>

<body>
    <p class="name" id="name1">我是一段内容</p>
</body>

</html>
运行实例 »
点击 "运行实例" 按钮查看在线实例
1.盒模型是布局的基础,页面上的一切可见元素皆可看做盒子
2.盒子默认都是块级元素:独占一行,支持宽度设置(根据盒子模型示意图分析)
3.盒子模型可以设置6个样式:宽高背景内外边距与边框
(1):width:宽度(水平方向)
(2):height:高度(垂直方向)
(3):background-color:背景(默认透明)
(4):padding:内边距,内容与边框之间的填充区域
(5):margin:外边距,决定当前盒子与其它盒子之间的位置与关系
(6):border:边框,位于内外边距之间,是可见元素,允许设置宽度,样式和颜色
4.根据是可见性可以分为二类:
(1).可见的:width,height,border
(2).透明的:background,padding,margin
实例
<!DOCTYPE html>
<html lang="en">

<head>
    <meta charset="UTF-8">
    <meta name="viewport" content="width=device-width, initial-scale=1.0">
    <meta http-equiv="X-UA-Compatible" content="ie=edge">
    <style>
        .box1 {
            float: left;
            height: 200px;
            width: 200px;
            background: blue;
            padding-top: 20px;
            padding-right: 30px;
            padding-bottom: 40px;
            padding-left: 50px;
            border-top-width: 15px;
            border-top-style: solid;
            border-top-color: black;
            border-right: dashed;
            border-right: 20px dashed red;
            border-bottom: 17px dotted yellow;
            margin: 20px;
        }

        .box2 {
            width: 200px;
            height: 200px;
            background: lightseagreen;
        }

        .box3 {
            float: left;
            height: 200px;
            width: 200px;
            background: blue;
            padding: 40px 60px 70px;
            border-top: 15px dashed yellow;
            border-right: 20px dotted black;
            border-bottom: 10px dashed green;
            margin-top: 30px;
            margin-left: 60px;
        }

        .box4 {
            width: 200px;
            height: 200px;
            background: lightseagreen;
        }
    </style>

    <title>Document</title>

</head>

<body>

    <div class="box1">
        <div class="box2"></div>
    </div>
    <div class="box3">
        <div class="box4"></div>
    </div>

</body>

</html>
运行实例 »
点击 "运行实例" 按钮查看在线实例

