집 >위챗 애플릿 >미니 프로그램 개발 >Wu APP의 WeChat 애플릿을 모방하는 방법을 가르쳐주세요.
Wu APP의 WeChat 애플릿을 모방하는 방법을 가르쳐주세요.
- 青灯夜游앞으로
- 2021-08-23 11:06:185283검색

최근에는 WeChat 애플릿 개발을 배우고 있고, 두 명의 반 친구와 함께 Wu APP의 WeChat 애플릿을 흉내내는 작업도 하고 있습니다. 여기에서는 주로 제가 학습하는 과정과 제가 겪은 몇 가지 함정을 공유하겠습니다. 이것이 여러분에게 도움이 되기를 바랍니다.
개발 준비
- WeChat 개발자 도구
- VScode 코드 편집기
- Dewu APP WeChat 애플릿
- Youzanvant 구성 요소 라이브러리
- Alibaba 벡터 아이콘 라이브러리
- 마크맨 (색상 거리)
전체 아키텍처
- 이 프로젝트는 미니 프로그램 클라우드 개발을 기반으로 하며 사용된 템플릿은 클라우드 개발 빠른 시작 템플릿풀 스택 프로젝트이므로 프론트엔드는 wxml + 미니 프로그램 wxss + js에서 지원하는 것을 사용합니다. 개발 모드에서는 BEM 명명 규칙을 채택합니다. 백엔드는 데이터 관리를 위해 클라우드 데이터베이스를 사용합니다. [관련 학습 추천 : 미니 프로그램 개발 튜토리얼]
프로젝트에서 제가 담당하는 부분은 주로 다음과 같습니다. (일부 데이터는 config에 작성된 고정 데이터이고, js 파일은 전달됩니다. module.exports 를 통해 노출됩니다. 참조가 필요한 경우 페이지의 해당 js 헤더에 삽입하세요. 예를 들어 const {} = require('../../../ ../config/buys')) . 프로젝트에서 vant 컴포넌트를 많이 사용하는데, npm 패키지를 빌드할 때 vant를 도입해야 합니다. 자세한 내용은 를 참조하세요. href="https:/ /vant-contrib.gitee.io/vant-weapp/#/quickstart" target="_blank" ref="nofollow noopener noreferrer">vant config中,js文件通过module.exports暴露,需要引用时在页面对应js头部引入,例const {} = require('../../../../config/buys'))。项目中我使用的较多vant组件,需要在构建npm包时引入vant,详情可见有赞vant的npm安装。页面使用第三方组件时须在对应json文件中声明,为了不做重复工作可直接在app.json中声明。例:("usingComponents": "van-search": "@vant/weapp/search/index"}와 같은 npm 설치가 있습니다. 페이지가 타사 구성 요소를 사용하는 경우 해당 json 파일에서 선언해야 하며 작업 중복을 피하기 위해 app.json에서 직접 선언할 수 있습니다. 예: ("usingComponents": "van-search": "@vant/weapp/search/index"})
    |-config  对应数据
        |-assem.js
        |-buys.js
        |-detail.js
        |-kind.js
        |-search.js
    |-pages
        |-buy_page
            |-page
                |-assem   筛选排序页
                |-buy     购买首页
                |-detail  商品详情页
                |-kinds   品牌分类页
                |-produce 鉴别简介页
                |-search  搜索页
프로젝트 계획
- 이 작은 프로그램을 수행하기 전에 먼저 , 각 페이지의 해당 기능을 분석하고, 이 애플릿의 상호 작용 세부 사항을 이해하고, 데이터 수집 항목을 이해합니다. 이는 대략 페이지 분석, 데이터 컬렉션 생성, 페이지 기본 레이아웃 해체, 데이터 바인딩 및 점프의 네 단계로 나눌 수 있습니다.
Dewu APP WeChat 애플릿을 참고하세요. 다음은 내 애플릿의 tabBar입니다. (조금 거칠지만 그래도 볼 수 있음)

  "tabBar": {
    "selectedColor": "#000000",
    "borderStyle": "white",
    "backgroundColor": "#fff",
    "list": [
      {
        "text": "购买",
        "pagePath": "pages/buy_page/page/buy/buy",
        "iconPath": "images/buy.png",
        "selectedIconPath": "images/buy_active.png"
      },
      {
        "text": "鉴别查询",
        "pagePath": "pages/disting/disting",
        "iconPath": "images/disting.png",
        "selectedIconPath": "images/disting_active.png"
      },
      {
        "text": "洗护",
        "pagePath": "pages/wash/wash",
        "iconPath": "images/wash.png",
        "selectedIconPath": "images/wash_active.png"
      },
      {
        "text": "我",
        "pagePath": "pages/my_page/my/my",
        "iconPath": "images/my.png",
        "selectedIconPath": "images/my_active.png"
      }
    ]
  },
클라우드 데이터베이스
클라우드 데이터베이스는 NoSQL 데이터베이스입니다. 각 테이블은 컬렉션입니다. 내 프로젝트의 일부에서는 기본적으로 항목 컬렉션을 만들었습니다.
dewu_goods 商品表 用于存储创商品的信息
    - _id
    - amway  是否为推荐
    - brand  品牌
    - buyer  已购买人数
    - ctime  数据创建时间
    - digest 详情介绍
    - img    详情图
    - pic    商品展示图
    - kind   种类
    - price  价格
    - sex    适应人群
    - title  简介
    - type   首页索引
데이터 컬렉션을 생성한 후 데이터 권한을 수정해야 정상적으로 접근할 수 있습니다.
이러한 작업은 데이터베이스에서 수행할 수 있습니다. 가져온 데이터 형식은 .csv或.json 파일이어야 합니다. 먼저 Excel 테이블을 사용하여 데이터 세트를 생성하고 이를 해당 형식 파일로 변환할 수 있습니다. 데이터베이스로 직접 가져옵니다.

const db = wx.cloud.database() //云数据库
const dewuCollection = db.collection('dewu') //在js文件中导入数据集合
프로젝트 해체
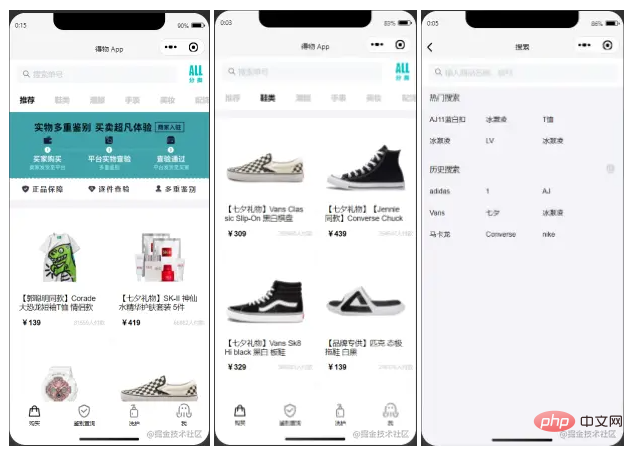
다음은 제가 주로 구현한 Dewu APP 애플릿 인터페이스입니다

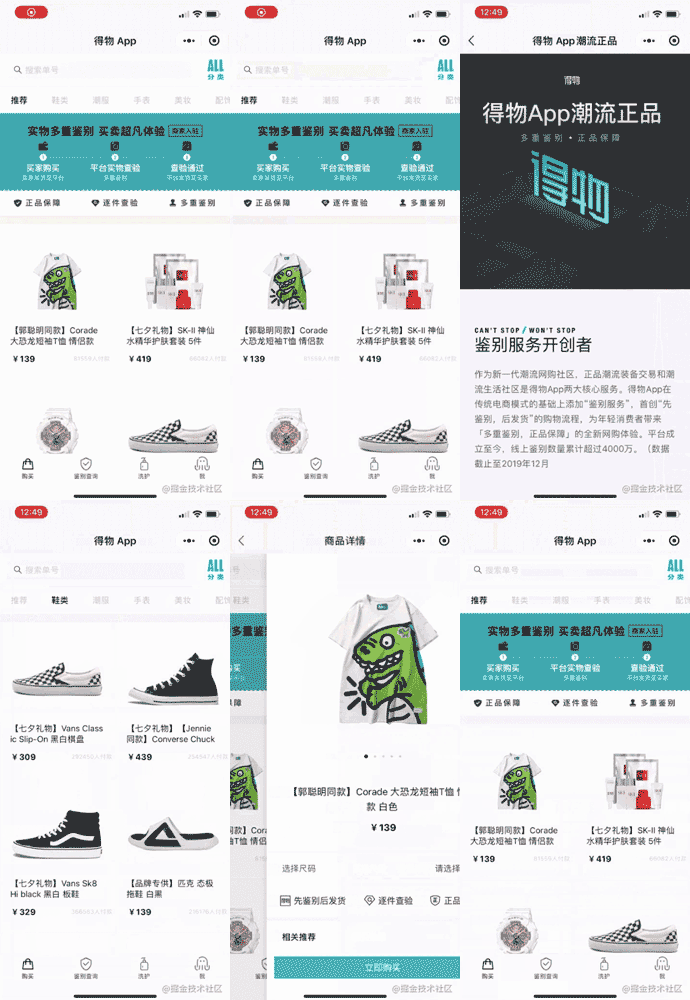
다음으로 각 페이지의 세부 사항을 분해하겠습니다.
홈페이지 구매

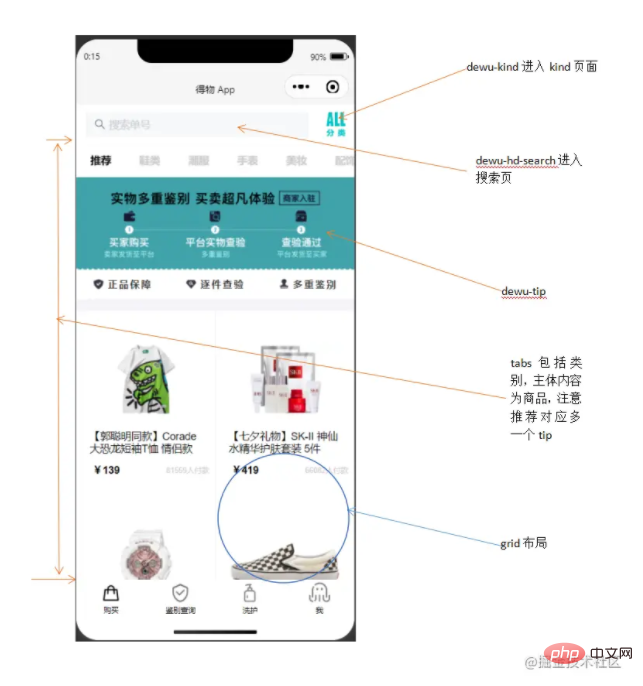
홈페이지 스타일 구매
<view class="page">
  <!-- 使用van-sticky设置dewu-hd吸顶 搜索栏-->
  <van-sticky>
  <!-- dewu-hd使用flex布局 -->
    <view class="dewu-hd">
      <view class="dewu-hd-search" bindtap="gotoSearch">
        <van-search placeholder="搜索单号" disabled />
      </view>
      <view class="dewu-kinds" bindtap="kinds"><image src=""></image>
      </view>
    </view>
  </van-sticky>
  <!-- van-tabs实现购买页导航及与内容页对应 -->
  <van-tabs class="dewu-tabs">
    <van-tab title="推荐">
      <view class="dewu-tip">
        <view class="dewu-tip-img-hd"><image src=""></image>
        </view>
        <!-- 使用van-grid布局设置边框隐藏快速定位 -->
        <van-grid>
          <van-grid-item use-slot>
            <image  src=""></image>
            <text>正品保障</text>
          </van-grid-item>
        </van-grid>
      </view>
      <view class="van-items">
        <van-grid class="van-grid-bd">
        <!-- grid布局自定义van-grid-item样式 -->
          <van-grid-item use-slot>
            <view class="item-img"><image src=""></image></view>
            <view class="item-text">
              <span>{{}}</span>
            </view>
          </van-grid-item>
        </van-grid>
      </view>
    </van-tab>
  </van-tabs>
</view>商品项van-grid-item中采用绝对定位。tips中将direction属性设置为horizontal,可以让宫格的内容呈横向排列。搜索框设置disabled属性为禁用状态解决单击自动聚焦的问题。在使用van-grid布局时自定义每一项的属性需设置use-slot属性,否则不生效。
这个页面布局并不复杂,不过我在写这个布局时还是遇到了坑(感觉是自己跳进去的 我太了)。在做dewu-hd吸顶时我是直接用van-sticky包起来实现,但是实际效果是tabs也需要固定在dewu-hd下面。这里不可以使用同上的方法,实际效果会使得整个van-tabs吸顶导致页面无法滑动。其实在这里只需要给van-tabs添加一个sticky属性并且设置offset-top,注意这两个属性需一起使用才能生效。
获取商品项
  async onLoad() {
     this.proData()   //获取推荐数据项
     this.shoeData()  //获取鞋类数据项
  },
  proData() {
     const {data} = await dewuCollection
    .where({
      amway: db.command.eq('TRUE')
    })
    .field({          //获取指定数据项,提升性能
      _id:true,
      pic:true,
      title:true,
      buyer:true,
      price:true
    })
    .get()
    // console.log(data);
    this.setData({
      produces: data,
    })
  }
  shoeData() {
    let data1 = await dewuCollection
    .where({
      type: 1
    })
    .get()
    // console.log(data1.data);
    this.setData({
      shoes: data1.data
    })
  }
绑定详情页
  gotoDetail(e) {
    // console.log(e);
    wx.navigateTo({
      url: '/pages/buy_page/page/detail/detail?id='+e.currentTarget.dataset.id,
    })
  },
利用商品_id属性唯一,当设定数据项id等于_id时跳转到详情页且展示对应数据。
商品详情页
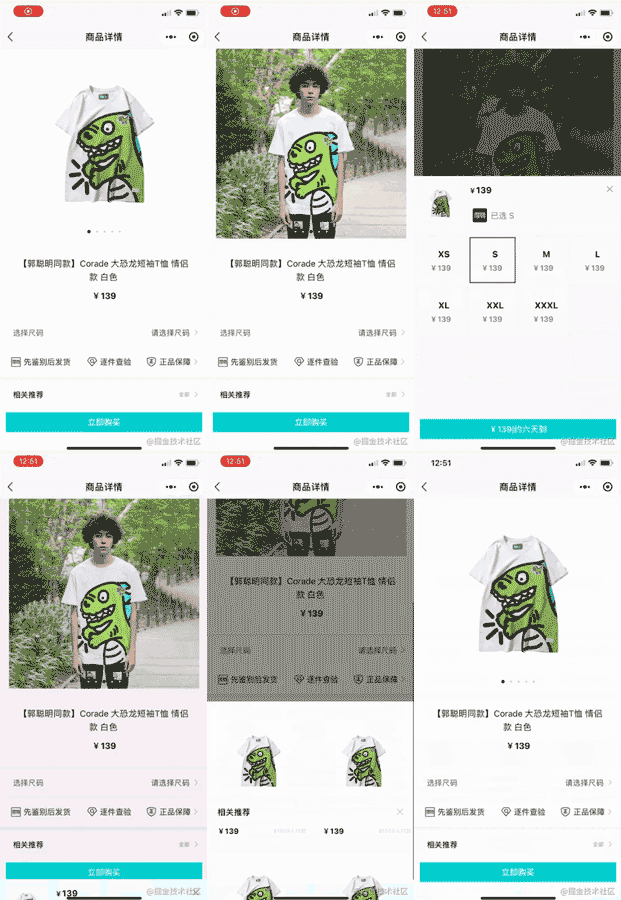
商品详情页样式

<view class="page">
<!-- 头部 滑块及标题 -->
<view class="detail_hd">
<swiper class="swiper__hd">
<swiper-item class="swiper_hd"></swiper-item>
</swiper>
<view class="dots1">
<view class="{{current==index?'active':''}}"></view>
</view>
<view class="detail_hd-title">{{img.digest}}</view>
<view class="detail_hd-price">
<text id="p2">¥{{img.price}}</text>
</view>
</view>
<van-cell class="size" bind:click="showPopup1">
<view class="size-l">选择尺码</view>
<view class="size-r">请选择尺码</view>
<image class="ricon" style="width:26rpx;height:26rpx;" ></image>
</van-cell>
<!-- flex布局 每一个swiper-item包含三项 -->
<view class="detail_bd">
<swiper></swiper></view>
<van-goods-action>
<button>立即购买</button>
</van-goods-action>
</view>整体分为detail_hd和detail_bd两部分。自定义swiper需设置dot对应展示图片并更改样式,circular属性设置是否启用滑块切换动画,这里使用三目运算符判断是否添加新的样式类名。在定义商品价格的样式的时候可以通过first-letter伪元素来定义¥符号样式。引用组件van-goods-action使得购买按钮吸底。

<van-popup closeable position="bottom" custom-  style="max-width:90%">
    <view class="detail_size-hd">
      <view class="detail_size-hd-img">
        <image bindtap="previewImage" mode="aspectFit" >
        </image>
      </view>
      <view class="detail_size-hd-price">
        <text style="font-size:25rpx;">¥</text>
        <text wx:if="{{activeSizeIndex==-1}}">--</text>
        <text wx:if="{{activeSizeIndex==index}}">{{item.price}}</text>
      </view>
      <view>
        <image src=""></image>
        <text wx:if="{{activeSizeIndex==-1}}">请选择商品</text>
        <text wx:if="{{activeSizeIndex==index}}">已选 {{item.size}}</text>
      </view>
    </view>
    <!-- 尺码布局 -->
    <view class="detail_size-bd">
      <van-grid square gutter="10">
        <van-grid-item>
          <view class="size">
            <text id="p3">{{item.size}}</text>
            <text id="p4">¥{{item.price}}</text>
          </view>
        </van-grid-item>
      </van-grid>
    </view>
    <view>
      <button>{{}}</button>
    </view>
</van-popup>使用van-popup组件,给对应标签设置事件即可绑定弹出。例:<van-cell bind:click="showPopup"></van-cell>。三目运算符设置默认样式并且控制选中边框样式,设置closeable属性启用关闭按钮。square设置van-grid-item为方形,gutter设置格子间距。
<van-sticky sticky offset-top="{{ 180 }}">
      <view class="head">
        <view class="detail_produce-hd">相关推荐</view>
        <view class="detail_close" bindtap="onClose2">
          <image style="width:40rpx;height:40rpx;" ></image>
        </view>
      </view>
</van-sticky>设置detail_produce-hd吸顶,给右侧关闭icon绑定bind:close="onClose"事件。
获取商品详情
  async onLoad(options) {  //获取对应_id的商品数据
    console.log(options);
    let id = options.id
    console.log(id);
    wx.cloud.database().collection('dewu')
    .doc(id)
    .get()
    .then(res => {
      console.log(res);
      this.setData({
       img :res.data
      })
    })
  },
弹出层
  showPopup() {   //显示弹出层
    this.setData({
      show: true,
    });
  },
  onClose() {     //关闭弹出层
    this.setData({
      show: false,
    });
  },
选择尺码
  pickSize(e) {
    let flag = e.currentTarget.dataset.flag
    let index = e.currentTarget.dataset.index
    if(flag==index) {
      this.setData({
        activeSizeIndex: -1,
        flag: -1
      })
    }
    else {
      this.setData({
        activeSizeIndex: index,
        flag: index
      })
    }
},点击尺码,flag==index即为选中状态,再次点击时或者点击其他尺码时设置为非选中状态,否则使flag等于index,使其变成选中状态。
搜索页

搜索页样式
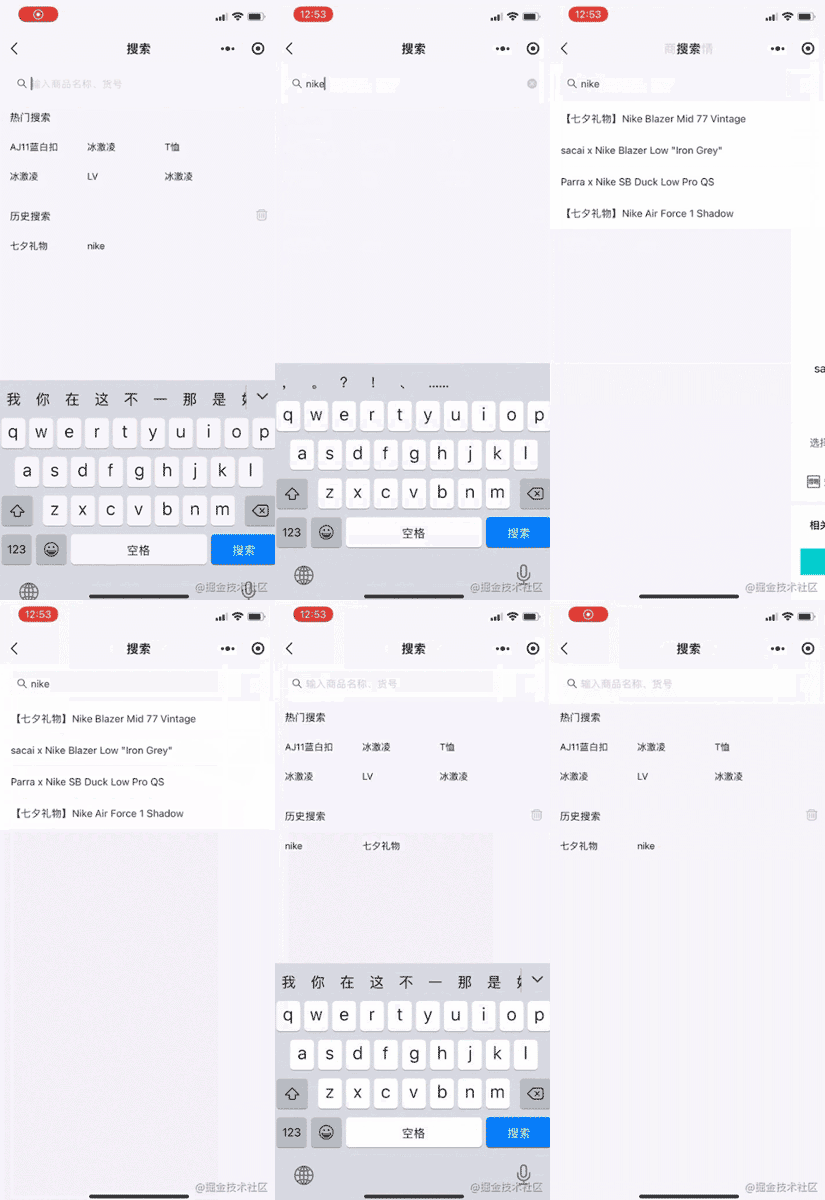
<view class="page">
  <view class="search">
    <van-stichy>
      <van-search value="{{value}}" bind:clear="onClear" placeholder="输入商品名称、货号"/>
    </van-stichy>

    <!-- block包装  flex布局 -->
    <block wx:if="{{showHistory == true && historyList.length > 0}}">
      <view class="historyContainer">
        <view class="title">历史搜索<image class="delete" ></image>
        </view>
        <view class="historyList">
          <view class="historyItem">
            <text class="order">{{}}</text>
          </view>
        </view>
      </view>
    </block>
  </view>
</view>搜索页面主要分为头部搜索框和内容(搜索推荐,历史记录和搜索到的商品列表)两部分。这里用van-sticky包装搜索框使吸顶,内容部分则用block标签包装,利用wx:if这个控制属性来判断是否显示。
搜索记录
  async onSearch(e) {
    // console.log(e);
    if (!e.detail.trim()) {
      wx.showToast({
        title: '请输入商品名',
      })
      return
    }
    let {value, historyList} = this.data
    if(historyList.indexOf(value) !== -1) {
      historyList.splice(historyList.indexOf(value), 1)
    }
    historyList.unshift(value)
    this.setData({
      historyList
    })
    wx.setStorageSync('value', historyList)
    let keyword = e.detail.trim()
    let results = await dewuCollection
      .where({
        title: db.RegExp({
          regexp: keyword,
          options: 'i'
        })
      })
      .get()
    if (results.data.length == 0 || keyword == '') {
      wx.showToast({
        title: '不存在'+keyword,
      })
    }
    else {
      await dewuCollection
      .where({
        title: db.RegExp({
          regexp: keyword,
          options: 'i'
        })
      })
      .orderBy('hot', 'desc')
      .get()
      .then(res => {
        console.log(res);
        this.setData({
          results: res.data
        })
      })
    }
  },
onLoad() {
    this.getSearchHistory()  //获取历史搜索
  },
getSearchHistory() {
    let historyList = wx.getStorageSync('value')
    if(historyList) {
      this.setData({
        historyList
      })
    }
},页面加载时从本地storage中获取历史搜索记录,在确定搜索onSearch时判断value是否为空,将合法value插入historyList中,这里使用的时unshift方法,这样可以保证最近的搜索记录展示在前面,利用正则表达式模糊查询数据库中符合的项存入数组results中,当results.length > 0时显示商品列表。利用wx.setStorageSync将value存入缓存,wx.getStorageSync获取打印出来。通过indexOf方法判断value是否已经存在,是则删除historyList中的该项。
历史搜索
  async historySearch(e) {
    // console.log(e);
    let historyList = this.data.historyList
    let value = historyList[e.currentTarget.dataset.index]
    this.setData({
      value,               //修改value
      showHotList: false,  //隐藏热门搜索
      showHistory: false,  //隐藏历史搜索
      results: []          //清空商品列表
    })
},点击历史搜索项时setData使对应值改变,再调用onSearch方法。
清空控件
  onClear() {
    this.setData({
      results: [],
      value: '',
      showHotList: true,
      showHistory: true
    });
  },
  onChange(e) {  //search框输入改变时实时修改数据
    // console.log(e.detail);
    this.setData({
      value: e.detail,
      showHotList: false,
      showHistory: false,
      results: []
    })
    // console.log(this.data.showHotList);
    if (this.data.value=='') {
      this.setData({
        showHotList: true,
        showHistory: true
      })
    }
  },
清空搜索历史
  deleteSearchHistory() {
    wx.showModal({
      content: '确认清空历史记录',
      success: (res) => {
        if(res.confirm) {
          this.setData({
            historyList: []
          })
        }
      }
    })
    wx.removeStorageSync('value')
},点击删除icon弹出对话框wx.showModal实现交互,用户点击确定则清空historyList并利用wx.removeStorageSync将本地存储的历史记录删除。
品牌分类页

分类页样式

<view class="page">
<van-sticky>
<view class="search" bindtap="gotoSearch">
<van-search placeholder="搜索商品" input-align="center" disabled />
</view>
</van-sticky>
<view class="kinds">
<view class="hd">
<scroll-view class="scroll-view-left">
<view class="scroll-view-left-item {{activeNavIndex == index?'active': ''}}">
<text>{{}}</text>
</view>
</scroll-view>
</view>
<view class="bd">
<scroll-view>
<view>
<view class="kind-title">
<van-divider contentPosition="center">{{}}</van-divider>
</view>
<van-grid>
<van-grid-item>{{}}</van-grid-item>
</van-grid>
</view>
</scroll-view>
</view>
</view>
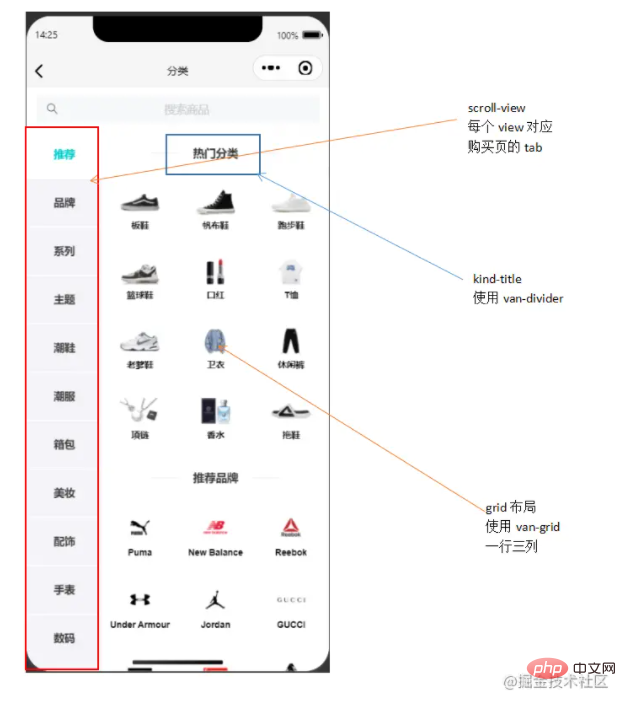
</view>分类页面主要是使用了scroll-view设置竖向滚动,点击左侧scroll-view-left-item时该项变为得物色(#00cbcc)并显示对应的品牌种类项kindsItem。整体采用flex布局,这里的坑是scroll-view-left应该把font-size设为0,在子元素scroll-view-left-item中设置font,避免块元素边距影响布局。
初始化品类
  onLoad: function (options) {
      this.setData({
        kindNav: kindNav,
        kindall: kindItem,
    // console.log(this.data.kindall);
    let kinds=[];
    // console.log(this.data.kindall)
    this.data.kindall.forEach(kind => { //循环从所有品类中获取对应kindNav的并存入数组中
      if(kind.camptype == 0) {
        kinds.push(kind)
      }
    })
    this.setData({
      kindItem: kinds,
    })
    }, )
  },
选择分类
  changeKinds(e) {
    console.log(e);
    let {index, type} = e.currentTarget.dataset;
    console.log(index, type);//index与推荐品牌的索引有关。type与kind.js的camptype有关
    this.setData({
      activeNavIndex: index,
    })
    let title=[]
    this.data.kindTitles.forEach(kindTitle => {
      if(index == kindTitle.titletype) {
        title.push(kindTitle)
      }
    })
    this.setData({
      kindItem: kinds,
    })
  },
绑定筛选页
  gotoAssem(e) {
    // console.log(e);  利用kind属性值唯一(buy页面tabs的title)
    wx.navigateTo({
      url: '/pages/buy_page/page/assem/assem?title='+e.currentTarget.dataset.title,
    })
  },
筛选排序页
排序页样式
<view class="page">
<van-sticky>
<view class="search" bindtap="gotoSearch">
<van-search placeholder="{{titles}}" disabled />
</view>
<view class="tab">
<view wx:for="{{tabs}}" wx:key="index" data-index="{{index}}"
class="tab-item {{activeTabIndex == index?'active': ''}}" bindtap="changeItem">
<text>{{item.title}}</text>
<image style="width:26rpx;height:26rpx;" src="{{item.pic}}"></image>
</view>
</view>
</van-sticky>
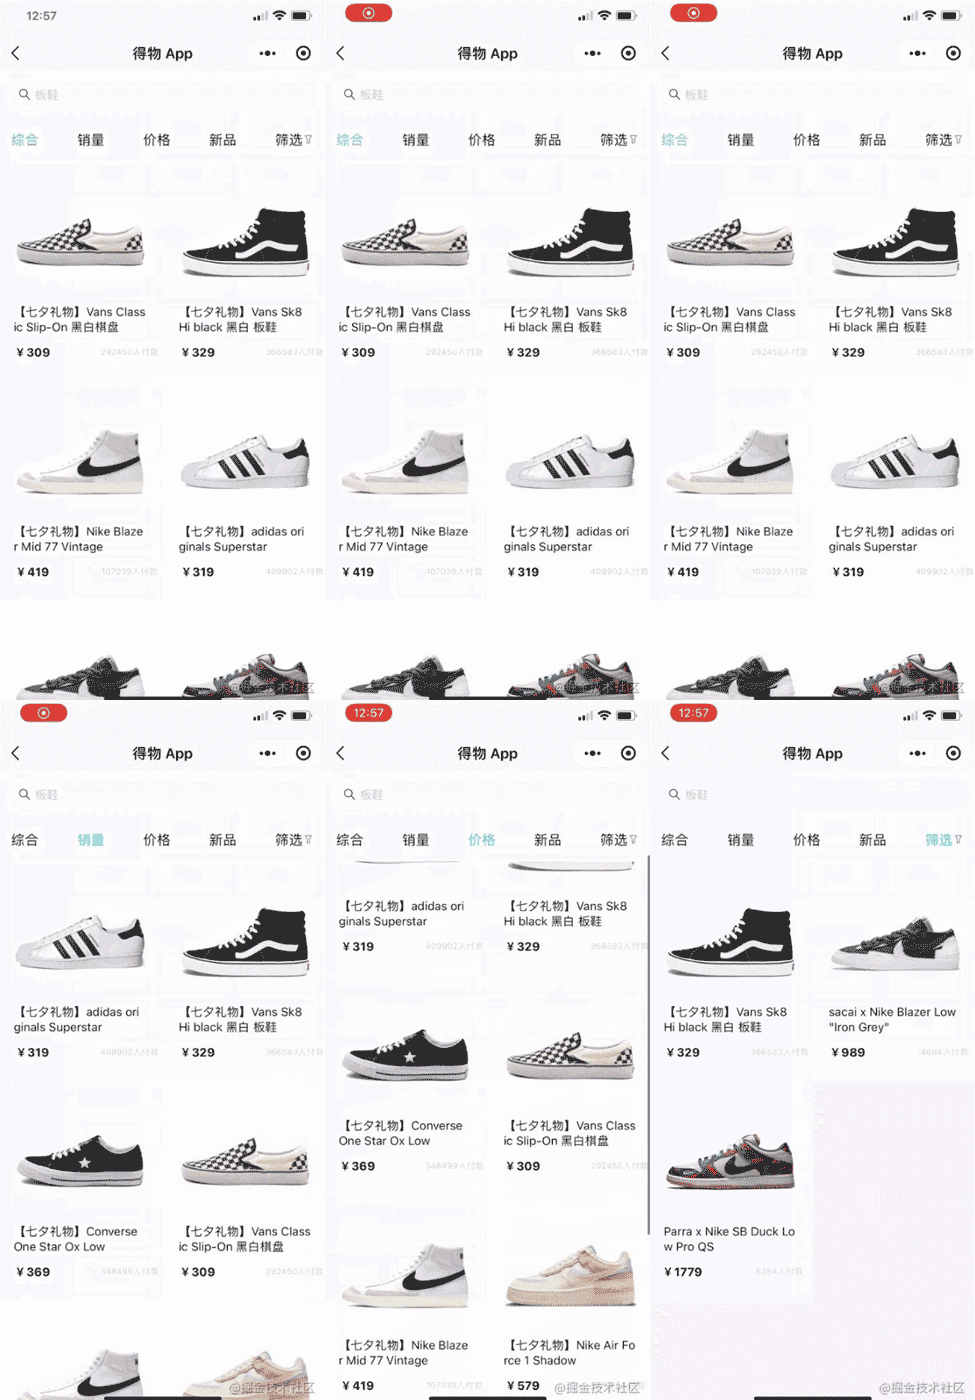
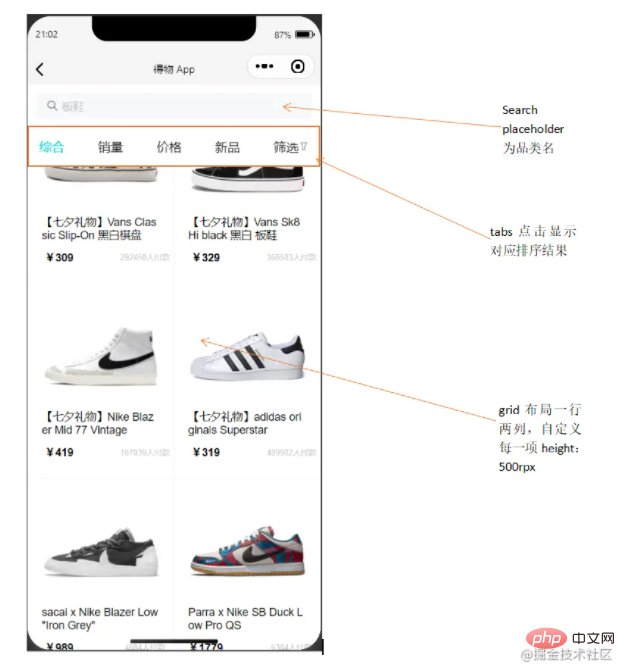
</view>tab使用flex布局。goods部分布局参照buy页面的商品布局。
<van-popup>
<scroll-view class="pop" scroll-y>
<van-collapse>
<van-collapse-item title="适用人群" value="全部" name="1">
</van-collapse-item>
<van-grid column-num="3" gutter="{{ 10 }}">
<van-grid-item class="{{activeIndex1==index?'active1':''}}">{{}}</van-grid-item>
</van-grid>
</van-collapse>
<van-goods-action>
<button>重置</button>
<button>确定</button>
</van-goods-action>
</scroll-view>
</van-popup>这里使用van-collapse组件做折叠面板时有个坑,不应该将van-grid内容部分放在van-collapse-item中,应与其同级,否则会在该单元格下形成留白且无法正常显示内容,多次尝试后还是放在外面方便实现效果。
初始商品排序
  async onLoad(options) {
    // console.log(options);
    let title = options.title
    let data1 = await dewuCollection
    .where({
      kind: title        //绑定跳转时(kind唯一)获取对应数据
    })
    .get()
    // console.log(data1);
    this.setData({
      goods: data1.data,
      titles: title
    })
  },
基本排序
  async changeItem(e) {
    // console.log(e);
    let index = e.currentTarget.dataset.index  //index对应排序方式
    this.setData({
      activeTabIndex: index
    })
    // console.log(index);
    if(index == 1) {                        //销量排序
    await dewuCollection
    .where({
      kind: this.data.titles
    })
    .orderBy('buyer', 'desc')
    .get()
    .then(res => {
      this.setData({
        goods: res.data,
        index: index
      })
      // console.log(this.data.index);
    })
    }
    if(index == 0) {                        //综合排序
      await dewuCollection
      .where({
        kind: this.data.titles
      })
      .get()
      .then(res => {
        this.setData({
          goods: res.data
        })
      })
    }
    if(index == 2 && this.data.flag == -1) {  //价格降序排序
      await dewuCollection
      .where({
        kind: this.data.titles
      })
      .orderBy('price', 'desc')
      .get()
      .then(res => {
        this.setData({
          goods: res.data,
          flag: 1
        })
      })
      return
    }
    if(index == 3) {                         //创建时间排序
      await dewuCollection
      .where({
        kind: this.data.titles
      })
      .orderBy('ctime', 'desc')
      .get()
      .then(res => {
        this.setData({
          goods: res.data
        })
      })
    }
    if(index == 4) {                         //弹出筛选层
      this.setData({
        show: true,
      })
    }
    else if(index == 2 && this.data.flag == 1) {    //价格升序排序
      await dewuCollection
      .where({
        kind: this.data.titles
      })
      .orderBy('price', 'asc')
      .get()
      .then(res => {
        this.setData({
          goods: res.data,
          flag: -1
        })
      })
    }
},设置一个flag属性默认值为-1,flag==-1时点击价格降序排序并设置flag==1,flag==1时点击价格升序排序并设置flag==-1。
筛选排序
  pick(e) {
    let flag = e.currentTarget.dataset.flag
    let index = e.currentTarget.dataset.index
    let cd = this.data.human[index].kind
    if(flag==index) {
      this.setData({
        activeIndex1: -1,
        flag1: -1,
        cd1: ''
      })
    }
    else {
      this.setData({
        activeIndex1: index,
        flag1: index,
        cd1: cd
      })
    }
  },
筛选重置
  replace() {    // 点击重置按钮将所有筛选条件回复默认
    this.setData({
      flag1: -1,
      activeIndex1: -1,
      flag2: -1,
      activeIndex2: -1,
      flag3: -1,
      activeIndex3: -1,
      cd1: '',
      cd2: '',
      cd3: 0,
      cd4: 10000000,
    })
},这里有一个坑是,不可在data中声明(num:Infinity),这里无穷大并不会生效,目前优化是声明为常量.
确认筛选
  async ischeck() {   //点击确定按钮进行筛选显示结果
    let cd3 = Number(this.data.cd3)
    let cd4 = Number(this.data.cd4)==0?1000000:Number(this.data.cd4)
    let index = Number(this.data.index)
    if(this.data.cd1!='' && this.data.cd2!=''){
      await dewuCollection
    .where({
      kind: this.data.titles,
      sex: this.data.cd1,
      brand: this.data.cd2,
      price: _.gt(cd3).and(_.lt(cd4)),
    })
    .get()
    .then(res => {
      this.setData({
        goods: res.data,
        show: false,
      })
    })
    return
    }
  },
难点排坑
<van-grid-item use-slot wx:for="{{shoes}}" data-item="{{item}}"
wx:key="index" data-id="{{item._id}}" bindtap="gotoDetail"></van-grid-item>
gotoDetail(e) {
// console.log(e);
wx.navigateTo({
url: '/pages/buy_page/page/detail/detail?id='+e.currentTarget.dataset.id,
})
},跳转到详情页且保留对应数据项。这里利用_id唯一,将每一项的_id赋给data-id,当id相等时才能跳转并接受对应_id的数据。
<van-grid-item class="{{activeSizeIndex==index?'size-active':''}}"
use-slot wx:for="{{size}}" wx:key="index" data-flag="{{flag}}"
data-index="{{index}}" bindtap="pickSize">
<view class="size">
<text id="p3">{{item.size}}</text>
<text id="p4">¥{{item.price}}</text>
</view>
</van-grid-item>
pickSize(e) {
let flag = e.currentTarget.dataset.flag
let index = e.currentTarget.dataset.index
if(flag==index) {
this.setData({
activeSizeIndex: -1,
flag: -1
})
}
else {
this.setData({
activeSizeIndex: index,
flag: index
})
}
},点击尺码时选中并更改text,再次点击该项则重置样式,若点击其他项则取消选中,选中被点击项。这里通过多设一个flag,结合index双重控制是否选中。
<view
wx:for="{{kindNav}}"
wx:key="index"
data-index="{{index}}"
data-type="{{item.type}}"
bindtap="changeKinds"
class="scroll-view-left-item {{activeNavIndex == index?'active': ''}}">
<text>{{item.text}}</text>
</view>
changeKinds(e) {
console.log(e);
let {index, type} = e.currentTarget.dataset;
console.log(index, type);//index与推荐品牌的索引有关。type与kind.js的camptype
this.setData({
activeNavIndex: index,
})
let kinds = []
this.data.kindall.forEach(kind => {
if(kind.camptype == type) {
kinds.push(kind)
}
})
this.setData({
kindItem: kinds,
})
}绑定type和kind.camptype,当点击项改变时,将当前项index赋给activeNavIndex,用kindall存储所有数据项,使用foreach循环遍历kindall,将满足条件kind.camptype==type的数据存入一个数组中kinds,再将setData即可。
  deleteSearchHistory() {
    wx.showModal({
      content: '确认清空历史记录',
      success: (res) => {
        if(res.confirm) {
          this.setData({
            historyList: []
          })
        }
      }
    })
    wx.removeStorageSync('value')
  },
清空历史记录时不仅将historyList设为空,且利用wx.removeStorageSync将本地存储的缓存清除。
小建议
在自己写项目时,多使用console.log()打印,跟进数据变化;多查看文档w3cschool,微信开发文档,Vant-Weapp。
소스 코드
이 프로젝트의 소스 코드: https://gitee.com/onepiece1205/dewu_weapp
결론
나에게 프로젝트를 작성하는 과정은 도전입니다. 처음 협업 프로젝트에 집중하다 보니 프로젝트에서 마주치는 버그 때문에 짜증이 나겠지만, 계속해서 글쓰기 기능을 수행하고 나니 프로젝트 작성 과정에서 도움을 준 선생님들과 반 친구들에게 정말 감사드립니다. 제 글이 마음에 드셨거나 도움이 되셨다면 좋아요를 눌러주세요! 동시에 기사를 읽은 후 몇 가지 제안을 해주실 수 있기를 바랍니다. WeChat 미니 프로그램에 대해 여러분과 토론하고 학습하기를 기대합니다!
더 많은 프로그래밍 관련 지식을 보려면 프로그래밍 소개를 방문하세요! !
위 내용은 Wu APP의 WeChat 애플릿을 모방하는 방법을 가르쳐주세요.의 상세 내용입니다. 자세한 내용은 PHP 중국어 웹사이트의 기타 관련 기사를 참조하세요!


