Html5 비디오 업로드 미리보기 이미지 비디오, 비디오의 특정 순간의 포스터 프레임 설정 및 미리보기
- 青灯夜游앞으로
- 2018-10-09 15:47:043094검색
이 글은 주로 HTML5 영상 업로드, 영상의 특정 순간의 포스터 프레임 설정 및 미리보기 관련 정보를 소개하고 있으니, 도움이 필요한 친구들에게 참고가 되었으면 좋겠습니다. 당신에게.
이 글에서는 미리보기 이미지 동영상을 업로드하고, 동영상의 특정 순간의 포스터 프레임을 설정 및 미리보기하여 모두와 공유할 수 있는 HTML5 동영상을 소개합니다.

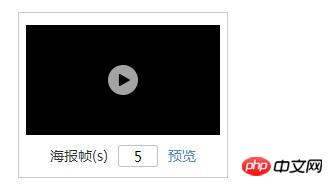
이미지 동영상을 업로드할 때. 요청을 충족할 때 비디오 디스플레이의 포스터 프레임을 동적으로 설정할 수 있습니다. 제가 가장 생각하고 싶은 것은 비디오를 구문 분석하고 Baidu에서 제작한 대부분의 프레임의 사진을 얻고 저장하는 방법입니다. 비디오를 재생하고 스크린샷을 클릭해야 하거나 php ffmpeg 확장자를 사용해야 하는 다음과 유사합니다. 이는 요구 사항과 일치하지 않고 약간 혼란스럽습니다. 그러다가 먼저 비디오 사진에 대한 미리 보기 기능을 만들었습니다. 그러다가 포스터 프레임 설정 아이디어를 바꿔서 영상 재생 시작 시간을 입력해서 설정하고, 자동 재생과 컨트롤 바를 취소해서 사용자가 보는 게 사진이 되도록
/*预览*/
$('.qtuploader__items').on('click', '[name="viewVideoPicBtn"]', function() {
var parent = $(this).closest('.qtab__page');
var video = $(this).closest('.qtuploader__itemsbd').find('video');
var srcStr = '', htmlStr = '';
if($(this).siblings('.qtuploader__picinputbox').hasClass('is-error')){
$.fn.toast({
'parentDom': parent,
'classes': 'isorange',
'top': '0',
'spacing': 0,
'toastContent': '请设置正确范围的海报帧',
'autoHide': 3000,
'position': {
'top': '5px',
'left': '50%'
}
});
return;
}
if (video.length > 0) {
var thumbHeight = setSize(video)[0];
var thumbWidth = setSize(video)[1];
srcStr = video.attr('src');
htmlStr = '<p class="qtuploader__view"><p class="qtuploader__mask"></p><p class="qtuploader__thumb" style="width:' + thumbWidth + 'px;height:' + thumbHeight + 'px;margin:0 auto;"><video controls width="' + thumbWidth + '" height="' + thumbHeight + '" src="' + srcStr + '">您的浏览器不支持 video 标签</video></p></p>';
}
parent.append(htmlStr);
parent.find('.qtuploader__view video')[0].currentTime = $(this).siblings('.qtuploader__picinputbox').find('.qtuploader__picinput').val();
parent.find('.qtuploader__view').fadeIn();
});
/*设置海报帧预览时间*/
$('.qtuploader__items').on('keyup', '.qtuploader__picinput', function() {
var parent = $(this).closest('.qtuploader__picinputbox');
var video = $(this).closest('.qtuploader__itemsbd').find('video');
var strVal = $.trim($(this).val());
console.log(strVal)
if (strVal == '') {
parent.addClass('is-error');
parent.find('.qverify__font').text('请设置海报帧');
} else if (!(/^[0-9]*$/.test(strVal))) {
parent.addClass('is-error');
parent.find('.qverify__font').text('请输入数字');
} else if (video.length > 0 && strVal > video[0].duration) {
parent.addClass('is-error');
parent.find('.qverify__font').text('不超过(' + video[0].duration + ')');
console.log('111---' + video[0].duration)
} else {
parent.removeClass('is-error');
parent.find('.qverify__font').text('请设置海报帧');
}
})
/*关闭预览*/
$(document).undelegate('.qtuploader__mask', 'click');
$(document).delegate('.qtuploader__mask', 'click', function() {
$(this).closest('.qtuploader__view').fadeOut('normal', function() {
$(this).closest('.qtuploader__view').remove();
})
})
/*设置预览大小*/
function setSize(element) {
var thumbWidth = 0, thumbHeight = 0, arr = [];
var winWidth = $(window).width(), winHeight = $(window).height();
var imgWidth = element.width(), imgHeight = element.height();
if (imgWidth > imgHeight) {
thumbHeight = parseInt(winHeight - 200);
thumbWidth = parseInt((1920 * thumbHeight) / 1080);
} else {
thumbHeight = parseInt(winHeight - 200);
thumbWidth = parseInt((1080 * thumbHeight) / 1920);
}
arr.push(thumbHeight, thumbWidth)
return arr;
}요약: 위 이 글의 전체 내용입니다. 모든 분들의 연구에 도움이 되기를 바랍니다. 더 많은 관련 튜토리얼을 보려면 Html5 비디오 튜토리얼을 방문하세요!
관련 권장 사항:
위 내용은 Html5 비디오 업로드 미리보기 이미지 비디오, 비디오의 특정 순간의 포스터 프레임 설정 및 미리보기의 상세 내용입니다. 자세한 내용은 PHP 중국어 웹사이트의 기타 관련 기사를 참조하세요!

