H5, 회전하는 3차원 루빅스 큐브 구현
- php中世界最好的语言원래의
- 2018-03-26 13:21:515260검색
이번에는 회전하는 3차원 루빅큐브를 구현하는 H5를 들고 와보겠습니다. 회전하는 3차원 루빅큐브를 구현하는 H5의 노트는 무엇일까요?
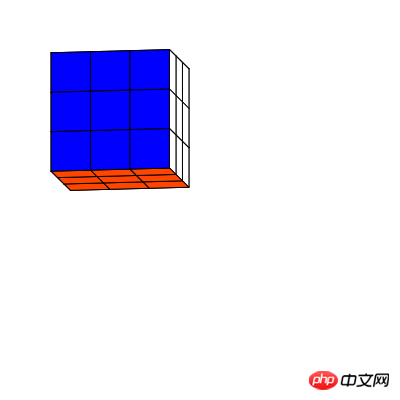
아래는 미리보기 화면입니다. 이제 각각의 작은 직사각형을 클래스로 캡슐화합니다. 우리가 지금 만들고 있는 것은 3D 루빅스 큐브이므로 각각의 작은 직사각형을 그리려면 작은 직사각형의 고정점 4개를 알아야 합니다. 회전 각도에 따라 변환되므로 이 네 개의 고정점의 좌표를 계산하려면 x축과 z축을 중심으로 한 루빅 큐브의 회전 각도를 알아야 합니다.
그래서 다음과 같이 직사각형 클래스를 만듭니다
function Rect(pointA,pointB,pointC,pointD,angleX,angleZ,color){
    base(this,LSprite,[]);
    this.pointZ=[(pointA[0]+pointB[0]+pointC[0]+pointD[0])/4,(pointA[1]+pointB[1]+pointC[1]+pointD[1])/4,(pointA[2]+pointB[2]+pointC[2]+pointD[2])/4];
    this.z = this.pointZ[2];
    this.pointA=pointA,this.pointB=pointB,this.pointC=pointC,this.pointD=pointD,this.angleX=angleX,this.angleZ=angleZ,this.color=color;
}

Rect.prototype.setAngle = function(a,b){
    this.angleX = a;
    this.angleZ = b;
    this.z=this.getPoint(this.pointZ)[2];
};
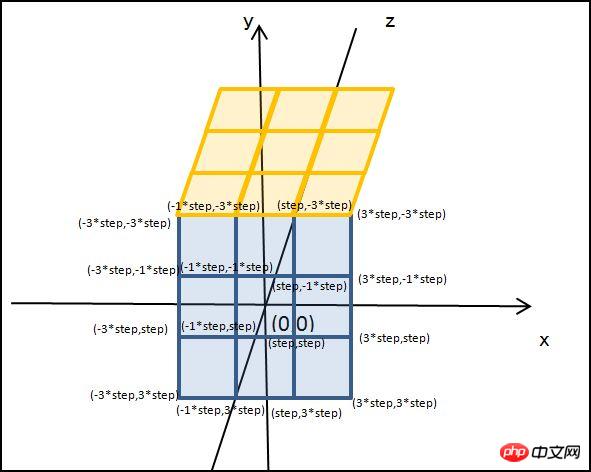
pointA, pointB, pointC, pointD는 작은 직사각형의 네 꼭지점이고 angleX, angleZ는 각각 x축과 z축의 회전 각도이고 색상은 작은 직사각형의 색상입니다. 루빅큐브는 6개의 면으로 나누어져 있습니다. 먼저 앞면을 살펴보겠습니다. 큐브의 중심을 3D 좌표계의 중심으로 사용하면 9개의 작은 직사각형의 고정점에 해당하는 좌표가 됩니다. 아래 그림과 같이
따라서 이전 표면의 9개의 작은 직사각형은 다음 코드로 생성될 수 있습니다for(var x=0;x<3;x++){
for(var y=0;y<3;y++){
z = 3;
var rect = new Rect([-3*step + x*2*step,-3*step + y*2*step,-3*step + z*2*step],[-step + x*2*step,-3*step + y*2*step,-3*step + z*2*step],[-step + x*2*step,-step + y*2*step,-3*step + z*2*step],[-3*step + x*2*step,-step + y*2*step,-3*step + z*2*step],0,0,"#FF0000");
backLayer.addChild(rect);
}
} 여기서 backLayer는 LSprite 클래스이고 step은 작은 직사각형의 절반 길이입니다. 같은 방법으로 다른 5개의 표면도 얻을 수 있습니다.
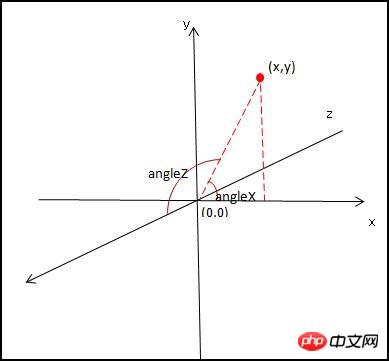
6개의 면이 모두 설정되었습니다. 이 6개의 면을 그리기 전에 먼저 회전 각도를 기준으로 각 고정점의 좌표를 계산해야 합니다. 아래 그림을 참조하세요.
위 그림에 따라 다음을 사용하세요. 공식 변환된 고정 소수점 좌표 가져오기Rect.prototype.getPoint = function(p){
var u2,v2,w2,u=p[0],v=p[1],w=p[2];
u2 = u * Math.cos(this.angleX) - v * Math.sin(this.angleX);
v2 = u * Math.sin(this.angleX) + v * Math.cos(this.angleX);
w2 = w;
u = u2; v = v2; w = w2;
u2 = u;
v2 = v * Math.cos(this.angleZ) - w * Math.sin(this.angleZ);
w2 = v * Math.sin(this.angleZ) + w * Math.cos(this.angleZ);
u = u2; v = v2; w = w2;
return [u2,v2,w2];
};마지막으로 작은 직사각형의 4개의 고정 소수점 좌표를 기반으로 직사각형을 그립니다.Rect.prototype.draw = function(layer){
this.graphics.clear();
this.graphics.drawVertices(1,"#000000",[this.getPoint(this.pointA),this.getPoint(this.pointB),this.getPoint(this.pointC),this.getPoint(this.pointD)],true,this.color);
}; 여기서 drawVertices는 lufylegend.js 라이브러리에 있는 LGraphics 클래스의 메서드입니다. 들어오는 고정 소수점 좌표 Array 를 기반으로 다각형을 그립니다.
마지막으로 코드가 매우 적고 총 91줄의 JS 코드가 제공됩니다.
One, index.html

<!DOCTYPE html> <html> <head> <meta charset="UTF-8"> <title>3D魔方</title> </head> <body> <p id="mylegend">loading……</p> <script type="text/javascript" src="../lufylegend-1.4.0.min.js"></script> <script type="text/javascript" src="./Main.js"></script> <script type="text/javascript" src="./Rect.js"></script> </body> </html>Two, Rect class
function Rect(pointA,pointB,pointC,pointD,angleX,angleZ,color){
base(this,LSprite,[]);
this.pointZ=[(pointA[0]+pointB[0]+pointC[0]+pointD[0])/4,(pointA[1]+pointB[1]+pointC[1]+pointD[1])/4,(pointA[2]+pointB[2]+pointC[2]+pointD[2])/4];
this.z = this.pointZ[2];
this.pointA=pointA,this.pointB=pointB,this.pointC=pointC,this.pointD=pointD,this.angleX=angleX,this.angleZ=angleZ,this.color=color;
}
Rect.prototype.draw = function(layer){
this.graphics.clear();
this.graphics.drawVertices(1,"#000000",[this.getPoint(this.pointA),this.getPoint(this.pointB),this.getPoint(this.pointC),this.getPoint(this.pointD)],true,this.color);
};
Rect.prototype.setAngle = function(a,b){
this.angleX = a;
this.angleZ = b;
this.z=this.getPoint(this.pointZ)[2];
};
Rect.prototype.getPoint = function(p){
var u2,v2,w2,u=p[0],v=p[1],w=p[2];
u2 = u * Math.cos(this.angleX) - v * Math.sin(this.angleX);
v2 = u * Math.sin(this.angleX) + v * Math.cos(this.angleX);
w2 = w;
u = u2; v = v2; w = w2;
u2 = u;
v2 = v * Math.cos(this.angleZ) - w * Math.sin(this.angleZ);
w2 = v * Math.sin(this.angleZ) + w * Math.cos(this.angleZ);
u = u2; v = v2; w = w2;
return [u2,v2,w2];
};
Three, Main.js
init(50,"mylegend",400,400,main);
var a = 0,b=0,backLayer,step = 20,key = null;
function main(){
backLayer = new LSprite();
addChild(backLayer);
backLayer.x = 120,backLayer.y = 120;
//后
for(var x=0;x<3;x++){
for(var y=0;y<3;y++){
z = 0;
var rect = new Rect([-3*step + x*2*step,-3*step + y*2*step,-3*step + z*2*step],[-step + x*2*step,-3*step + y*2*step,-3*step + z*2*step],[-step + x*2*step,-step + y*2*step,-3*step + z*2*step],[-3*step + x*2*step,-step + y*2*step,-3*step + z*2*step],0,0,"#FF4500");
backLayer.addChild(rect);
}
}
//前
for(var x=0;x<3;x++){
    for(var y=0;y<3;y++){
        z = 3;
        var rect = new Rect([-3*step + x*2*step,-3*step + y*2*step,-3*step + z*2*step],[-step + x*2*step,-3*step + y*2*step,-3*step + z*2*step],[-step + x*2*step,-step + y*2*step,-3*step + z*2*step],[-3*step + x*2*step,-step + y*2*step,-3*step + z*2*step],0,0,"#FF0000");
        backLayer.addChild(rect);
    }
}
//上
for(var x=0;x<3;x++){
for(var z=0;z<3;z++){
y = 0;
var rect = new Rect([-3*step + x*2*step,-3*step + y*2*step,-3*step + z*2*step],[-step + x*2*step,-3*step + y*2*step,-3*step + z*2*step],[-step + x*2*step,-3*step + y*2*step,-step + z*2*step],[-3*step + x*2*step,-3*step + y*2*step,-step + z*2*step],0,0,"#FFFFFF");
backLayer.addChild(rect);
}
}
//下
for(var x=0;x<3;x++){
for(var z=0;z<3;z++){
y = 3;
var rect = new Rect([-3*step + x*2*step,-3*step + y*2*step,-3*step + z*2*step],[-step + x*2*step,-3*step + y*2*step,-3*step + z*2*step],[-step + x*2*step,-3*step + y*2*step,-step + z*2*step],[-3*step + x*2*step,-3*step + y*2*step,-step + z*2*step],0,0,"#FFFF00");
backLayer.addChild(rect);
}
}
//左
for(var y=0;y<3;y++){
for(var z=0;z<3;z++){
x = 0;
var rect = new Rect([-3*step + x*2*step,-3*step + y*2*step,-3*step + z*2*step],[-3*step + x*2*step,-3*step + y*2*step,-step + z*2*step],[-3*step + x*2*step,-step + y*2*step,-step + z*2*step],[-3*step + x*2*step,-step + y*2*step,-3*step + z*2*step],0,0,"#008000");
backLayer.addChild(rect);
}
}
//右
for(var y=0;y<3;y++){
for(var z=0;z<3;z++){
x = 3;
var rect = new Rect([-3*step + x*2*step,-3*step + y*2*step,-3*step + z*2*step],[-3*step + x*2*step,-3*step + y*2*step,-step + z*2*step],[-3*step + x*2*step,-step + y*2*step,-step + z*2*step],[-3*step + x*2*step,-step + y*2*step,-3*step + z*2*step],0,0,"#0000FF");
backLayer.addChild(rect);
}
}
backLayer.addEventListener(LEvent.ENTER_FRAME,onframe);
}
function onframe(){
a += 0.1 , b += 0.1;
backLayer.childList = backLayer.childList.sort(function(a,b){return a.z - b.z;});
for(key in backLayer.childList){
backLayer.childList[key].setAngle(a,b);
backLayer.childList[key].draw(backLayer);
}
}
여기서 사례를 읽으신 후 방법을 마스터하셨으리라 믿습니다. 기사, 더보기 PHP 중국어 웹사이트의 다른 관련 기사도 주목해주세요! 추천 도서: spring mvc+localResizeIMG는 H5 이미지 압축 및 업로드를 구현합니다
캔버스 드로잉 API 사용에 대한 자세한 설명위 내용은 H5, 회전하는 3차원 루빅스 큐브 구현의 상세 내용입니다. 자세한 내용은 PHP 중국어 웹사이트의 기타 관련 기사를 참조하세요!

