Html5 블라인드 effect_html5 튜토리얼 팁의 샘플 코드
- 韦小宝원래의
- 2017-12-16 10:42:203043검색
이 글에서는 주로 HTML5 블라인드 효과의 샘플 코드를 소개합니다. 편집자는 이것이 꽤 좋다고 생각합니다. 이제 HTML5 소스 코드와 설명을 공유하고 참고 자료도 제공하겠습니다. HTML5에 관심 있는 친구들은 에디터를 따라가 보세요
이 글에서는 Html5 블라인드 효과의 샘플 코드를 소개하고 모두와 공유합니다. 자세한 내용은 다음과 같습니다.
구현 방법 소개:
1 .블라인드 레이아웃에 위치 지정(위치: 절대)을 사용하면 콘텐츠 레이아웃이 오버레이되고 배경은 투명(배경색: 투명)으로 설정됩니다
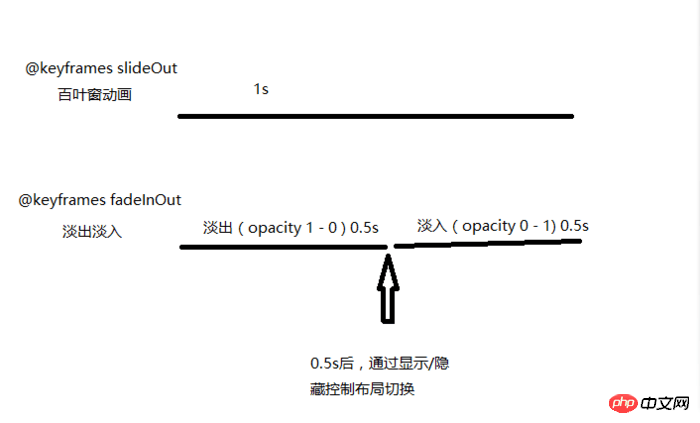
2. 키프레임은 페이드 인 및 페이드 아웃(투명도 변경)과 블라인드 창을 정의합니다. 효과 애니메이션.
3. DOM의 className 속성을 설정하여 애니메이션을 시작합니다. animator.className = 'baiyeWindow'; 애니메이션 완료 이벤트 'animationend'를 수신하고 className 속성을 지웁니다.
4. 콘텐츠 레이아웃 전환 시 시작 애니메이션 메서드를 호출하세요. 두 레이아웃 모두 전환 이벤트 ng-click="switchLayout()"
5. 애니메이션 실행 타이밍 다이어그램:

html 코드 :
<!--要显示百叶窗效果的布局--切换内容-->
<p id="fadeInOut" class="content"  ng-click="switchLayout()">
...
</p>
<!--百叶窗布局-->
 <ul id="baiyeWindow"  ng-click="switchLayout()">
       <li><p class="ye"></p></li>
        <li><p class="ye"></p></li>
        <li><p class="ye"></p></li>
        <li><p class="ye"></p></li>
  </ul>
css 스타일 코드:
  //谈入谈出效果
 .fade-animation{
        @-webkit-keyframes fadeInOut {
          0% {
            opacity: 1;
          }
          50% {
            opacity: 0;
          }
          100% {
            opacity: 1;
          }
        }
    @keyframes fadeInOut {
          0% {
            opacity: 1;
          }
          50% {
            opacity: 0;
          }
          100% {
            opacity: 1;
          }
        }
        animation: fadeInOut 1s ease-in;
        -webkit-animation: fadeInOut 1s ease-in;
      }
      //百叶窗效果
      .baiyeWindow{
        width: 100%;
        height: 1.68rem;
        position: absolute;
        left: 0;
        top: 1.2rem;
        li{
          height: 0.42rem;
          line-height: 40px;
          overflow: hidden;
          background-color: transparent;
          .ye{
            -webkit-animation: slideOut 1s ease-in-out;
            animation: slideOut 1s ease-in-out;
            width: 100%;
            background-color: rgba(0,0,0,.2);
            position: relative;
            top: 50%;
          }
        }
        @-webkit-keyframes slideOut {
          0% {
            padding-bottom: 0;
            top: 50%;
          }
          100% {
            padding-bottom: 40px;
            top: 0;
          }
        }
        @keyframes slideOut {
          0% {
            padding-bottom: 0;
            top: 50%;
          }
          100% {
            padding-bottom: 40px;
            top: 0;
          }
        }
      }
JS 코드:
//切换布局
$scope.switchLayout = function(){
    ...
    $scope.startBaiYeWindow();
    //启动动画0.5s后,控制布局显示/隐藏
    $timeout(function () {
             if ($scope.show) {
                  $scope.show = false;
              } else {
                    ....
              }
     }, 500);
 }
//启动动画
        $scope.startBaiYeWindow = function () {
            var animator = document.getElementById('baiyeWindow');
            var animatorFadeInOut = document.getElementById('fadeInOut');
            animator.addEventListener('animationend', function () {
                animator.className = '';
                animatorFadeInOut.className = 'content';
            });
            $timeout(function () {
                animator.className = 'baiyeWindow';
                animatorFadeInOut.className = 'content fade-animation';
            }, 0);
        };
위 내용은 전체 이 글의 내용이 그랬으면 좋겠습니다 모든 분들의 학습에 도움이 되기를 바라며, 또한 모든 분들이 PHP 중국어 웹사이트를 응원해 주시길 바랍니다.
관련 권장 사항:
모바일 HTML5에서 가로 및 세로 화면을 판단하는 방법
HTML5 단일 페이지 제스처 슬라이딩 화면 전환 원리 분석
위 내용은 Html5 블라인드 effect_html5 튜토리얼 팁의 샘플 코드의 상세 내용입니다. 자세한 내용은 PHP 중국어 웹사이트의 기타 관련 기사를 참조하세요!

