Maison >interface Web >js tutoriel >Comment installer et gérer plusieurs versions de node ? Présentation de la méthode
Comment installer et gérer plusieurs versions de node ? Présentation de la méthode
- 青灯夜游avant
- 2022-06-24 10:37:485524parcourir
Comment installer et gérer plusieurs versions de node ? L'article suivant vous présentera les opérations détaillées d'installation et de changement de plusieurs versions de node. J'espère qu'il vous sera utile !

La raison de l'installation de plusieurs versions de nœud :
Pendant le processus de développement du projet, différents projets utilisent différentes versions de nodejs Parfois, des erreurs sont signalées car la version du nœud est trop élevée ou trop basse ; comment installer le même nœud sur le même nœud ? Il existe deux façons d'installer plusieurs versions de nœud dans le système. Regardez en bas et choisissez la manière qui vous convient
Méthode 1 : utiliser nvm pour la gestion
Introduction à NVM
NVM signifie Node Version Manager. C'est un outil de gestion des versions NodeJS.
NVM ne prend en charge que l'approche Linux et OS NodeJS.
- Instructions avant l'installation :
Si vous avez déjà un environnement de nœud, vous devez le désinstaller Si après l'installation du nœud, entrez
nvm use <num de version></num>, il ne fonctionne toujours pas (le noeud ("*" n'est pas sélectionné devant la version), il faut le réinstallerNe pas avoir de caractères chinois ni d'espaces dans le chemin d'installation, sinon une erreur se produira

- Désinstaller le nodeJS installé
-
nvm use,仍无效(node版本前面都没有选中的"*"),需重新安装 - 安装路径上不要有中文字符或者空格,否则会出现错误

卸载已安装的nodeJS
1、点击开始菜单,找到nodejs的文件夹,点击箭头处,进行卸载(注意:进行此操作之前需结束使用nodejs的项目)
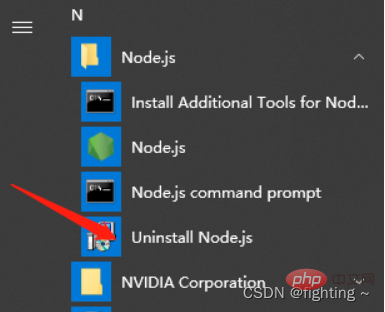
2、检测系统中是否还存在nodejs
(1) 在开始菜单中进行查看
(2) 在cmd窗口中输入 node -v 进行查看
nvm 的安装与使用
nvm下载
安装包下载地址: https://github.com/coreybutler/nvm-windows/releases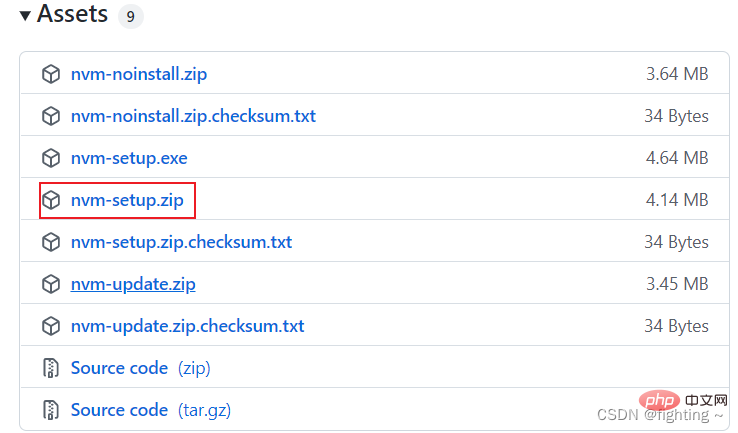
注意:安装环境 win10系统,64位
nvm安装(注:最好不要装在C盘)
(1)在指定的文件下新建两个文件夹,一个用来存放nvm的安装文件,另一个用来存放node的文件
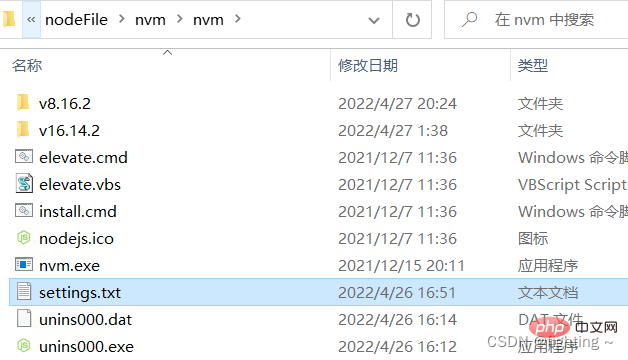
(2)将下载好的安装包放入nvm文件夹中,解压,进行安装。
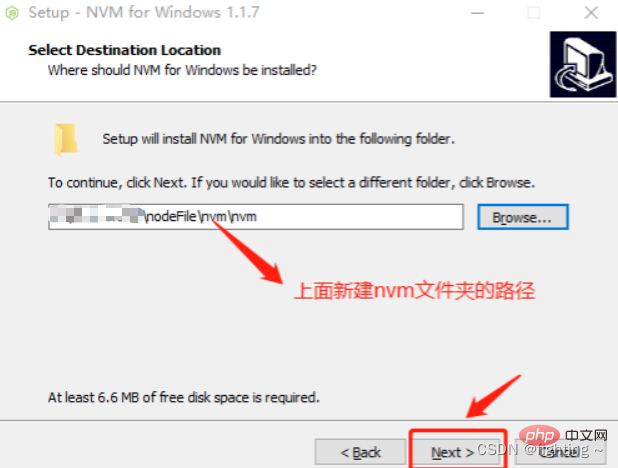
注意:安装时选择开始新建的文件夹作为指定安装目录
(3)选择nvm安装路径,点击下一步
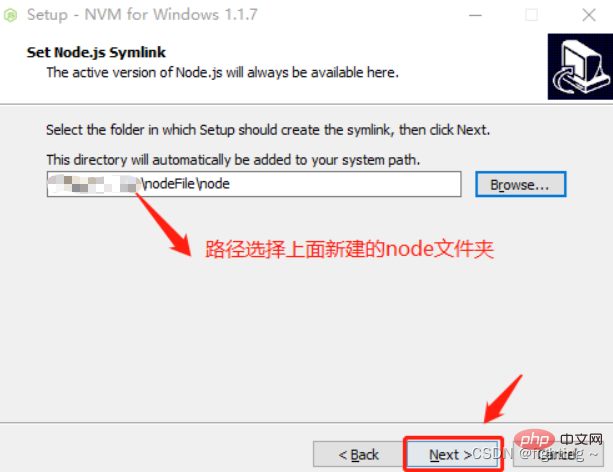
(4)选择nodejs路径
(5)点击 Install——>点击 Finish,安装完成。
(6)确认是否安装成功
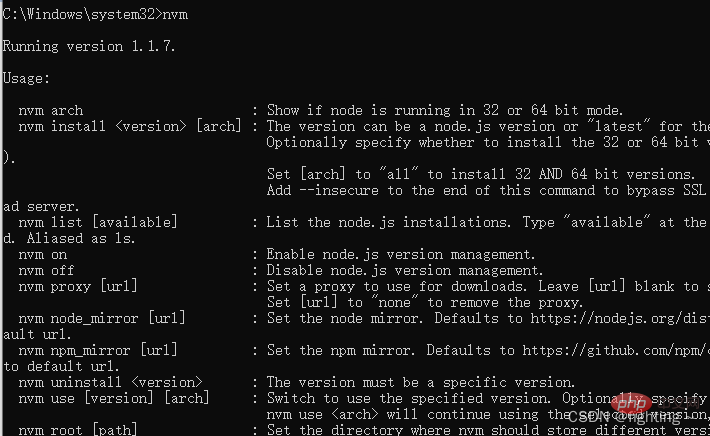
打开CMD,输入命令nvm命令,安装成功则如下显示
(7)到此nvm已经安装成功
如果有安装淘宝镜像的需完成下载镜像的配置,没有可跳过
打开nvm文件夹下的settings.txt文件,在最后添加以下代码(不改,下载node可能会报错)
arch: 64proxy:
node_mirror: https://npm.taobao.org/mirrors/node/
npm_mirror: https://npm.taobao.org/mirrors/npm/
注:
arch:Windows 操作系统位数
proxy:代理,淘宝 NodeJS 镜像和 NPM 镜像
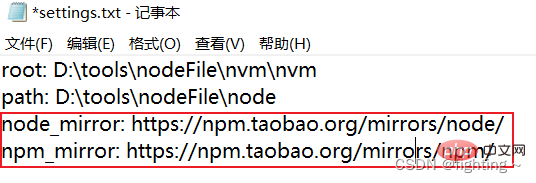
注:
root:NVM 安装路径
path:NodeJS 快捷方式路径
node 的不同版本安装及切换
1、NVM 安装成功后,win + r 输入cmd 新开cmd窗口,可以通过 nvm -v
 🎜🎜2. Vérifiez si nodejs existe toujours dans le système🎜🎜(1) Enregistrez-vous le menu Démarrer🎜🎜(2) Dans la fenêtre cmd, entrez
 node -v pour voir l'installation et l'utilisation de 🎜🎜🎜nvm🎜🎜🎜🎜🎜🎜nvm download🎜🎜🎜🎜🎜Téléchargement du package d'installation adresse : https://github.com/coreybutler/nvm -windows/releases🎜 🎜🎜🎜Remarque🎜 : Environnement d'installation du système
 win10, 64 bits 🎜🎜🎜🎜🎜installation nvm🎜 (Remarque : il est préférable de ne pas installer sur le lecteur C)🎜 (1) Créez deux nouveaux dossiers sous le fichier spécifié, un pour stocker les fichiers d'installation nvm et l'autre pour stocker les fichiers de nœuds🎜 🎜 (2) Placez le package d'installation téléchargé dans le dossier nvm, décompressez-le et installez-le. 🎜 Remarque : lors de l'installation, sélectionnez le dossier nouvellement créé comme répertoire d'installation désigné 🎜
 🎜 (3) Sélectionnez le chemin d'installation de NVM et cliquez sur Suivant🎜
 🎜 (4) Sélectionnez le chemin nodejs🎜
 🎜 (5) Cliquez sur Installer——> Cliquez sur Terminer pour terminer l'installation. 🎜 (6) Confirmez si l'installation a réussi🎜 Ouvrez CMD et entrez la commande
 nvm Si l'installation réussit, elle s'affichera comme suit🎜 🎜 (7) À ce stade, nvm a été installé avec succès🎜Si vous avez une image Taobao installée, vous devez terminer la configuration de l'image téléchargée, non Peut être ignoré🎜 Ouvrez le fichier settings.txt dans le dossier nvm et ajoutez le code suivant à la fin (si vous ne modifiez pas cela, une erreur peut être signalée lors du téléchargement du nœud) 🎜
 🎜🎜🎜
🎜🎜🎜C:\>nvm -v Running version 1.1.7. Usage: nvm arch : Show if node is running in 32 or 64 bit mode. nvm install <version> [arch] : The version can be a node.js version or "latest" for the latest stable version. Optionally specify whether to install the 32 or 64 bit version (defaults to system arch). Set [arch] to "all" to install 32 AND 64 bit versions. Add --insecure to the end of this command to bypass SSL validation of the remote download server. nvm list [available] : List the node.js installations. Type "available" at the end to see what can be installed. Aliased as ls. nvm on : Enable node.js version management. nvm off : Disable node.js version management. nvm proxy [url] : Set a proxy to use for downloads. Leave [url] blank to see the current proxy. Set [url] to "none" to remove the proxy. nvm node_mirror [url] : Set the node mirror. Defaults to https://nodejs.org/dist/. Leave [url] blank to use default url. nvm npm_mirror [url] : Set the npm mirror. Defaults to https://github.com/npm/cli/archive/. Leave [url] blank to default url. nvm uninstall <version> : The version must be a specific version. nvm use [version] [arch] : Switch to use the specified version. Optionally specify 32/64bit architecture. nvm use <arch> will continue using the selected version, but switch to 32/64 bit mode. nvm root [path] : Set the directory where nvm should store different versions of node.js. If <path> is not set, the current root will be displayed. nvm version : Displays the current running version of nvm for Windows. Aliased as v.</path></arch></version></version>🎜Remarque : 🎜
🎜arch : numéro de bit du système d'exploitation Windows 🎜 proxy : proxy, miroir Taobao NodeJS et miroir NPM🎜🎜
 🎜 Remarque : 🎜
🎜racine : chemin d'installation de NVM🎜 chemin : chemin de raccourci NodeJS🎜🎜Installation et changement de différentes versions de node🎜🎜1. Une fois l'installation de NVM réussie, win + r Entrez cmd pour ouvrir une nouvelle fenêtre cmd. Vous pouvez afficher toutes les commandes disponibles via
nvm -v<.> commande. 🎜<pre class="brush:php;toolbar:false">C:\>nvm -v
Running version 1.1.7.
Usage:
nvm arch : Show if node is running in 32 or 64 bit mode.
nvm install <version> [arch] : The version can be a node.js version or "latest" for the latest stable version.
Optionally specify whether to install the 32 or 64 bit version (defaults to system arch).
Set [arch] to "all" to install 32 AND 64 bit versions.
Add --insecure to the end of this command to bypass SSL validation of the remote download server.
nvm list [available] : List the node.js installations. Type "available" at the end to see what can be installed. Aliased as ls.
nvm on : Enable node.js version management.
nvm off : Disable node.js version management.
nvm proxy [url] : Set a proxy to use for downloads. Leave [url] blank to see the current proxy.
Set [url] to "none" to remove the proxy.
nvm node_mirror [url] : Set the node mirror. Defaults to https://nodejs.org/dist/. Leave [url] blank to use default url.
nvm npm_mirror [url] : Set the npm mirror. Defaults to https://github.com/npm/cli/archive/. Leave [url] blank to default url.
nvm uninstall <version> : The version must be a specific version.
nvm use [version] [arch] : Switch to use the specified version. Optionally specify 32/64bit architecture.
nvm use <arch> will continue using the selected version, but switch to 32/64 bit mode.
nvm root [path] : Set the directory where nvm should store different versions of node.js.
If <path> is not set, the current root will be displayed.
nvm version : Displays the current running version of nvm for Windows. Aliased as v.</path></arch></version></version></pre>
<p>2、使用 <code>nvm install 命令安装指定版本的NodeJSC:\>nvm install v8.16.2 Downloading node.js version 8.16.2 (64-bit)... Complete Downloading npm version 6.4.1... Complete Installing npm v6.4.1... Installation complete. If you want to use this version, type nvm use 8.16.2
3、安装成功后在 NVM 安装目录下出现一个 v8.16.2 文件夹,使用 nvm list 命令查看已安装 NodeJS 列表。
C:\>nvm list

     8.16.2
4、再次使用 nvm install 命令安装另一版本的 NodeJS
C:\>nvm install v12.8.0
Downloading node.js version 12.8.0 (64-bit)...
Complete
Creating C:\Dev\nvm\temp

Downloading npm version 6.10.2... Complete
Installing npm v6.10.2...

Installation complete. If you want to use this version, type

nvm use 12.8.0
5、使用nvm use 切换需要使用的 NodeJS 版本,切换成功后可以使用 node -v 和 npm -v 命令查看是否切换成功。
C:\>nvm use v8.16.2
Now using node v8.16.2 (64-bit)

C:\>node -v
v8.16.2

C:\>npm -v
6.4.1
这里需注意使用nvm use 时可能出现乱码的情况
C:\>nvm use v8.16.2
exit status 1: ��û���㹻��Ȩ��ִ�д˲�����
不要慌张,不要生气,这时候用重新打开一个以管理员身份运行cmd窗口就不会出现乱码的情况,使用nvm use 切换需要使用的 NodeJS 版本,使用nvm ls 查看所有安装的node版本,版本号前面带有*号的表示当前使用的NodeJS版本。
C:\Windows\system32>nvm use v8.16.2
Now using node v8.16.2 (64-bit)

C:\Windows\system32>nvm ls
    12.8.0
  * 8.16.2 (Currently using 64-bit executable)
6、这里是一些常用命令汇总:
nvm off                     // 禁用node.js版本管理(不卸载任何东西)
nvm on                      // 启用node.js版本管理
nvm install <version>       // 安装node.js的命名 version是版本号 例如:nvm install 8.12.0
nvm uninstall <version>     // 卸载node.js是的命令,卸载指定版本的nodejs,当安装失败时卸载使用
nvm ls                      // 显示所有安装的node.js版本
nvm list available          // 显示可以安装的所有node.js的版本
nvm use <version>           // 切换到使用指定的nodejs版本
nvm v                       // 显示nvm版本
nvm install stable          // 安装最新稳定版</version></version></version>
方法二:通过配置环境变量(切换node时只需更改文件夹名称)
安装node及注意事项
1、同样,如果之前有安装过node,为了避免不必要的麻烦,将其先卸载掉
注意:安装多个版本的node的时候一定要从低版本开始安装,如果你先安装高版本的话会出现许多问题,如果你已经安装啦,先卸载掉然后进行下面的步骤
2、在安装node之前,我先选择一个node安装目录,我要安装到D盘下,所以我在D盘中新建了一个NODE的目录,并且在里面创建了一个nodejs8的文件夹,因为我一会要在这个文件夹中安装8.16.2版本的node

3、开始安装
node版本可以去node中文网或者点击这里下载https://nodejs.org/
打开下载好的node8.16.2的安装包,一直点击下一步,直到出现安装路径,将安装路径切换为我们上面新建的nodejs8文件夹路径:D:\tools\NODE\nodejs8,然后一路下一步,直到安装成功
配置环境变量
在开始搜索框搜环境变量,注意这里选择编辑系统环境变量—>高级—>环境变量
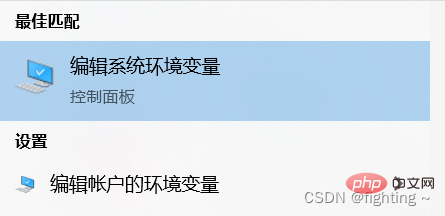
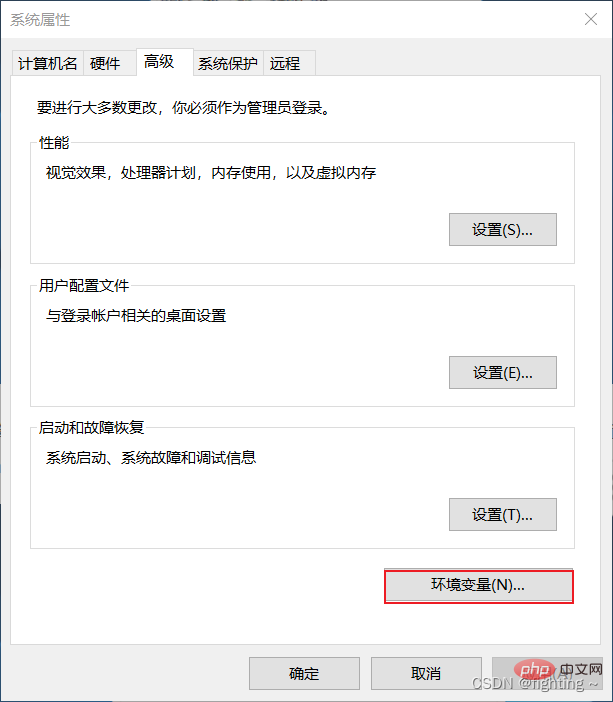
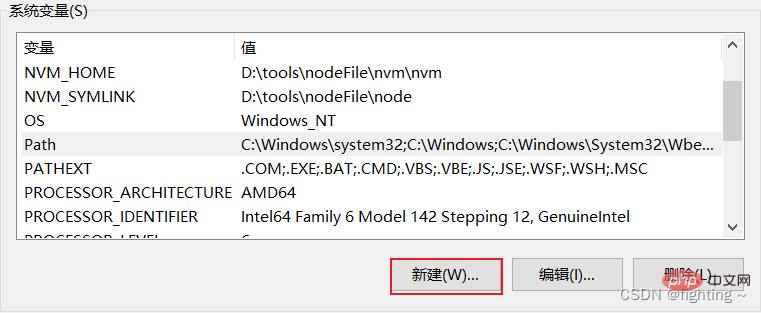
在系统变量中点击新建,变量名:nodejs,变量值:D:\tools\NODE\nodejs(即上面存放node的文件夹,这里先去掉nodejs8后面的8)

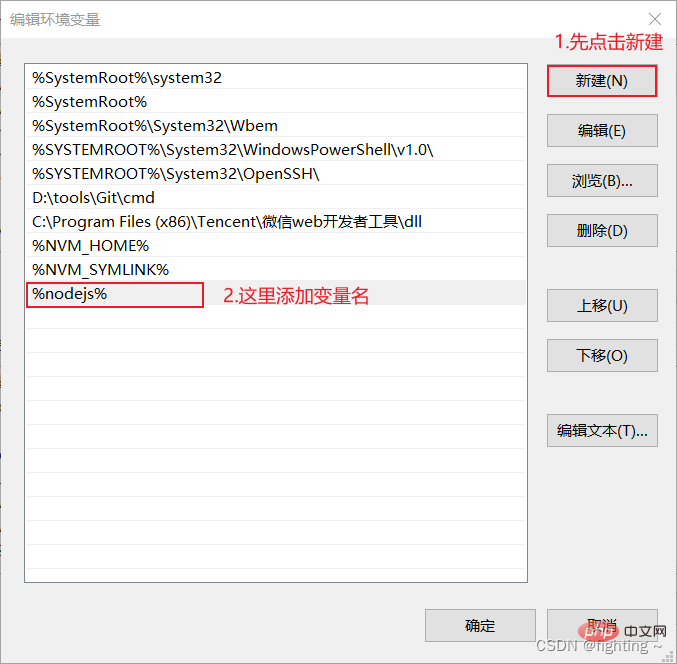
点击确定后再系统变量中找到path 变量,选中后点击编辑,然后点击新建,将上面新建系统变量的变量名以%变量名%的形式加入,点击确定
这时候还不行,最关键的一点是:我们需要将一开始建的文件夹nodejs8重命名为nodejs
值得注意的是:这里将nodejs8重命名的一方面是为了与上面配置的环境变量中的变量名匹配(即使用此版本node),另一方面是为了更好的安装下一个版本(因为在安装完一个node版本之后如果文件名不修改的话,后面再安装其他版本的node时无论你安装到什么地方,都会把之前的那个覆盖掉)

检查并安装多版本
1、检查
重名名之后,然后win+R—>cmd,在命令窗口输入node -v查看node 版本,出现版本号说明第一个node版本安装成功
C:\>node -v
v8.16.2
2、安装下一个版本
由于上面已经将安装的node8.16.2版本的文件名重命名(防止覆盖),这时我们只需在同级目录下新建一个文件夹nodejs12,安装node12.8.0版本的node(方法同上面安装node8.16.2)
node版本切换
重点来了,在安装了多个版本的node的之后,在我们需要切换版本的时候,只需要将对应版本的文件夹重命名为nodejs即可
例如:我们先装了node8.16.2版本的(放在nodejs文件夹下)和node12.8.0版本的(放在nodejs12文件夹下),现在使用的node是8.16.2,那么要想切换至node12.8.0版本的node,只需更改文件名,将nodejs重命名为nodejs8,再将nodejs12重命名为nodejs即可,换句话说就是用哪个版本的node就将哪个版本的node文件夹重命名为nodejs
此时在打开命令行窗口,输入node -v检查node版本
C:\>node -v
v12.8.0
小伙伴儿们你们习惯使用哪个种方式呢?两种方式你们都学废了吗!评论区一起讨论一下吧!
更多node相关知识,请访问:nodejs 教程!
Ce qui précède est le contenu détaillé de. pour plus d'informations, suivez d'autres articles connexes sur le site Web de PHP en chinois!
Articles Liés
Voir plus- Que sont les ressources asynchrones ? Une brève analyse de la méthode Node pour réaliser le partage de contexte de ressources asynchrone
- Qu'est-ce qu'une file d'attente de messages ? Comment utiliser la file d'attente de messages dans le nœud ?
- Node développement pratique d'un outil de ligne de commande mycli
- Vous guidez étape par étape pour développer un outil de compression en ligne de commande à l'aide de node
- Parlons des fonctions d'outils courantes dans le module de chemin Node.js


