Maison >interface Web >js tutoriel >Une brève discussion sur l'utilisation d'angular9+echarts pour dessiner des cartes 3D
Une brève discussion sur l'utilisation d'angular9+echarts pour dessiner des cartes 3D
- 青灯夜游avant
- 2021-03-25 11:37:252579parcourir
Cet article partagera avec vous l'utilisation des echarts en angulaire et présentera la méthode de dessin de cartes 3D. Il a une certaine valeur de référence. Les amis dans le besoin peuvent s'y référer. J'espère qu'il sera utile à tout le monde.

Créer un nouveau projet angulaire9
1 Installé l'échafaudage @angular-cli
2. code><strong>ng -v</strong>ng -v
ng new my-project(项目名)3,
Télécharger les echarts
npm i echartsrecommandations : "Tutoriel angulaire"
Création d'un conteneur
src/app/app.componnet.html<div id="main" style="width:800px;height:500px"></div>
Créer une instance de carte
src/app/app.componnet.tsimport { Component } from '@angular/core';
import * as echarts from "echarts";
import 'echarts/map/js/china.js'
@Component({
selector: 'app-root',
templateUrl: './app.component.html',
styleUrls: ['./app.component.scss']
})
export class AppComponent {
option = {
title: {
top: 10,
text: '3D中国地图',
left: 'center',
textStyle: {
color: '#fff'
}
},
backgroundColor: 'rgba(0, 10, 52, 1)',
geo: {
map: 'china',
aspectScale: 0.75,
layoutCenter: ["50%", "51.5%"], //地图位置
layoutSize: '118%',
roam: true,
itemStyle: {
normal: {
borderColor: 'rgba(147, 235, 248, 1)',
borderWidth: 0.5,
color: {
type: 'linear-gradient',
x: 0,
y: 1500,
x2: 2500,
y2: 0,
colorStops: [{
offset: 0,
color: '#009DA1' // 0% 处的颜色
}, {
offset: 1,
color: '#005B9E' // 50% 处的颜色
}],
global: true // 缺省为 false
},
opacity: 0.5,
},
emphasis: {
areaColor: '#2a333d'
}
},
regions: [{
name: '南海诸岛',
itemStyle: {
areaColor: 'rgba(0, 10, 52, 1)',
borderColor: 'rgba(0, 10, 52, 1)'
},
emphasis: {
areaColor: 'rgba(0, 10, 52, 1)',
borderColor: 'rgba(0, 10, 52, 1)'
}
}],
z: 2
},
series: [{
type: 'map',
map: 'china',
tooltip: {
show: false
},
label: {
show: true,
color: '#FFFFFF',
fontSize: 16
},
aspectScale: 0.75,
layoutCenter: ["50%", "50%"], //地图位置
layoutSize: '118%',
roam: true,
itemStyle: {
normal: {
borderColor: 'rgba(147, 235, 248, 0.6)',
borderWidth: 0.8,
areaColor: {
type: 'linear-gradient',
x: 0,
y: 1200,
x2: 1000,
y2: 0,
colorStops: [{
offset: 0,
color: '#009DA1' // 0% 处的颜色
}, {
offset: 1,
color: '#005B9E' // 50% 处的颜色
}],
global: true // 缺省为 false
},
},
emphasis: {
areaColor: 'rgba(147, 235, 248, 0)'
}
},
zlevel: 1
}]
};
ngOnInit(){
let dom = document.getElementById('main')
let myChart = echarts.init(dom)
myChart.on('georoam', function(params) {
var option = myChart.getOption(); //获得option对象
if (params.zoom != null && params.zoom != undefined) { //捕捉到缩放时
option.geo[0].zoom = option.series[0].zoom; //下层geo的缩放等级跟着上层的geo一起改变
option.geo[0].center = option.series[0].center; //下层的geo的中心位置随着上层geo一起改变
} else { //捕捉到拖曳时
option.geo[0].center = option.series[0].center; //下层的geo的中心位置随着上层geo一起改变
}
myChart.setOption(option); //设置option
});
myChart.setOption(this.option)
}
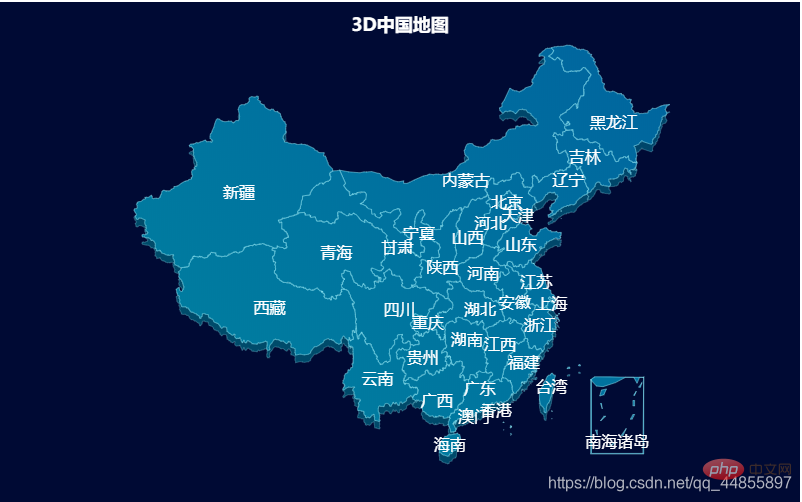
}Image d'effet

Pour plus de connaissances sur la programmation, veuillez visiter : Vidéo de programmation
! !Ce qui précède est le contenu détaillé de. pour plus d'informations, suivez d'autres articles connexes sur le site Web de PHP en chinois!
Déclaration:
Cet article est reproduit dans:. en cas de violation, veuillez contacter admin@php.cn Supprimer
Article précédent:Une brève discussion sur la façon de résoudre les problèmes de vérification des e-mails npmArticle suivant:Une brève discussion sur la façon de résoudre les problèmes de vérification des e-mails npm
Articles Liés
Voir plus- Une brève discussion sur la compatibilité d'Angular8 avec la version ie10+
- Une brève discussion sur la façon de configurer l'alias @path dans Angular10
- Une brève discussion sur la méthode d'implémentation du chargement dynamique des composants dans angulaire9
- Explication détaillée de la façon de transmettre des valeurs entre les composants angulaires parent et enfant ?
- Une brève discussion sur la liaison de classe et de style dans Angular10

