Maison >Applet WeChat >Développement de mini-programmes >Explication détaillée d'un composant d'applet WeChat personnalisé (composant pop-up modal)
Explication détaillée d'un composant d'applet WeChat personnalisé (composant pop-up modal)
- php是最好的语言original
- 2018-08-01 10:05:238606parcourir
Je ne sais pas quand les mini-programmes sont devenus populaires, et de nombreuses personnes se sont lancées dans le développement, qu'il s'agisse d'Android, d'iOS ou du très populaire mini-programme WeChat,
. Tout le monde constatera que les contrôles natifs fournis par le fonctionnaire ne peuvent plus répondre pleinement à nos besoins de développement, c'est pourquoi cet article présente un composant d'applet WeChat personnalisé (composant pop-up modal
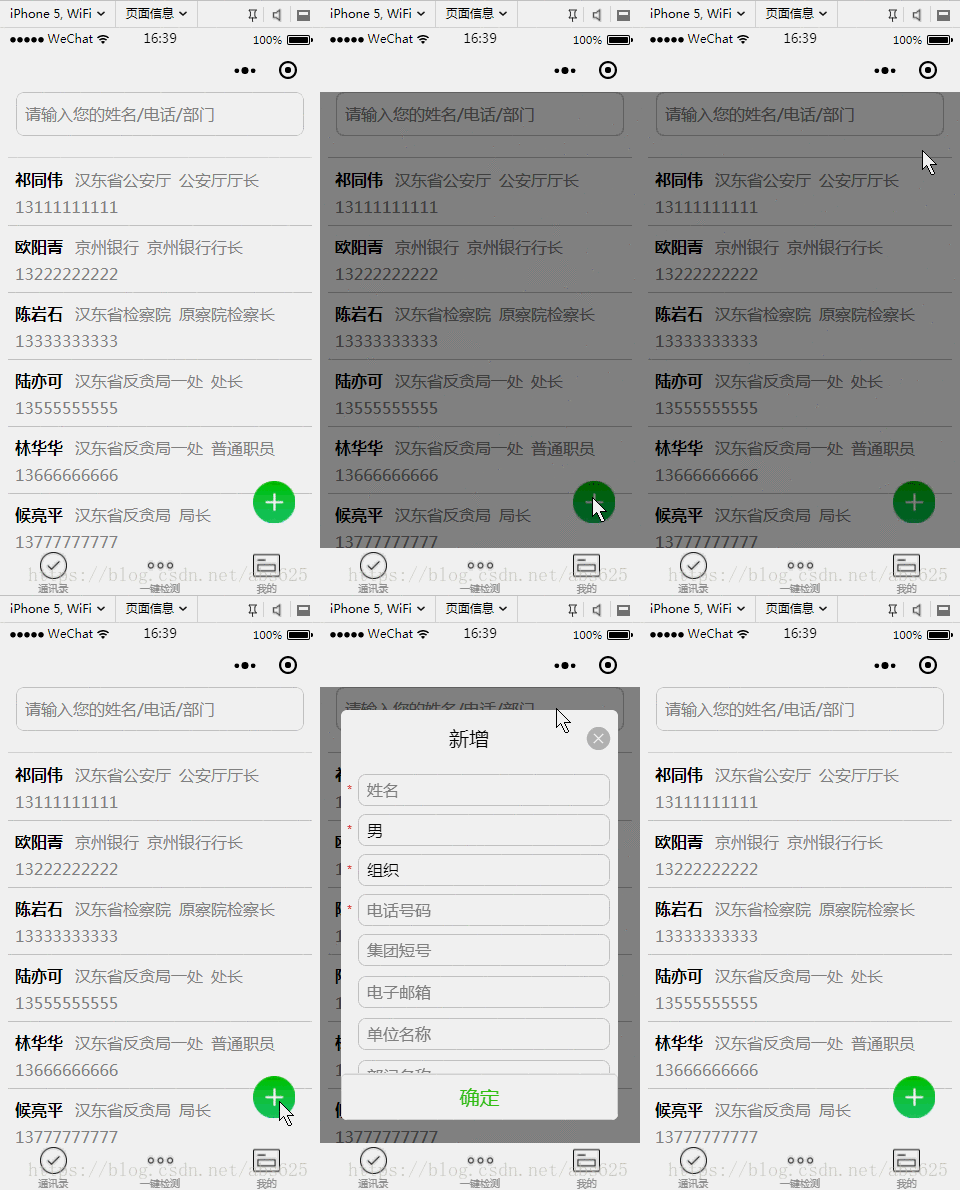
Prenons d'abord). une photo.

Maintenant que vous avez vu ça, les rendus vous plaisent encore un peu, haha, sans plus attendre, commençons à coder. . .
Il y a quatre fichiers au total, js, json, xml et wxss. Si vous n'êtes toujours pas clair à ce sujet, veuillez tourner à gauche lorsque vous sortez et réfléchissez-y pendant 5 minutes.
D'abord le fichier de mise en page dialog.xml
<!--mask dialog-->
<view class="drawer_screen" bindtap="hideDialog" wx:if="{{isShow}}" catchtouchmove="myCatchTouch"></view>
<!--content-->
<!--使用animation属性指定需要执行的动画-->
<view animation="{{animationData}}" class="drawer_box" wx:if="{{isShow}}">
<!--drawer content-->
<view class='row'>
<view class="drawer_title" style='width:100%;padding-left:60rpx'>{{title}}</view>
<icon type="clear" style='margin-top:40rpx;margin-right:20rpx;' bindtap="hideDialog"></icon>
</view>
<form bindsubmit="_formSubmit">
<scroll-view scroll-y>
<view class="drawer_content">
<view wx:for="{{dataObject}}" wx:key="{{id}}">
<view class="top grid">
<label class="title col-0" style="color:red" wx:if="{{item.must}}">*</label>
<label class="title col-0" wx:else> </label>
<input class="input_base input_h30 col-1" placeholder='{{item.placeholder}}' wx:if="{{item.type === type_input}}" name="{{item.id}}" value="{{bean[item.id]}}"></input>
<view class="input_base input_h30 col-1" wx:elif="{{item.id === id_sex}}" hover-class='btn_ok_hover' bindtap='{{item.event}}'>{{sexDefault}}</view>
<view class="input_base input_h30 col-1" wx:elif="{{item.id === id_group}}" hover-class='btn_ok_hover' bindtap='{{item.event}}'>{{groupDefault}}</view>
</view>
</view>
</view>
</scroll-view>
<button class="btn_ok" hover-class='btn_ok_hover' formType="submit">确定</button>
</form>
</view>puis le fichier dialog.wxss
/*mask dialog start*/
.drawer_screen {
  width: 100%;
  height: 100%;
  position: fixed;
  top: 0;
  left: 0;
  right:0;
  bottom:0;
  z-index: 1000;
  background: #000;
  opacity: 0.5;
  overflow: hidden;
}

/*content*/

.drawer_box {
  width: 650rpx;
  overflow: hidden;
  position: fixed;
  top: 50%;
  left: 0;
  z-index: 1001;
  background: #fafafa;
  margin: -480rpx 50rpx 0 50rpx;
  border-radius: 6px;
}

.drawer_title {
  padding: 15px;
  font: 20px "microsoft yahei";
  text-align: center;
}

.drawer_content {
  height: 720rpx;
  /*overflow-y: scroll; 超出父盒子高度可滚动*/
}

.btn_ok {
  padding: 10px;
  font: 20px "microsoft yahei";
  text-align: center;
  border-top: 1rpx solid #e8e8ea;
  color: #3cc51f;
}

.btn_ok_hover {
  color: #aaa;
  background: #d9d9d9;
}

.top {
  padding-top: 8px;
}

.input_base {
  border: 2rpx solid #ccc;
  border-radius: 20rpx;
  padding-left: 20rpx;
  margin-right: 20rpx;
}

.input_h30 {
  height: 30px;
  line-height: 30px;
}

.title {
  height: 30px;
  line-height: 30px;
  width: 40rpx;
  text-align: center;
  display: inline-block;
  font: 300 28rpx/30px "microsoft yahei";
}

.grid {
  display: -webkit-box;
  display: box;
}

.col-0 {
  -webkit-box-flex: 0;
  box-flex: 0;
}

.col-1 {
  -webkit-box-flex: 1;
  box-flex: 1;
}

/*mask dialog end*/

.row {
  display: flex;
  flex-direction: row;
}
et ensuite le fichier dialog.js
// components/Dialog/dialog.js
Component({
  options: {
    multipleSlots: true // 在组件定义时的选项中启用多slot支持
  },
  /**
   * 组件的属性列表
   */
  properties: {
    title: { // 属性名
      type: String, // 类型(必填),目前接受的类型包括:String, Number, Boolean, Object, Array, null(表示任意类型)
      value: '标题' // 属性初始值(可选),如果未指定则会根据类型选择一个
    }

  },

  /**
   * 组件的初始数据
   */
  data: {
    // 弹窗显示控制
    isShow: false,
    type_input: "input",
    type_btn: "button",
    id_sex: "sex",
    id_group: "group",
    dataObject: [],
    sexDefault: "男",
    groupDefault: "组织",
    sexArray: ['男', '女'],
    groupArray: ['组织', '群众'],
    bean: {},
  },

  /**
   * 组件的方法列表
   */
  methods: {
    /*
     * 公有方法
     */
    setDataObj(dataObj,beanObj) {
      this.setData({
        dataObject: dataObj,
        bean: beanObj
      })
      if (beanObj.hasOwnProperty("sex") && beanObj.sex != ""){
        this.setData({
          sexDefault: beanObj.sex
        })
      }
      if (beanObj.hasOwnProperty("group") && beanObj.group != "") {
        this.setData({
          groupDefault: beanObj.group
        })
      }
    },
    //隐藏弹框
    hideDialog() {
      this._showOrCloseDialog("close")
    },
    //展示弹框
    showDialog() {
      this._showOrCloseDialog("open")
    },
    /*
     * 内部私有方法建议以下划线开头
     * triggerEvent 用于触发事件
     */

    _formSubmit(e) {
      if ("" === e.detail.value.name) {
        wx.showToast({
          title: '请填写姓名',
          icon: 'none'
        })
        return
      }
      if ("" === e.detail.value.phone) {
        wx.showToast({
          title: '请填写电话',
          icon: 'none'
        })
        return
      }
      this._showOrCloseDialog("close")
      //触发成功回调
      this.triggerEvent("confirmEvent", {
        e: e
      });
    },

    sexButton: function() {
      var that = this;
      wx.showActionSheet({
        itemList: this.data.sexArray,
        success: function(res) {
          console.log(res.tapIndex)
          that.setData({
            sexDefault: that.data.sexArray[res.tapIndex]
          })
        },
        fail: function(res) {
          console.log(res.errMsg)
        }
      })
    },
    groupButton: function() {
      var that = this;
      wx.showActionSheet({
        itemList: this.data.groupArray,
        success: function(res) {
          console.log(res.tapIndex)
          that.setData({
            groupDefault: that.data.groupArray[res.tapIndex]
          })
        },
        fail: function(res) {
          console.log(res.errMsg)
        }
      })
    },
    _showOrCloseDialog: function(currentStatu) {
      var that = this;
      /* 动画部分 */
      // 第1步:创建动画实例
      var animation = wx.createAnimation({
        duration: 200, //动画时长
        timingFunction: "linear", //线性
        delay: 0 //0则不延迟
      });

      // 第2步:这个动画实例赋给当前的动画实例
      this.animation = animation;

      // 第3步:执行第一组动画
      animation.opacity(0).rotateX(-100).step();

      // 第4步:导出动画对象赋给数据对象储存
      that.setData({
        animationData: animation.export()
      })

      // 第5步:设置定时器到指定时候后,执行第二组动画
      setTimeout(function() {
        // 执行第二组动画
        animation.opacity(1).rotateX(0).step();
        // 给数据对象储存的第一组动画,更替为执行完第二组动画的动画对象
        that.setData({
          animationData: animation
        })

        //关闭
        if (currentStatu == "close") {
          that.setData({
            isShow: false
          });
        }
      }.bind(this), 200)

      // 显示
      if (currentStatu == "open") {
        that.setData({
          isShow: true
        });
      }
    }
  },
  //解决滚动穿透问题
  myCatchTouch: function () {
    return
  }
})
Après avoir vu cela, certains amis peuvent demander, vous, importateur parallèle, pourquoi la structure des fichiers js est-elle différente de la mienne ? Êtes-vous ici pour nous tromper ? Ne vous inquiétez pas, monsieur, écoutez-moi : en fait, pour faciliter l'appel, j'ai encapsulé cette boîte de dialogue dans un composant. Vous me demandez comment encapsuler des composants ? Veuillez passer au tutoriel officiel :
https://developers.weixin.qq.com/miniprogram/dev/framework/custom-component/
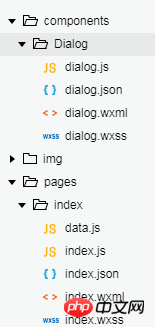
Une fois l'empaquetage terminé, la structure du projet est la suivante :

Le malentendu a été clairement expliqué ici, s'il vous plaît, donnez-moi un visage et continuez à lire. .
Les trois rois ont été affichés, et il y a un fichier dialog.json qui n'est pas affiché. Ce fichier est très simple
{
  "component": true,//作为组件
  "usingComponents": {}//引用别的组件
}
Ce fichier est également différent des fichiers json ordinaires, principalement dans la configuration En tant que composant que d'autres peuvent référencer, donc à ce stade, ce composant a été encapsulé
Peut-être qu'à ce moment-là, de nombreux enfants ont hâte de copier et coller, puis de mettre le code dans le projet pour voir le contenu réel et constater que les résultats d'exécution sont les mêmes Les rendus sont différents, et certaines personnes peuvent dire : Niang Xipi est en effet une importation parallèle et un menteur ! ! ! À ce stade, je ne peux que dire : Chers amis, Danding, Danding. . . , car il n'y a pas de dataObjects ni de beans dans js, donc le rendu est différent de ce que j'ai montré au début de l'article. Alors laissez-moi vous dire comment l'appeler et obtenir le même effet que moi.
Ajoutez le code suivant dans le xml référencé
<image src="../../img/add.png" class="buttom" bindtap="bindAdd"></image> <dialog id='dialog' title='新增' bind:confirmEvent="_confirmEvent"></dialog>
buttom Ceci est un bouton flottant, wxss vous le donne également
.buttom{
  width: 100rpx;
  height: 100rpx;
  display: flex;
  flex-direction: row;
  position: fixed;
  bottom:60rpx;
  right: 60rpx;
}
Puis référencez le fichier js de la page
onReady: function() {
    //获得dialog组件
    this.dialog = this.selectComponent("#dialog");
}


//响应button弹框
bindAdd: function(e) {
    this.dialog.setDataObj(addObject, {})
    this.dialog.showDialog();
}
À ce stade, vous pouvez essentiellement cliquer sur le bouton flottant pour réaliser la boîte pop-up. Certains dei aux gros seins ont répété : Hé, hé, attendez, addObject, et cet add.png n'a pas encore été donné. D'accord, donne-le, donne-le-toi
const addObject = [{
  id: "name",
  must: true,
  placeholder: "姓名",
  type: "input",
  event: "nameInput"
},
{
  id: "sex",
  must: true,
  placeholder: "男",
  type: "button",
  event: "sexButton"
},
{
  id: "group",
  must: true,
  placeholder: "组织",
  type: "button",
  event: "groupButton"
},
{
  id: "phone",
  must: true,
  placeholder: "电话号码",
  type: "input",
  event: "phoneInput"
},
{
  id: "shortNum",
  must: false,
  placeholder: "集团短号",
  type: "input",
  event: "shortNumInput"
},
{
  id: "mail",
  must: false,
  placeholder: "电子邮箱",
  type: "input",
  event: "mailInput"
},
{
  id: "unit",
  must: false,
  placeholder: "单位名称",
  type: "input",
  event: "unitInput"
},
{
  id: "department",
  must: false,
  placeholder: "部门名称",
  type: "input",
  event: "departmentInput"
},
{
  id: "job",
  must: false,
  placeholder: "职务",
  type: "input",
  event: "jobInput"
},
{
  id: "function",
  must: false,
  placeholder: "涉及工作内容",
  type: "input",
  event: "functionInput"
},
{
  id: "comPhone",
  must: false,
  placeholder: "办公电话",
  type: "input",
  event: "comPhoneInput"
},
{
  id: "fax",
  must: false,
  placeholder: "传真",
  type: "input",
  event: "faxInput"
},
{
  id: "homePhone",
  must: false,
  placeholder: "家庭电话",
  type: "input",
  event: "homePhoneInput"
},
{
  id: "showOrder",
  must: false,
  placeholder: "显示顺序",
  type: "input",
  event: "showOrderInput"
},
{
  id: "departOrder",
  must: false,
  placeholder: "部门顺序",
  type: "input",
  event: "departOrderInput"
},
{
  id: "remark",
  must: false,
  placeholder: "备注",
  type: "input",
  event: "remarkInput"
}
]
photos

À ce stade, vous devriez pouvoir obtenir le même effet que moi, allez pour cela, essayez-le.
Articles connexes :
Applet WeChat - soi-même Création de définition
Vidéos associées :
Développement d'applets WeChat de l'entrée au didacticiel vidéo de maîtrise
Ce qui précède est le contenu détaillé de. pour plus d'informations, suivez d'autres articles connexes sur le site Web de PHP en chinois!
Articles Liés
Voir plus- WeChat Mini Program Exercices simples de mise en page, de logique et de style
- Explication détaillée et exemples de l'applet WeChat wx.request (méthode d'appel d'interface)
- Programme WeChat Mini - Explication détaillée de la connexion WeChat, du paiement WeChat et des modèles de messages
- Applet WeChat (compte d'application) exemple d'application simple et explication détaillée de l'exemple
- Explication détaillée de l'applet WeChat pour la boucle

