
Home >Software Tutorial >Office Software >Detailed steps to complete recording and playback in Excel table
Detailed steps to complete recording and playback in Excel table

- WBOYWBOYWBOYWBOYWBOYWBOYWBOYWBOYWBOYWBOYWBOYWBOYWBforward
- 2024-04-17 13:30:091240browse
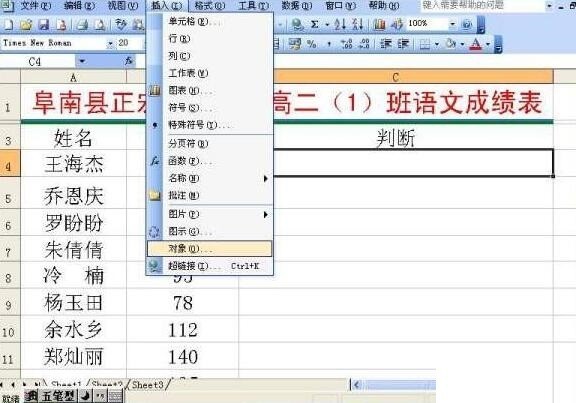
Open Excel → click the [Insert] button in the menu → select [Object].
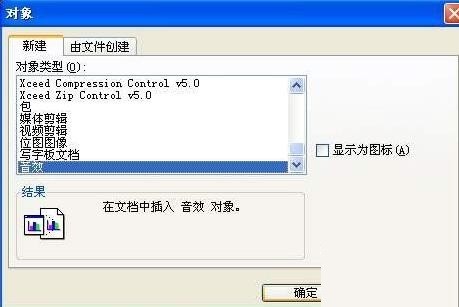
Select [Sound Effect] in the [Object] dialog box → click the [OK] button.
Click the [Start Recording Sound] button. Now you can speak while operating. Everything said was recorded in the spreadsheet. (Note: This recording method can only record for 60 seconds. Of course, we can let it record for a while. The method is: when the recording is almost finished, click the [Stop Recording] button, and then click the [Start Recording Sound] button. , in this way, you can record for a long time)
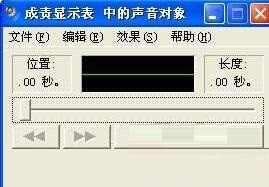
After all recording is completed → click the [Exit] button in the [File] menu → click in the pop-up dialog box [Yes] button. Finally, save the file and give it to students. Students only need to double-click the icon in the spreadsheet to hear the sound.
The above is the detailed content of Detailed steps to complete recording and playback in Excel table. For more information, please follow other related articles on the PHP Chinese website!