
Home >Technology peripherals >AI >A review of automatic programming NLP model technology
A review of automatic programming NLP model technology

- PHPzforward
- 2023-04-13 09:52:051797browse
Copilot, Codex, and AlphaCode: The current state of self-programmed computer programs
In recent years, we have seen an astonishing array of depths in code writing due to the rise of transformers in the field of natural language processing. Learning model. The ability to write computer programs, often called the program synthesis problem, has been studied since at least the late 1960s and early 1970s.
In the 2010s and 2020s, the success of attention-based models in other fields once again stimulated research on procedural synthesis, that is, pre-training on hundreds of gigabytes of text with millions or tens of Strategies for large-scale attention-based neural models (transformers) with billions of parameters.
The pre-trained models demonstrated impressive capabilities in meta-learning, thanks to their attention mechanism, and appear to have practical application in text task development - through prompting Only a few examples (called "zero-shot or few-shot learning" in the research literature) are provided in the content.
Modern procedural synthesis based on deep NLP models
NLP models can be further trained using specialized datasets to fine-tune performance for specific tasks. Writing code is a particularly interesting use case for this application.
The Copilot project on GitHub, promoted as "Your AI Pair Programmer", caused quite a controversy when it was launched in 2021. In large part, this is due to the use of all public GitHub code in the training dataset. According to the instructions, these code bases include projects with copyleft licenses, which may not allow code to be used in projects such as Copilot, unless Copilot itself is open source.
Copilot is the product of a relationship between the OpenAI organization and Microsoft Corporation, and is based on a code-trained version of GPT-3. The version demonstrated by OpenAI and available through its API is called Codex. The formal experimental description using Copex is detailed in the paper published by Chen et al. in 2021.
In early 2022, DeepMind was not to be outdone and developed their own procedurally synthesized deep NLP system: AlphaCode.
New Challenger: AlphaCode
Like Codex and Copilot before it, AlphaCode is a large-scale NLP model designed and trained for writing code. Like Copilot, AlphaCode was not developed to use AlphaCode as a productivity tool for software engineers, but to challenge human-level programming performance in competitive programming tasks.
The competition coding challenges used to train and evaluate AlphaCode (which make up the new CodeContests dataset) range in difficulty between the difficulty of previous datasets and the difficulty of real-world software engineering.
For those unfamiliar with competitive programming challenge sites, this task is a bit like a simplified version of test-driven development. Given some textual descriptions and a few examples, the gist of this challenge is to write a program that passes a set of tests—most of which are hidden from the programmer.
Ideally, hidden testing should be comprehensive, and passing all tests means that a given problem has been successfully solved. However, covering every edge case with unit tests is a difficult problem. An important contribution to the field of program synthesis is actually the CodeContests dataset itself, as the DeepMind team made a significant effort to generate additional tests through a mutation process, with the aim of reducing the false positive rate (tests passed, but the problem has not been solved ) and slow positivity rate (the test passes, but the solution is too slow).
AlphaCode's performance is evaluated based on content from competitive programming challenges on the competition website CodeForces. Overall, AlphaCode's average performance among competing (possibly human) programmers was "top 54.3%".
Please note that this metric may be a bit misleading, as it actually equates to 45.7% performance. Incredibly, the AlphaCode system is capable of writing any algorithm that passes all hidden tests. However, be warned: AlphaCode uses a very different strategy than humans do to solve programming problems.
While a human competitor might write an algorithm to solve most routines - incorporating insights from running earlier versions of the solution and continually improving it until it passes all tests; however, AlphaCode adopts a more broadly based The method is to generate multiple samples for each question and then select 10 samples for submission.
A big contribution to AlphaCode's performance on the CodeContests dataset is the results of post-generation filtering and clustering: after it has generated about 1,000,000 candidate solutions, it starts filtering candidates to remove the problems in the problem description. Candidates that fail the sample test, thereby eliminating approximately 99% of the candidate pool.
The author mentioned that about 10% of the problems have no candidate solutions that pass all the example tests at this stage.
The remaining candidates are then filtered through clustering to 10 or fewer submissions. In short, they trained another model to generate additional test inputs based on the problem description (but note that they did not have valid outputs for these tests).
The remaining candidate solutions (the number after filtering may be less than 1000), are clustered based on their output on the generated test input. One candidate from each cluster is selected for submission in order from largest to smallest. If there are less than 10 clusters, clusters are sampled multiple times.
While the filtering/clustering steps are unique and AlphaCode is fine-tuned on the new CodeContests dataset, it is initially trained in much the same way as Codex or Copilot. AlphaCode was first pre-trained on a large, publicly available code dataset from GitHub (retrieved July 14, 2021). They trained 5 variants, and the number of parameters increased from 284 million to 41 billion.
In the same spirit as the AlphaGo series or the AlphaStar robot that plays the game StarCraft II, AlphaCode is also a research project aimed at developing a system that approaches human capabilities in specialized task areas, and is developed in a procedural synthesis process The barrier to entry for out-of-the-box utility programs is lower.
From the perspective of developing practical tools to solve problems, representatives of robots in this area are Codex and Copilot tools based on GPT-3. Codex is an OpenAI variant of GPT-3, trained on a corpus of publicly available code. Based on the HumanEval dataset released with the paper, OpenAI reports that Codex is able to solve more than 70% of the problems by generating 100 samples in tasks in the "docstring to code" format.
Next, we will explore this prompt programming technique that automatically generates code through the use of Codex. We will simultaneously use the model given below to develop John Conway's Game of Life.
GitHub Copilot adopts the method of automatic code completion. The current packaging form is an extension of integrated development environments such as Visual Studio, VSCode, Neovim and JetBrains. According to the description on the Copilot web page, Copilot has been able to successfully rewrite a set of well-tested Python functions according to the given description, 57% of which are similar to the HumanEval data set.
We’ll look at some practical use cases for Copilot, such as automating test writing using a dedicated beta version of the Copilot extension for VSCode.
Prompt Programming: Writing Conway's "Game of Life" with Codex
In this section, we will introduce writing a cellular automaton simulator based on John Conway's "Game of Life" task. With a few modifications and without hard-coding the rules, our program should be able to simulate any set of life-like cellular automaton rules.
Instead of generating 100 examples and selecting the best one (either manually or by running tests), we will take an interactive approach. When Codex gives a poor solution, we make adjustments to try to guide a better answer. Of course, if absolutely necessary, we can continue to modify the code to get a working example in the event that Codex fails completely.
Write a realistic CA (Cellular Automata, i.e. "cellular automaton". It is a grid dynamics model in which time, space, and state are all discrete, and spatial interaction and temporal causality are local. , has the ability to simulate the spatiotemporal evolution process of complex systems) The first step of the simulator is to propose a function to calculate neighbors. We wrote the following docstring prompt and provided it to code-davinci-001, which is the largest Codex model in the OpenAI API library:
# PROMPT<br>import numpy as np<br>def compute_neighborhood(grid: np.array) -> np.array:<br>"""<br>Compute the sum of cell states in the Moore neighborhood<br>for each cell in the input grid.<br>A Moore neighborhood includes 8 cells,<br>diagonally and orthogonally adjacent to, but not including, the center cell.<br>The cells denoted by '1' correspond to the Moore neighborhood for cell a:<br>1 1 1<br>1 a 1<br>1 1 1<br>If cell 'a' is on the edge of the grid,<br>the Moore neighborhood wraps around to the cells on the opposite edge,<br>i.e. grid is on a toroid.<br><br>args:<br>grid, a numpy array with binary values 0 or 1. grid contains the current cell state values<br>Returns:<br><br>neighorhood_grid, a numpy array with integer values from 0 to 8.<br>For each cell (element in grid) in grid, neighborhood_grid should<br>contain the sum of states in that cell's Moore neighborhood<br>"""
In the above code, add the comment lines "# PROMPT" and " #GENERATED" is to make it clearer where the prompt ends.
Have you carefully analyzed the rather comprehensive docstring prompt above? How does Codex work? Actually, the first attempt at Codex looked like this:
# GENERATED<br># TODO: implement this function<br>pass
This probably doesn’t bode well for our little experiment. Even after tuning the P-value hyperparameter to achieve looser kernel sampling (and hopefully better diversity), Codex still doesn't seem to have an answer to the above question.
Fortunately, we can just add a little something like the following to the docstring prompt and Codex will produce a more promising output.
# PROMPT (appended to previous prompt)<br><br>this function is completed and does not include any TODOs<br>"""<br><br># GENERATED<br><br># get the dimensions of the grid<br>n_rows, n_cols = grid.shape<br><br># initialize the output array<br>neighborhood_grid = np.zeros((n_rows, n_cols), dtype=int)<br><br># loop over the grid<br>for i in range(n_rows):<br>for j in range(n_cols):<br><br># get the current cell value<br>cell_val = grid[i, j]<br><br># get the Moore neighborhood of the current cell<br># using the get_neighborhood function<br>neighborhood = get_neighborhood(grid, i, j)<br><br># sum the cell values in the neighborhood<br>neighborhood_sum = np.sum(neighborhood)<br><br># store the sum in the neighborhood grid<br>neighborhood_grid[i, j] = neighborhood_sum<br><br>return neighborhood_grid
Of course, this is not a very good solution yet, as it introduces an unused variable cell_val and delegates most of its work to another function it just added, get_neighborhood. But overall, it looks like a feasible start.
Next, we wrote a simple docstring for the get_neighborhood function mentioned above:
def get_neighborhood(grid: np.array, i: int, j: int) -> np.array:<br>"""<br>get_neighborhood is used by compute_neighborhood <br>to return the 3x3 Moore neighborhood for the cell <br>located at coordinates i,j If i,j coordinates are <br>on the edge of the grid (i.e. i or j equal 0, or i == <br>grid.shape[0]-1 or j == grid.shape[1]), the Moore<br>Neighborhood should wrap around to include cells on the<br>opposite edge. In other words the grid can be considered to <br>be the surface of a toroid, like 'Pac-Man'<br><br>args:<br>grid, np.array, this is the current state of<br>the cellular automata grid<br>i, int, this coordinate corresponds to the row<br>j, int, coordinate corresponding to column<br><br>returns:<br>moore_neighborhood - np.array, should always have<br>dimensions 3x3 and<br>contain the Moore neighborhood for the cell at i,j <br>in grid.Because the center cell is not part of the<br>neighborhood, moore_neighborhood[1,1] should always <br>be 0<br>"""<br><br># GENERATED<br><br># get the dimensions of the grid<br>n_rows, n_cols = grid.shape<br><br># initialize the output array<br>moore_neighborhood = np.zeros((3, 3), dtype=int)<br><br># get the coordinates of the Moore neighborhood<br># using the get_neighborhood_coordinates function<br>neighborhood_coords = <br>get_neighborhood_coordinates(i, j, n_rows, n_cols)<br><br># loop over the coordinates<br>for coord in neighborhood_coords:<br># get the cell value at the coordinate<br>cell_val = grid[coord[0], coord[1]]<br><br># store the cell value in the output array<br>moore_neighborhood[coord[0], coord[1]] = cell_val<br><br>return moore_neighborhood
The output of the above program looks feasible; but after inspection, it actually contains An important mistake.
In the loop over the neighborhood coordinates, it assigns the value to the Moore neighborhood using the same coordinates that were used to retrieve the value from the grid.
We did not find a clear way to prompt Codex to avoid errors; therefore, we had to manually modify the code:
# FIXED loop over the coordinates <br>for index, coord in enumerate(neighborhood_coords): <br># get the cell value at the coordinate<br>cell_val = grid[coord[0], coord[1]] <br><br># FIXED store the cell value in the output array<br>moore_neighborhood[index // 3, index % 3] = cell_val<br><br>return moore_neighborhood
In addition, another function get_neighborhood_coordinates was introduced in the previous code to handle the more "tricky" "part.
Next, we need to write a prompt for the function get_neighborhood_coordinates.
# PROMPT <br>def get_neighborhood_coordinates(<br>i: int, j: int, n_rows: int, n_cols: int) -> list:<br>"""<br>get_neighborhood_coordinates is used by get_neighborhood <br>to return the coordinates of the 3x3 Moore neighborhood for<br>the cell located at coordinates i,j If i,j coordinates are on<br>the edge of the grid (i.e. i or j equal 0, or i ==<br>grid.shape[0]-1 or j == grid.shape[1]), the Moore<br>Neighborhood should wrap around to include cells on the<br>opposite edge. In other words the grid can be considered to <br>be the surface of a toroid, like 'Pac-Man'<br><br>args:<br>i, int, this coordinate corresponds to the row<br>j, int, coordinate corresponding to column<br>n_rows, int, number of rows in the grid<br>n_cols, int, number of columns in the grid<br><br>returns:<br>neighborhood_coords - list of tuples, <br>each tuple contains the coordinates<br>of a cell in the Moore neighborhood<br>"""<br><br># GENERATED<br><br># initialize the output list<br>neighborhood_coords = []<br><br># get the coordinates of the Moore neighborhood<br># using the get_neighborhood_coordinates function<br>for row in range(i-1, i+2):<br>for col in range(j-1, j+2):<br># skip the center cell<br>if row == i and col == j:<br>continue<br><br># check if the cell is on the edge of the grid<br># if so, wrap around to the opposite edge<br>if row row = n_rows - 1<br>elif row == n_rows:<br>row = 0<br><br>if col col = n_cols - 1<br>elif col == n_cols:<br>col = 0<br><br># store the cell coordinates<br>neighborhood_coords.append((row, col))<br><br>return neighborhood_coords
这比我们预期的函数式编程深度要深一点(compute_neighborhood调用get_neighborhood,反过来get_neighborhood又调用get_neighborhood_coordinates),但看起来我们终于有了一组函数,可以返回一个邻居和的网格。
还剩下update函数,它对应的docstring提示如下所示:
# PROMPT<br><br>def update_grid(grid: np.array, rules: list) -> np.array:<br>"""<br>update input arg grid according the the Life-like rules<br>contained in input arg rules. rules is a list of lists, <br>with the first element containing a list of 'birth'<br>conditions (cells go from 0 -> 1) and the second element<br>containing a list of 'survival' conditions (cells are<br>unchanged).<br>Cells which have a neighborhood sum that is not in the<br>'birth' (B) or 'survival' (S) rules go to 0. <br><br>This functions uses function compute_neighborhood to compute <br>the neighborhood value for each cell in grid.<br><br>args:<br>grid, np.array. grid contains the cell values (0 or 1)<br> rules, list of lists. rules contains the B/S rules <br> for Life-like cellular automatafor example, to<br> simulate Conway's Life CA, `rules = [[3], [2,3]]`,<br> i.e. B3/S23 Life Without Death has rules<br> B3/S012345678, so `rules = [[3],<br> [0,1,2,3,4,5,6,7,8]]`<br><br>update_grid should raise an Exception if rules contains <br>values greater than 8 (maximum number of live cells in a<br>Moore neighborhood) or less than 0. <br>"""<br><br># GENERATED<br><br># get the dimensions of the grid<br>n_rows, n_cols = grid.shape<br><br># get the neighborhood grid<br>neighborhood_grid = compute_neighborhood(grid)<br><br># loop over the grid<br>for i in range(n_rows):<br>for j in range(n_cols):<br># get the current cell value<br>cell_val = grid[i, j]<br><br># get the neighborhood value for the current cell<br>neighborhood_val = neighborhood_grid[i, j]<br><br># check if the cell is alive<br>if cell_val == 1:<br># check if the cell should die<br>if neighborhood_val not in rules[1]:<br>grid[i, j] = 0<br>else:<br># check if the cell should be born<br>if neighborhood_val in rules[0]:<br>grid[i, j] = 1<br><br>return grid
这看起来是解决上面问题的一种非常合理的方法;尽管我们确实明确建议,如果邻居网格包含错误的值并且在生成的输出中找不到,就会引发异常。
只需进行一些修复:在函数get_neighborhood中进行手动干预,并且尝试给出一些提示,我们就可以成功地设计出一个完全可行的类似生命的细胞自动机模拟器。
上面的代码不是一个特别快的实现方案,但它的质量与程序员在开始使用一种新语言时可能做出的那种“Hello World”尝试相似。值得注意的是,在训练数据集中包含了许多示例,供研究者参考。
在康威的《生命游戏》中,我们可以想象这段程序在微型滑翔机的发展过程中取得的成功。

虽然我们确实通过一组函数完成了CA模拟器的编写,但这种方法对于日常软件工程来说并不是非常有用或现实的开发方式。但另一方面,这并不能阻止像SourceAI这样的初创公司(本质上是OpenAI Codex API的包装商)将其服务宣传为“给每个人创造有价值的定制软件的机会”。
“我们构建了一个独立的系统,可以开发出世界上最熟练的工程师级别的软件。”不过,与Codex交互的确是学习或实践编程的一种潜在有用的方式,尤其是针对CodeSignal、CodeForces或HackerRank等网站的编程问题方面。
接下来,我们将尝试评估Codex/Copilot,以获得自动编写测试和docstring的更现实的使用情形。
任务2:编写测试
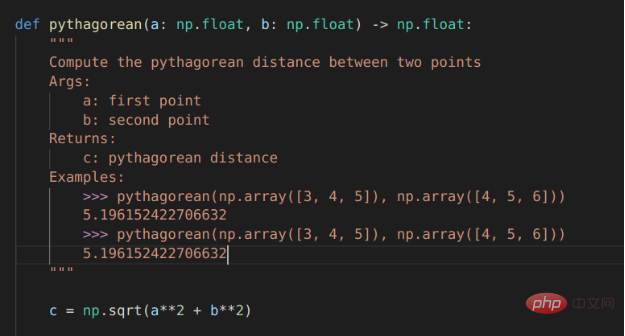
对于本例来说,我们选择使用VSCode开发工具的GitHub Copilot扩展来编写测试。
# PROMPT (in VSCode)<br>import numpy as np<br>def pythagorean(a: np.float, b: np.float) -> np.float:<br>"""<br>Use the Pythagorean theorem to comput the hypotenuse for<br>a triangle with side lengths a and b<br><br>args:<br>a, np.float, side of the triangle<br>b, np.float, the other side of the triangle<br><br>returns:<br>c, np.float, the length of the hypotenuse<br>"""<br>c = np.sqrt(a**2 + b**2)<br>return c<br><br>def test_pythagorean():<br><br># GENERATED (Copilot autocomplete)<br>"""<br>Test the pythagorean function<br>"""<br>a = np.array([3, 4, 5])<br>b = np.array([4, 5, 6])<br>c = pythagorean(a, b)<br><br>assert np.allclose(c, np.sqrt(a**2 + b**2))
虽然毕达哥拉斯定理函数可能过于简单,但Copilot建议进行一次合理的测试。如果您运行它,它就会通过。你会注意到,自动完成建议能够正确地获得测试的结构和数字内容。
如果我们想使用自己喜欢的框架以更系统的方式编写测试,该怎么办?不用太担心,因为我们已经使用numpy库和自动微分技术编写了大量的低级学习模型,供给测试者使用。因此,虽然接下来的这个示例不是100%真实地来自真实世界,但效果还是比较贴近真实情况的。
在本例中,我们将使用autograd和numpy以及unittest中的TestCase类设置一个简单的多层感知器前向传递、损失函数和梯度函数进行测试。
#PROMPT<br>import unittest<br>from autograd import numpy as np<br>from autograd import grad<br><br>def forward_mlp(input_x: np.array, <br>weights: list, biases: list) -> np.array:<br>"""<br>compute the forward pass of a multilayer perceptron. <br>The number of layers is equal to the length of the list of<br>weights, which must be the same as the list of biases,<br>biases. <br><br>args:<br>input_x, np.array, input data<br>weights, list of np.arrays, a list of np.array matrices,<br> representing the weights<br>biases: list of np.arrays, a list of biases for each<br> layer<br><br>returns:<br>result, np.array, the output of the network<br>"""<br><br>assert len(weights) == len(biases)<br><br>for layer_index in range(len(weights) - 1):<br>input_x = np.tanh(np.matmul(input_x,<br>weights[layer_index]) + biases[layer_index])<br><br>output = np.matmul(input_x, weights[-1]) + biases[-1]<br>return output<br>def get_loss(input_x: np.array, weights: list, <br>biases: list, target: np.array) -> np.float:<br>"""<br>compute the mean squared error loss for an mlp with weights<br>and biases, with respect to the input data input_x and the<br>target array target.<br><br>args:<br>input_x, np.array, input data<br>weights, list of np.arrays, a list of np.array matrices,<br>representing the weights<br>biases: list of np.arrays, a list of biases for each<br>layer<br>target: np.array, the target values<br><br>returns:<br>loss, np.float, the loss<br>"""<br><br>output = forward_mlp(input_x, weights, biases)<br><br>return np.mean((output - target)**2)<br><br>get_loss_grad = grad(get_loss, argnum=(1,2))<br><br><br>class TestMLP(unittest.TestCase):<br>"""<br>tests for MLP, get_loss, and get_grad_loss<br>"""<br># GENERATED (chosen from Copilot suggestions)<br>def setUp(self):<br>pass<br><br>def test_forward_mlp(self):<br>"""<br>test forward_mlp<br>"""<br><br>input_x = np.array([[1, 2, 3], [4, 5, 6]])<br>weights = [np.array([[1, 2], [3, 4]]), <br>np.array([[5, 6], [7, 8]]), <br>np.array([[9, 10], [11, 12]])]<br>biases = [np.array([[1, 2]]), np.array([[3, 4]]),<br>np.array([[5, 6]])]<br><br>output = forward_mlp(input_x, weights, biases)<br>self.assertTrue(np.allclose(output, <br>np.array([[-0.9, -0.9], [-0.9, -0.9]])))<br><br>def test_get_loss(self):<br>"""<br>test get_loss<br>"""<br>input_x = np.array([[1, 2, 3], [4, 5, 6]])<br>weights = [np.array([[1, 2], [3, 4]]), <br>np.array([[5, 6], [7, 8]]), <br>np.array([[9, 10], [11, 12]])]<br>biases = [np.array([[1, 2]]), np.array([[3, 4]]),<br>np.array([[5, 6]])]<br>target = np.array([[1, 1], [1, 1]])<br><br>loss = get_loss(input_x, weights, biases, target)<br><br>self.assertTrue(np.allclose(loss, 0.5))<br><br>def test_get_loss_grad(self):<br>"""<br>test get_loss_grad<br>"""<br><br>input_x = np.array([[1, 2, 3], [4, 5, 6]])<br>weights = [np.array([[1, 2], [3, 4]]), <br>np.array([[5, 6], [7, 8]]), <br>np.array([[9, 10], [11, 12]])]<br>biases = [np.array([[1, 2]]), np.array([[3, 4]]), <br>np.array([[5, 6]])]<br>target = np.array([[1, 1], [1, 1]])<br><br>loss_grad = get_loss_grad(<br>input_x, weights, biases, target)<br><br>self.assertTrue(<br>np.allclose(loss_grad[0], <br>np.array([[-0.9, -0.9], [-0.9, -0.9]])))<br>self.assertTrue(<br>np.allclose(loss_grad[1], <br>np.array([[-0.9, -0.9], [-0.9, -0.9]])))<br>self.assertTrue(<br>np.allclose(loss_grad[2],<br>np.array([[-0.9, -0.9], [-0.9, -0.9]])))<br><br># END GENERATED (the final two lines are part of the prompt)<br>if __name__ == "__main__":<br>unittest.main(verbosity=1)
Copilot的建议虽然并不完美,但确实为测试类提供了合理的思路。不过,如果您尝试原封不动地运行代码的话,则不会执行任何测试,更不用说通过测试了。
输入数据和第一个权重矩阵之间存在维度不匹配,数据类型也是错误的(所有数组都是整数数据类型),而且无法使用Autograd梯度函数。
当然,上面这些问题并不是很难解决,如果用3x2矩阵替换权重矩阵列表中的第一个条目,那么前向传播应该可以运行。要使得梯度计算测试顺利进行,或者需要在np.array定义的数字上添加小数点,或者显式定义数组数据类型。
有了这些更改后,测试即可成功执行并失败,但预期值在数字表现方面还不正确。
任务3:自动文档字符串
Copilot有很大潜力的一项任务是自动编写文档,特别是为已经编写的函数填写docstring内容。这方面几乎是比较实用了。
对于毕达哥拉斯定理的示例程序,Copilot运行结果已经非常接近,但它将问题描述为查找两点a和b之间的距离,而不是查找边长c到边长a和边长b的距离。不出所料,随同Copilot一同发行的docstring中的示例也与函数的实际内容不匹配:返回的是一个标量,而不是c的值数组。
Copilot对前向MLP函数的docstrings的建议也很接近,但并不完全正确。
Copilot支持的自动Docstring建议
机器能取代我的工作吗?
对于软件工程师来说,程序合成方面的每一项新进展都可能引发一次经济恐慌。
After all, if computer programs can program computers just like programmers, doesn’t that mean machines should “take our jobs”? Will this be the case in the near future?
On the surface, the answer seems to be "not yet"; however, that doesn't mean that as these tools become more mature, the nature of software engineering is likely to remain the same. In the future, using sophisticated autocompletion tools for successful reasoning may be as important as using code formatting tools.
Copilot is currently in beta and has a limited number of options on how to use it. Likewise, Codex also has an API available in beta through OpenAI. The pilot program's terms of use and privacy considerations do limit the potential use cases for the technology.
Per current privacy policies, any code entered into these systems can be used to fine-tune models and can be reviewed by GitHub/Microsoft or OpenAI staff. This rules out the possibility of using Codex or Copilot in sensitive projects.
Copilot does add a lot of utilities to the Codex model it is based on. You can write a skeleton or outline for the code you want (like writing an example for a test of the unittest framework) and move the cursor to the middle of the outline to get sensible OK autocomplete suggestions.
Currently Copilot is unlikely to suggest correct complete code for any problem more complex than simple coding practices; however, it can usually create a reasonable outline and save some manual typing.
It should also be noted that Copilot runs in the cloud. This means it doesn't work offline and the autocomplete suggestions are a bit slow. At this point, you can cycle through the suggestions by pressing the Alt ] key combination, but sometimes there are only a few suggestions to choose from, or even just one suggestion to choose from.
When Copilot works well - it's actually good enough to be a little dangerous. The suggested tests in the unittest example and the suggested docstring for the Pythagorean function appear correct at first glance and will probably pass the scrutiny of a jaded software engineer. But when they contain mysterious errors, this only leads to pain later!
To sum up, although Copilot/Codex is more like a toy or a learning tool in its current state, it is incredible that it actually works. If you met a waltzing bear, I don't think what would impress you would be how well it danced. Likewise, if you come across a smart code completion tool, what impresses you shouldn't be how perfect the code it writes is.
In short, with the further development of automatic programming NLP model technology, and the large number of adjustments made by human programmers to use NLP automatic completion tools, it is likely that there will be a major killer application of program synthesis models in the near future.
Translator Introduction
Zhu Xianzhong, 51CTO community editor, 51CTO expert blogger, lecturer, computer teacher at a university in Weifang, and a veteran in the freelance programming industry. In the early days, he focused on various Microsoft technologies (compiled three technical books related to ASP.NET AJX and Cocos 2d-X). In the past ten years, he has devoted himself to the open source world (familiar with popular full-stack web development technology) and learned about OneNet/AliOS Arduino/ IoT development technologies such as ESP32/Raspberry Pi and big data development technologies such as Scala Hadoop Spark Flink.
Original title: NLP Models for Writing Code: Program Synthesis, Author: Kevin Vu
The above is the detailed content of A review of automatic programming NLP model technology. For more information, please follow other related articles on the PHP Chinese website!
Related articles
See more- Technology trends to watch in 2023
- How Artificial Intelligence is Bringing New Everyday Work to Data Center Teams
- Can artificial intelligence or automation solve the problem of low energy efficiency in buildings?
- OpenAI co-founder interviewed by Huang Renxun: GPT-4's reasoning capabilities have not yet reached expectations
- Microsoft's Bing surpasses Google in search traffic thanks to OpenAI technology