Home >Technology peripherals >AI >Practical application of deep learning neural network for image classification
Practical application of deep learning neural network for image classification
- 王林forward
- 2023-04-08 11:51:091426browse
Translator | Zhu Xianzhong
Reviewer|Sun Shujuan
Deep learning neural networks have received a lot of attention recently, The reason is that it is Today's speech recognition, face detection, voice control, self-driving cars, The technology behind brain tumor detection technology was not part of our lives 20 years ago. Although these neural networks look complex, they learn just like humans do—by working through a variety of examples. However, the neural network uses a large number of data sets for training and is optimized through multiple network layers and multiple iterations in order to obtain the best computing results.
Over the past 20 years, the exponential growth in computing power and data volume has created the perfect development for deep learning neural networks condition. Although we stumble over fancy terms like machine learning and artificial intelligence; in reality, these techniques are nothing more than linear algebra and calculus combined with computation.
Frameworks such as Keras, PyTorch, and TensorFlow facilitate the difficult construction and training of custom deep neural networks , verification and deployment process. When it comes to creating deep learning applications in real life, these frameworks clearly become the first choice. Still, sometimes it’s crucial to take a step back and move forward, and by that I mean really understand what’s going on behind the scenes of the framework. In this article, we will do this by creating a deep neural network and applying it to an image classification problem using only the basic framework NumPy. You may get lost somewhere during the calculations, especially during backpropagation related to calculus, but don't worry. In the framework process, intuition about the process is more important than calculation.
In this article, we will build an image classification (cat or no cat) neural network, which will be trained using two sets of 1652 images . Among them, 852 images are cat images from the
Dog and Cat Image Dataset, and the other 800 images are from the Unsplash random image set Random Image. To start, we first need to convert the image into an array, we will speed up the calculation by reducing the original size to 128x128 pixels, because if we keep the original shape, it will take a long time to train the model. All these 128x128 images have three color layers (red, green, and blue); when mixed, these colors reach the original color of the image. Each of the 128x128 pixels on each image has a red, green, and blue value ranging from 0 to 255, which are the values in our image vector. Therefore, in our calculations we will be dealing with a total of 128x128x3 vectors for 1652 images. To run the above vector in a network, you need to reconstruct it by stacking three layers of colors into a single array, as shown in the image below. We will then get a (49152, 1652) size vector which will be used to train the model by using 1323 image vectors and test it by predicting the image classification (cat or no cat) using the trained model. After comparing these predictions with the true classification labels of the images, it will be possible to estimate the accuracy of the model.
Image 1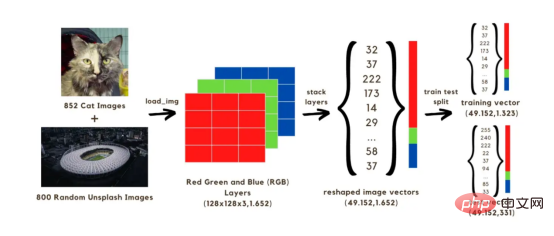
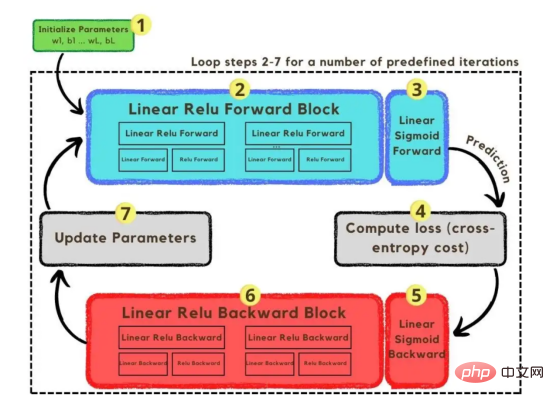
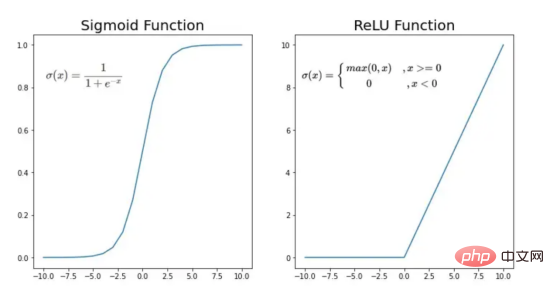
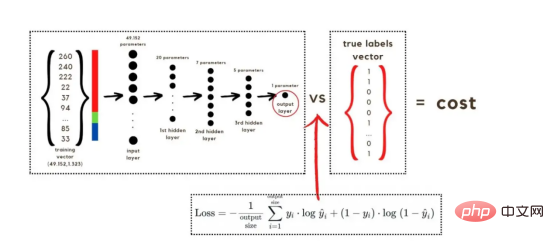
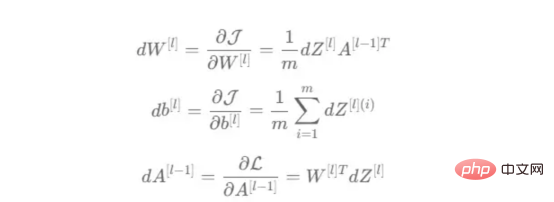
The process of converting an image to a vector With the training vectors explained, it is now time to discuss the network architecture, as shown in Figure 2. Since 49152 values were used in the training vector, the input layer of the model must have the same number of nodes (or neurons). Then, there are three hidden layers before the output layer, which will be the probability of a cat in this picture. In real-life models, there are usually more than 3 hidden layers because the network needs to be deeper to perform well in a big data environment. In this article, we only use three hidden layers because they are good enough for simple classification models. Although the architecture only has 4 layers (the output layer is not counted), this code can create deeper neural networks by using the dimensions of the layers as parameters of the training function. Figure 2:Network Architecture Till now, we have explained the image vectors and the network architecture adopted; next, we will use the optimization algorithm in the gradient descent algorithm shown in Figure 3 describe. Again, don't worry if you can't complete all the steps right away as this article will go into detail about each step shown in its diagram later in the coding section. Figure 3: Training Process First, we start the network parameters. These parameters are the weight (w) and bias (b) of each connection of the node shown in Image 2. In code, it's easier to understand how each weight and bias parameter works and how they are initialized. Later, when these parameters are initialized, it is time to run the forward propagation block and apply the sigmoid function on the last activation to obtain a probabilistic prediction. #In our example, this is the probability that a cat appears in the photo. We then compared our predictions to the true label of the image (cat or not cat) via cross-entropy cost, a loss function widely used to optimize classification models. Finally, with the cost calculated, we return it through the backpropagation module to calculate its gradient with respect to the parameters w and b. Now that the gradients of the loss function with respect to w and b are known to us, the parameters can be updated by summing the individual gradients as they point in the direction of the values of w and b that minimize the loss function. Since the goal is to minimize the loss function, the loop should go through a predefined number of iterations, taking a small step toward the minimum value of the loss function. step. At some point, the parameters will stop changing because the gradient will tend to zero as the minimum approaches. First, you need to load the library. In addition to using keras.preprprocessing.image to convert images into vectors, we only need to import three library modules: Numpy, Pandas and OS. On the other hand, we use sklearn.model_selection to split the image vector into two parts: training vector and test vector. . Data must be loaded from two folders: cats and random_images. This can be done by getting all the filenames and building the path to each file. Then just merge all the file paths in the dataframe and create a conditional column "is_cat". If the path is in the cats folder, the value is 1; otherwise, the value is 0. With the paths dataset in hand, it’s time to build our training and test vectors by splitting the images; 80% of them are for training and 20% for testing. Y represents the true label of the feature, while Finally, use the img_to_array function to convert the image to an array. These are the shapes of the X_train and X_test vectors: 图4:X_train和X_test向量的形状 由于线性函数是z=w*x+b并且网络具有4个层,所以要初始化的参数向量是w1、w2、w3、w4、b1、b2、b3和b4。在代码中,这是通过在层维度列表的长度上循环来完成的——稍后将定义;但是在这里它是一个硬编码列表,其中包含网络中每个层中的神经元数量。 参数w和b必须使用不同的初始化方式:w必须初始化为随机小数字矩阵,b必须初始化为零矩阵。这是因为如果我们将权重初始化为零,则权重wrt(相对于)损失函数的导数将全部相同,因此后续迭代中的值将始终相同,隐藏层将全部对称,导致神经元只学习相同的几个特征。因此,我们把权重初始化为随机数,以打破这种对称性,从而允许神经元学习不同的特征。需要注意的是,偏置可以初始化为零,因为对称性已经被权重打破,并且神经元中的值都将不同。 最后,为了理解参数向量初始化时定义的形状,必须知道权重参与矩阵乘法,而偏差参与矩阵和运算(还记得z1=w1*x+b1吗?)。得益于Python广播技术,可以使用不同大小的数组进行矩阵加法运算。另一方面,矩阵乘法只有在形状兼容时才可能进行运算,如(m,n)x(n,k)=(m,k)。这意味着,第一个阵列上的列数需要与第二个阵列上行数匹配,最终矩阵将具有阵列1的行数和阵列2的列数。图5显示了神经网络上使用的所有参数向量的形状。 图5:参数向量的形状 在第一层中,当我们将w1参数向量乘以原始49152个输入值时,我们需要w1形状为(20,49152)*(49152,1323)=(20,1323),这是第一个隐藏层激活的形状。b1参数与矩阵乘法的结果相加(记住z1=w1*x+b1),因此我们可以将(20,1)数组添加到乘法的(20,1323)结果中,因为广播会自动考虑不匹配的形状。这一逻辑继续到下一层,因此我们可以假设w(l)形状的公式是(节点数量层l+1,节点数量层l),而b(l)的公式为(节点数量,层l+1)。 最后,我们对权重向量初始化进行重要分析。我们应该将随机初始化值除以正在初始化w参数向量的各个层上节点数量的平方根。例如,输入层有49152个节点,因此我们将随机初始化的参数除以√49152,即222,而第一个隐藏层有20个节点;所以,我们将随机初始的w2参数除以√20,即结果值为45。初始化必须保持较小,因为这是随机梯度下降的要求。 现在,参数向量已经被初始化,现在我们可以进行正向传播了。该正向传播将线性操作z=w*x+b与ReLU激活相结合,直到最后一层,当sigmoid激活函数替代ReLU激活函数时,我们得到最后一次激活的概率。线性运算的输出通常用字母“z”表示,称为预激活参数。因此,预激活参数z将是ReLU和sigmoid激活的输入。 在输入层之后,给定层L上的线性操作将是z[L]=w[L]*a[L-1]+b[L],使用前一层的激活值而不是数据输入x。线性操作和激活函数的参数都将存储在缓存列表中,用作稍后在反向传播块上计算梯度的输入。 因此,首先定义线性正向函数: 接下来,我们来定义Sigmoid和ReLU两个激活函数。图6显示了这两个函数的图形示意。其中,Sigmoid激活函数通常用于二类分类问题,以预测二元变量的概率。这是因为S形曲线使大多数值接近0或1。因此,我们将仅在网络的最后一层使用Sigmoid激活函数来预测猫出现在图片中的概率。 另一方面,如果输入为正,ReLU函数将直接输出;否则,将输出零。这是一个非常简单的操作,因为它没有任何指数运算,有助于加快内层的计算速度。此外,与tanh和sigmoid函数不同,使用ReLU作为激活函数降低了消失梯度问题的可能性。 值得注意的是,ReLU激活函数不会同时激活所有节点,因为激活后所有负值将变为零。在整个网络中设置一些0值很重要,因为它增加了神经网络的一个理想特性——稀疏性;这意味着网络具有更好的预测能力和更少的过度拟合。毕竟,神经元正在处理有意义的信息部分。像我们的例子中一样,可能存在一个特定的神经元可以识别猫耳朵;但是,如果图像是人或风景的话,显然应该将其设置为0。 图6:Sigmoid和ReLU激活函数图形示意 现在可以实现全部的激活函数了。 最后,是时候根据前面预先计划的网络架构在一个完整的函数中整合上面的激活函数了。首先,创建缓存列表,将第一次激活函数设置为数据输入(训练向量)。由于网络中存在两个参数(w和b),因此可以将层的数量定义为参数字典长度的一半。然后,该函数在除最后一层外的所有层上循环;在最后一层应用线性前向函数,随后应用的是ReLU激活函数。 损失函数通过将预测的概率(最后一次激活的结果)与图像的真实标签进行比较来量化模型对给定数据的性能。如果网络使用数据进行学习,则每次迭代后成本(损失函数的结果)必须降低。在分类问题中,交叉熵损失函数通常用于优化目的,其公式如下图7所示: 图7:神经网络的成本(损失函数的输出结果)示意图 在本例中,我们使用NumPy定义交叉熵成本函数: 在反向传播模块中,我们应该在网络上从右向左移动,计算与损失函数相关的参数梯度,以便稍后更新。就像在前向传播模块中一样的顺序,接下来,我们首先介绍一下线性反向传播,然后是sigmoid和relu,最后通过一个函数整合网络架构上的所有功能。 对于给定的层L,线性部分为z[L]=w[L]*a[L-1]+b[L]。假设我们已经计算了导数dZ[L],即线性输出的成本导数,对应的公式稍后很快就会给出。但首先让我们看看下图8中dW[L]、dA[L-1]和db[L]的导数公式,以便首先实现线性后向函数。 图8:成本相关权重、偏差和先前激活函数的导数 这些公式是交叉熵成本函数相对于权重、偏差和先前激活(a[L-1])的导数。本文不打算进行导数计算,但它们已经在我的另一篇文章《走向数据科学》一文中进行了介绍。 定义线性向后函数需要使用dZ作为输入,因为在反向传播中线性部分位于sigmoid或relu向后激活函数之后。在下一段代码中,将计算dZ,但为了在正向传播上遵循相同的函数实现逻辑,首先应用线性反向函数。 在执行梯度计算之前,必须从前一层加载参数权重、偏置和激活,所有这些都在线性传播期间存储在缓存中。参数m最初来自交叉熵成本公式,是先前激活函数的向量大小,可以通过previous_activation.shape[1]获得。然后,可以使用NumPy实现梯度公式的矢量化计算。在偏置梯度中,keepdims=True和axis=1参数是必要的,因为求和需要在向量的行中进行,并且必须保持向量的原始维度,这意味着dB将具有与dZ相同的维度。 成本wrt对线性输出(dZ)公式的导数如图9所示,其中g’(Z[L])代表激活函数的导数。 图9——线性输出成本的导数。 因此,必须首先计算Sigmoid函数和ReLU函数的导数。在ReLU中,如果该值为正,则导数为1;否则,未定义。但是,为了计算ReLU后向激活函数中的dZ,有可能只复制去激活向量(因为dactivation * 1 = dactivation),并在z为负时将dZ设置为0。对于Sigmoid函数s,其导数为s*(1-s),将该导数乘以去激活,矢量dZ在Sigmoid向后函数中实现。 现在可以实现linear_activation_backward函数。 首先,必须从缓存列表中检索线性缓存和激活缓存。然后,对于每一次激活,首先运行activation_backward函数,获得dZ,然后将其作为输入,与线性缓存结合,用于linear_backward函数。最后,函数返回dW、dB和dprevious_activation梯度。请记住,这是正向传播的逆序,因为我们在网络上从右向左传播。 现在,我们可以为整个网络实现后向传播函数了。该函数将从最后一层L开始向后迭代所有隐藏层。因此,代码需要计算dAL;dAL是上次激活时成本函数的导数,以便将其用作sigmoid激活函数的linear_activation_backward函数的输入。dAL的公式如下图10所示: 图10:最后激活函数的成本导数 现在,实现后向传播函数的一切都设置到位。 首先,创建梯度字典。网络的层数是通过获取缓存字典的长度来定义的,因为每个层在前向传播块期间都存储了其线性缓存和激活缓存,因此缓存列表长度与层数相同。稍后,该函数将遍历这些层的缓存,以检索线性激活反向函数的输入值。此外,真正的标签向量(Y_train)被重构为与上一次激活的形状相匹配的维度,因为这是dAL计算中一个除以另一个的要求,即代码的下一行。 创建current_cache对象并将其设置为检索最后一层的线性缓存和激活缓存(请记住,python索引从0开始,因此最后一层是n_layers-1)。然后,到最后一层,在linear_activation_backward函数上,激活缓存将用于sigmoid_backward函数,而线性缓存将作为linear_backward的输入。最后,该函数收集函数的返回值并将它们分配给梯度字典。在dA的情况下,因为计算的梯度公式来自于先前的激活,所以有必要在索引上使用n_layer-1来分配它。在该代码块之后,计算网络的最后一层的梯度。 按照网络的反向顺序,下一步是在线性层向relu层上反向循环并计算其梯度。但是,在反向循环期间,linear_activation_backward函数必须使用“relu”参数而不是“sigmoid”,因为需要为其余层调用relu_backward函数。最后,该函数返回计算的所有层的dA、dW和dB梯度,并完成反向传播。 随着梯度的计算,我们将通过用梯度更新原始参数以向成本函数的最小值移动来结束梯度下降。 该函数通过在层上循环并将w和b参数的原始值减去学习率输入乘以相应的梯度来实现。乘以学习率是控制每次更新模型权重时响应于估计误差改变网络参数w和b的程度的方法。 最后,我们实现了计算梯度下降优化所需的所有函数,从而可以对训练和测试向量进行预处理,为训练做好准备。 初始化函数的layers_dimensions输入必须进行硬编码,这是通过创建一个包含每个层中神经元数量的列表来实现的。随后,必须将X_train和X_test向量展平,以作为网络的输入,如图11所示。这可以通过使用NumPy函数重构来完成。此外,有必要将X_train和X_test值除以255,因为它们是以像素为单位的(范围从0到255),并且将值标准化为0到1是一个很好的做法。这样,数字会更小,计算速度更快。最后,Y_train和Y_test被转换为数组,并被展平。 这些是训练和测试向量的最终形状打印结果: 图11:训练和测试向量的形状大小 有了所有的函数,只需要将它们组织成一个循环来创建训练迭代即可。 但首先,创建一个空列表来存储cross_entropy_cost函数的成本输出,并初始化参数,因为这必须在迭代之前完成一次,因为这些参数将由梯度更新。 现在,在输入的迭代次数上创建循环,以正确的顺序调用实现的函数:l_layer_model_forward、cross_entropy_cost、l_layer_mmodel_backward和update_parameters。最后,是一个每50次迭代或最后一次迭代打印一次成本的条件语句。 调用函数2500次迭代的形式如下: 调用训练函数的代码 下面输出展示了成本从第一次迭代的0.69下降到最后一次迭代的0.09。 图12:成本输出值越来越小 这意味着,在NumPy中开发的梯度下降函数优化了训练过程中的参数,这必将导致更好的预测结果,从而降低了成本。 训练结束以后,接下来我们可以检查训练后的模型是如何预测测试图像标签的。 通过使用训练的参数,该函数运行X_test向量的正向传播以获得预测,然后将其与真标签向量Y_test进行比较以返回精度。 图13:调用预测函数 该模型在测试图像上检测猫的准确率达到了77%。考虑到仅使用NumPy构建网络,这已经是一个相当不错的准确性了。将新图像添加到训练数据集、增加网络的复杂性或使用数据增强技术将现有训练图像转换为新图像都是提高准确性的可能方案。 最后,值得再次强调的是,当我们深入数学基础时,准确性并不是重点。这正是本文所强调的。努力学习神经网络的基础知识将为以后深入学习神经网络应用的迷人世界奠定扎实的基础。真诚希望您继续深入下去! 朱先忠,51CTO社区编辑,51CTO专家博客、讲师,潍坊一所高校计算机教师,自由编程界老兵一枚。 原文标题:Behind the Scenes of a Deep Learning Neural Network for Image Classification,作者:Bruno Caraffa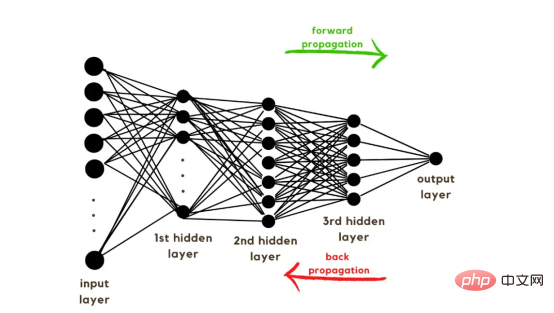
1. Load data
import numpy as np
import pandas as pd
import os

from os.path import join
from tensorflow.keras.preprocessing.image import load_img, img_to_array
from sklearn.model_selection import train_test_split
cats_dir = "data\cats"
all_cats_path = [join(cats_dir,filename) for filename in os.listdir(cats_dir)]

images_dir = "data\random_images"
images_path = [join(images_dir,filename) for filename in os.listdir(images_dir)]

all_paths = all_cats_path + images_path

df = pd.DataFrame({
'path': all_paths,
'is_cat': [1 if path in all_cats_path else 0 for path in all_paths] })X = df.path
Y = df.is_cat
X_train, X_test, y_train, y_test = train_test_split(X,Y, test_size=.2 , shuffle= True)
X_train = [load_img(img_path,target_size=(128,128)) for img_path in X_train]
X_train = np.array([img_to_array(img) for img in X_train])
X_test = [load_img(img_path,target_size=(128,128)) for img_path in X_test]
X_test = np.array([img_to_array(img) for img in X_test])
(X_train.shape,X_test.shape)

2. 初始化参数
def initialize(layers_dimensions):

parameters = {}
L = len(layers_dimensions)

for l in range (1,L):
parameters['w' + str(l)] = np.random.randn(layers_dimensions[l],layers_dimensions[l-1]) / np.sqrt(layers_dimensions[l-1])
parameters['b' + str(l)] = np.zeros((layers_dimensions[l],1))

return parameters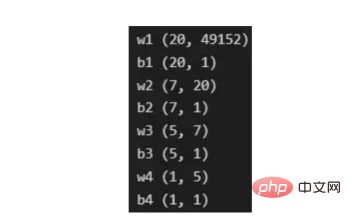
3. 正向传播
def linear_forward(activation, weight, bias):

Z = np.dot(weight,activation) + bias

cache = (activation, weight, bias)

return Z, cache
def sigmoid(Z):
activation = 1/ (1+ np.exp(-Z))
cache = Z
return activation, cache

def relu(Z):
activation = np.maximum(0,Z)
cache = Z
return activation, cache
def sigmoid_activation(previous_activation, weight, bias):

Z, linear_cache = linear_forward(previous_activation,weight, bias)

activation, activation_cache = sigmoid(Z)

cache = (linear_cache,activation_cache)

return activation, cache

def relu_activation(previous_activation, weight, bias):

Z, linear_cache = linear_forward(previous_activation,weight, bias)

activation, activation_cache = relu(Z)

cache = (linear_cache,activation_cache)

return activation, cache
def l_layer_model_forward(data, parameters):

caches = []
activation = data
n_layers = len(parameters)//2

for layer in range (1,n_layers):
previous_activation = activation

activation, cache = relu_activation(previous_activation,
weight = parameters['w' + str(layer)],
bias = parameters['b' + str(layer)])
caches.append(cache)

last_activation, cache = sigmoid_activation(activation,
weight = parameters['w' + str(layer+1)],
bias = parameters['b' + str(layer+1)])
caches.append(cache)

return last_activation, caches
4. 交叉熵损失函数
def cross_entropy_cost(last_activation,true_label):

m = true_label.shape[1]

cost = -1/m * np.sum(np.dot(true_label,np.log(last_activation).T) + np.dot(1-true_label, np.log(1-last_activation).T))

cost = np.squeeze(cost)

return cost
5. 反向传播
def linear_backward(dZ, cache):

previous_activation, weight, bias = cache
m = previous_activation.shape[1]

dw = 1/m * np.dot(dZ, previous_activation.T)
db = 1/m * np.sum(dZ, keepdims = True, axis = 1)
dpreviousactivation = np.dot(weight.T,dZ)

return dpreviousactivation, dw, db

def relu_backward(dactivation, cache):

Z = cache
dZ = np.array(dactivation, copy=True)
dZ[Z <= 0] = 0

return dZ

def sigmoid_backward(dactivation, cache):
Z = cache

s = 1/(1+np.exp(-Z))
dZ = dactivation * s * (1-s)

return dZ
def linear_activation_backward(dactivation, cache, activation):

linear_cache, activation_cache = cache

if activation == 'relu':

dZ = relu_backward(dactivation, activation_cache)
dprevious_activation, dw, db = linear_backward(dZ,linear_cache)

elif activation == 'sigmoid':

dZ = sigmoid_backward(dactivation, activation_cache)
dprevious_activation, dw, db = linear_backward(dZ,linear_cache)

return dprevious_activation, dw, db

def l_layer_model_backward(last_activation, true_labels, caches):

gradients = {}
n_layers = len(caches)
true_labels = true_labels.reshape(last_activation.shape)

dlast_activation =-(np.divide(true_labels, last_activation) - np.divide(1 - true_labels, 1 - last_activation))

current_cache = caches[n_layers-1]
dprevious_activation, dw_temp, db_temp = linear_activation_backward(dlast_activation,current_cache,'sigmoid')
gradients["da" + str(n_layers-1)] = dprevious_activation
gradients["dw" + str(n_layers)] = dw_temp
gradients["db" + str(n_layers)] = db_temp

for layer in reversed(range(n_layers-1)):
current_cache = caches[layer]
dprevious_activation, dw_temp, db_temp = linear_activation_backward(gradients["da" + str(layer + 1)],current_cache,'relu')
gradients["da" + str(layer)] = dprevious_activation
gradients["dw" + str(layer+1)] = dw_temp
gradients["db" + str(layer+1)] = db_temp

return gradients6. 参数更新
def update_parameters(parameters, gradients, learning_rate):

parameters = parameters.copy()
n_layers = len(parameters) // 2

for layer in range (n_layers):

parameters["w" + str(layer+1)] = parameters["w" + str(layer+1)]- learning_rate * gradients["dw" + str(layer+1)]
parameters["b" + str(layer+1)] = parameters["b" + str(layer+1)]- learning_rate * gradients["db" + str(layer+1)]

return parameters
7. 预处理矢量
layers_dimensions = [49152, 20, 7, 5, 1]

X_train_flatten = X_train.reshape(X_train.shape[0], -1).T
X_test_flatten = X_test.reshape(X_test.shape[0], -1).T

X_train = X_train_flatten/255.
X_test = X_test_flatten/255.

y_train = np.array(y_train)
y_test = np.array(y_test)

Y_train = y_train.reshape(-1,1).T
Y_test = y_test.reshape(-1,1).T

print(f'X train shape: {X_train.shape}')
print(f'Y train shape: {Y_train.shape}')
print(f'X test shape: {X_test.shape}')
print(f'Y test shape: {Y_test.shape}')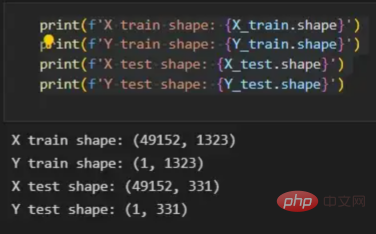
8. 训练
def l_layer_model(X, Y, layers_dimensions, learning_rate = 0.0075, iterations = 3000, print_cost=False):

costs = []

parameters = initialize(layers_dimensions)

for i in range(0, iterations):

last_activation, caches = l_layer_model_forward(X, parameters)

cost = cross_entropy_cost(last_activation, Y)

gradients = l_layer_model_backward(last_activation, Y, caches)

parameters = update_parameters(parameters, gradients, learning_rate)

if print_cost and i % 50 == 0 or i == iterations - 1:
print(f"Cost after iteration {i}: {np.squeeze(cost)}")
if i % 100 == 0 or i == iterations:
costs.append(cost)

return parameters, costsparameters, costs = l_layer_model(X_train, Y_train, layers_dimensions, iterations = 2500, print_cost = True)
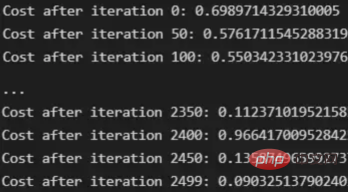
9. 预测
def predict(X, y, parameters):

m = X.shape[1]
p = np.zeros((1,m))

probs, _ = l_layer_model_forward(X, parameters)

for i in range(0, probs.shape[1]):
if probs[0,i] > 0.5:
p[0,i] = 1
else:
p[0,i] = 0

print("Accuracy: "+ str(np.sum((p == y)/m)))
return p

pred_test = predict(X_test, Y_test , parameters)
译者介绍
The above is the detailed content of Practical application of deep learning neural network for image classification. For more information, please follow other related articles on the PHP Chinese website!
Related articles
See more- Technology trends to watch in 2023
- How Artificial Intelligence is Bringing New Everyday Work to Data Center Teams
- Can artificial intelligence or automation solve the problem of low energy efficiency in buildings?
- OpenAI co-founder interviewed by Huang Renxun: GPT-4's reasoning capabilities have not yet reached expectations
- Microsoft's Bing surpasses Google in search traffic thanks to OpenAI technology

