


Translator | Bugatti
Review | Chonglou
You might use face blur for several reasons. Hide faces in videos or images. Privacy and security concerns are the main reasons. Most video sharing platforms and video editing software have built-in face blur features.
You can create your own face blur program from scratch using Python, OpenCV and NumPy libraries.
1. Establishing the environment
To complete the study of this article, you need to be familiar with the basic knowledge of Python and have a basic understanding of the use of the NumPy library.
Open any Python IDE you are familiar with. Create a virtual environment to install the required libraries. Create a new Python file. Go to the terminal and run the following commands to install the required libraries. Pass the libraries as a space-separated list.
pip install OpenCV-python NumPy
You will use OpenCV to obtain and preprocess the video input and NumPy to process the array.

Once you have installed the library, wait for the IDE to update the project backbone. Once the updates are complete and your environment is ready, you can start coding.
Note: The complete source code can be found in the GitHub repository (https://github.com/makeuseofcode/Face-Blurring).
2. Import the required libraries
First, import the OpenCV library and NumPy library. This will enable you to call and use any function they support. Import OpenCV-python as cv2.
import cv2
import numpy as np
The OpenCV-python module uses the name cv2 as a convention established by the OpenCV community. OpenCV-Python is a Python wrapper for the OpenCV library, written in C.
3. Get input
Create a variable and initialize the VideoCapture object. If you want to use your computer's main camera as the input source, you should pass 0 as the parameter. To use an external camera connected to your computer, pass 1. To perform face blurring on a pre-recorded video, pass the path of the video instead. To use a remote camera, pass the camera's URL, which contains the IP address and port number.
cap = cv2.VideoCapture(0)
To perform face blurring on input, you need these three functions:
- Functions that preprocess the input.
- Function that will blur the faces in the input.
- The main function that will control the program flow and display the output.
4. Video input preprocessing
Create an input preprocessing function that takes each frame of the input video as its input. Initialize the CascadeClassifier class, which you will use to detect faces. Resize the frame to 640*640 pixels. Convert the resized frames to grayscale for processing, and finally detect faces in the input and bind them to rectangles.
def image_preprocess(frame):
face_detector = cv2.CascadeClassifier(cv2.data.haarcascades
+ 'haarcascade_frontalface_default.xml')

resized_image = cv2.resize(frame, (640, 640))

gray_image = cv2.cvtColor(resized_image,
cv2.COLOR_BGR2GRAY)

face_rects = face_detector.detectMultiScale(
gray_image, 1.04, 5, minSize=(20, 20))

return resized_image, face_rects
This function returns a tuple containing the resized image and a list of rectangles representing the detected faces.
5. Blur the face
Create a blur function to blur the input face. This function takes as input the resized frame and the list of rectangles surrounding the face returned by the preprocessing function. Loop through face rectangles. Calculate the center of each rectangle and the radius of the blur circle. Creates a black image with the same dimensions as the resized frame by initializing all pixels to 0. Using the calculated radius, draw a white circle on the black image centered on the face rectangle. Finally, it blurs the image on the white circle.
def face_blur(resized_frame, face_rects):
for (x, y, w, h) in face_rects:
# Specifying the center and radius
# of the blurring circle
center_x = x + w // 3
center_y = y + h // 3
radius = h // 1

# creating a black image having similar
# dimensions as the frame
mask = np.zeros((resized_frame.shape[:3]), np.uint8)

# draw a white circle in the face region of the frame
cv2.circle(mask, (center_x, center_y), radius,
 (255, 255, 255), -1)

# blurring the whole frame
blurred_image = cv2.medianBlur(resized_frame, 99)

# reconstructing the frame:
# - the pixels from the blurred frame if mask > 0
# - otherwise, take the pixels from the original frame
resized_frame = np.where(mask > 0, blurred_image,
 resized_frame)

return resized_frame
This function uses the NumPy where() function to reconstruct the frame during the blur process.
6. Control the program flow
Create a main function to serve as the entry point of the program. It will then control the program flow. This function will start an infinite loop that continuously captures frames of the video input. Call the read method of the cap object to read frames from the camera.
The function then passes the frame to the preprocessing function and the return value to another function face_blur to obtain the blurred image. It then resizes the frame returned by the blur function and displays the output.
def main():
while True:
success, frame = cap.read()
resized_input, face_rects = image_preprocess(frame)
blurred_image = face_blur(resized_input, face_rects)

# Diplaying the blurred image
cv2.imshow("Blurred image", cv2.resize(blurred_image, (500, 500)))

if cv2.waitKey(1) == ord("q"):
break
This function also terminates the output display when the user presses the q key.
7. Run the program
Make sure to run the main function first when running the script. This condition will be false if the script is imported as a module in another program.
if __name__ == "__main__":
main()
This allows you to use the script as a module or run it as a standalone program. When the program runs, you should see output similar to this:

The face has been blurred and cannot be recognized come out.
8. Practical applications of face blur
You can use face blur to protect privacy in many types of application environments. Street View and mapping services use blurring technology to obscure the faces of people in images. Law enforcement uses face blurring technology to protect the identities of witnesses.
Many video sharing platforms have also integrated face blur functions for users. Comparing the use of face blur in these areas can help you see how other platforms are integrating this technology.
Original link: https://www.makeuseof.com/python-blur-human-faces-real-time/
The above is the detailed content of How to blur faces in real time using Python. For more information, please follow other related articles on the PHP Chinese website!

 The AI Skills Gap Is Slowing Down Supply ChainsApr 26, 2025 am 11:13 AM
The term "AI-ready workforce" is frequently used, but what does it truly mean in the supply chain industry? According to Abe Eshkenazi, CEO of the Association for Supply Chain Management (ASCM), it signifies professionals capable of critic
 How One Company Is Quietly Working To Transform AI ForeverApr 26, 2025 am 11:12 AM
The decentralized AI revolution is quietly gaining momentum. This Friday in Austin, Texas, the Bittensor Endgame Summit marks a pivotal moment, transitioning decentralized AI (DeAI) from theory to practical application. Unlike the glitzy commercial
 Nvidia Releases NeMo Microservices To Streamline AI Agent DevelopmentApr 26, 2025 am 11:11 AM
Enterprise AI faces data integration challenges The application of enterprise AI faces a major challenge: building systems that can maintain accuracy and practicality by continuously learning business data. NeMo microservices solve this problem by creating what Nvidia describes as "data flywheel", allowing AI systems to remain relevant through continuous exposure to enterprise information and user interaction. This newly launched toolkit contains five key microservices: NeMo Customizer handles fine-tuning of large language models with higher training throughput. NeMo Evaluator provides simplified evaluation of AI models for custom benchmarks. NeMo Guardrails implements security controls to maintain compliance and appropriateness
 AI Paints A New Picture For The Future Of Art And DesignApr 26, 2025 am 11:10 AM
AI: The Future of Art and Design Artificial intelligence (AI) is changing the field of art and design in unprecedented ways, and its impact is no longer limited to amateurs, but more profoundly affecting professionals. Artwork and design schemes generated by AI are rapidly replacing traditional material images and designers in many transactional design activities such as advertising, social media image generation and web design. However, professional artists and designers also find the practical value of AI. They use AI as an auxiliary tool to explore new aesthetic possibilities, blend different styles, and create novel visual effects. AI helps artists and designers automate repetitive tasks, propose different design elements and provide creative input. AI supports style transfer, which is to apply a style of image
 How Zoom Is Revolutionizing Work With Agentic AI: From Meetings To MilestonesApr 26, 2025 am 11:09 AM
Zoom, initially known for its video conferencing platform, is leading a workplace revolution with its innovative use of agentic AI. A recent conversation with Zoom's CTO, XD Huang, revealed the company's ambitious vision. Defining Agentic AI Huang d
 The Existential Threat To UniversitiesApr 26, 2025 am 11:08 AM
Will AI revolutionize education? This question is prompting serious reflection among educators and stakeholders. The integration of AI into education presents both opportunities and challenges. As Matthew Lynch of The Tech Edvocate notes, universit
 The Prototype: American Scientists Are Looking For Jobs AbroadApr 26, 2025 am 11:07 AM
The development of scientific research and technology in the United States may face challenges, perhaps due to budget cuts. According to Nature, the number of American scientists applying for overseas jobs increased by 32% from January to March 2025 compared with the same period in 2024. A previous poll showed that 75% of the researchers surveyed were considering searching for jobs in Europe and Canada. Hundreds of NIH and NSF grants have been terminated in the past few months, with NIH’s new grants down by about $2.3 billion this year, a drop of nearly one-third. The leaked budget proposal shows that the Trump administration is considering sharply cutting budgets for scientific institutions, with a possible reduction of up to 50%. The turmoil in the field of basic research has also affected one of the major advantages of the United States: attracting overseas talents. 35
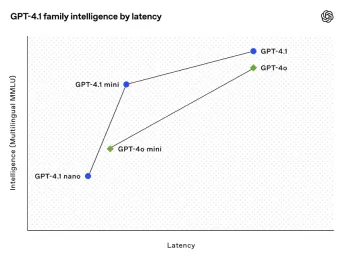 All About Open AI's Latest GPT 4.1 Family - Analytics VidhyaApr 26, 2025 am 10:19 AM
OpenAI unveils the powerful GPT-4.1 series: a family of three advanced language models designed for real-world applications. This significant leap forward offers faster response times, enhanced comprehension, and drastically reduced costs compared t


Hot AI Tools

Undresser.AI Undress
AI-powered app for creating realistic nude photos

AI Clothes Remover
Online AI tool for removing clothes from photos.

Undress AI Tool
Undress images for free

Clothoff.io
AI clothes remover

Video Face Swap
Swap faces in any video effortlessly with our completely free AI face swap tool!

Hot Article
Hot Tools

PhpStorm Mac version
The latest (2018.2.1) professional PHP integrated development tool

mPDF
mPDF is a PHP library that can generate PDF files from UTF-8 encoded HTML. The original author, Ian Back, wrote mPDF to output PDF files "on the fly" from his website and handle different languages. It is slower than original scripts like HTML2FPDF and produces larger files when using Unicode fonts, but supports CSS styles etc. and has a lot of enhancements. Supports almost all languages, including RTL (Arabic and Hebrew) and CJK (Chinese, Japanese and Korean). Supports nested block-level elements (such as P, DIV),

MinGW - Minimalist GNU for Windows
This project is in the process of being migrated to osdn.net/projects/mingw, you can continue to follow us there. MinGW: A native Windows port of the GNU Compiler Collection (GCC), freely distributable import libraries and header files for building native Windows applications; includes extensions to the MSVC runtime to support C99 functionality. All MinGW software can run on 64-bit Windows platforms.

MantisBT
Mantis is an easy-to-deploy web-based defect tracking tool designed to aid in product defect tracking. It requires PHP, MySQL and a web server. Check out our demo and hosting services.

EditPlus Chinese cracked version
Small size, syntax highlighting, does not support code prompt function

