


From the CSS Study Notes 05 display attribute article, we know that div is a block element and will occupy one line by itself, even if the width of the div is very small, like the following

Applying the inline attribute of the display attribute can make the div share a row with the div. Apart from this method, is there any other way to achieve it? As for this effect, the answer is yes, that is the floating feature of CSS that will be introduced below. Floating literally means floating and moving. So who floats and who moves? Read on and you'll find out the answer soon.
Floating of elements means that elements with the floating attribute set will break away from the control of the standard document flow and float above the standard flow. After the element is floated, although it is out of the standard flow, it will still affect the layout of the standard flow.
In CSS, float is defined through the float attribute. Its basic syntax format is as follows: selector {float: attribute value;}, the default value is none (not floating) , in addition, left means left floating, which can be understood as floating to the left and arranged to the left, right means right floating, and naturally arranged to the right.
Now we set float to div2 and see what effect will appear
1 nbsp;html> 2 3 4 <meta> 5 <title>浮动</title> 6 <style> 7 .div1 {background-color: red; height: 50px; width: 400px;} 8 .div2 {background-color: blue; height: 100px; width: 100px; float: left;} 9 .div3 {background-color: gray; height: 150px; width: 400px;}10 .div4 {background-color: green; height: 30px; width: 600px;}11 </style>12 13 14 <div>div1</div>15 <div>div2</div>16 <div>这是div3这是div3这是div3这是div3这是div3这是div3这是div3这是div3这是div3这是div3这是div3这是div3</div>17 <div>div4</div>18 19 
这时候div2的位置并没有变化,而div3向上移动了,与div2共用一行,相当于div2不占用页面的空间了,不过影响了div3中的文字布局。从这里也可以清楚的看出,是浮动的对象div2先漂浮起来,然后后面的对象div3会向它原来的位置动起来,这也解答了刚开始提出的问题。
浮动是将块元素独占一行的行为取消,将这个块从原来的文档流模式中,可以理解为它飘起来了,它原来的地方就空出来了,它的内容分离出来,这样它后面的对象就当它不存在了。
接下来给div3也设置一下浮动,会有什么意想不到的结果出现吗?

这时,由于div2与div3同时设置了浮动,所以都脱离了标准流,因此div4向上移动与div1组成了一个新的标准流,而浮动的元素是“浮”在标准流的元素之上的,所以div4被div2,div3挡住了一部分。
从上面的现象可以看出,给div3设置浮动之后,div3是紧接着跟在div2后面的,但是div2也是设置了浮动的,可是div2并没有跟在div1后面,这里可以得出一个结论:
浮动的元素A排列位置,跟上一个元素(块级)有关系。如果上一个元素有浮动,则A元素顶部会和上一个元素的顶部对齐(也就是紧挨着上一个元素的后面),如果一行放不下,A元素则会被挤到下一行;如果上一个元素是标准流,则A元素的顶部会和上一个元素的底部对齐。
假如把div4也设置成左浮动,效果如下

我们来一起分析一下,首先看div4,它的上一个元素div3设置了左浮动,所以div4的顶部与div3的顶部对齐,接着看div3,div3的上一个元素div2也设置了左浮动,所以div3的顶部与div2的顶部对其,现在看div2,div2的上一个元素是div1,但是div1并没有设置浮动属性,属于标准流,所以div2的顶部与div1的底部对齐。
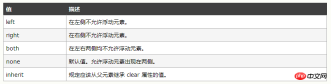
或许有人会想如果要让div4独占一行,该怎么办?这就需要用到CSS的清除浮动,清除浮动的关键字是clear,它有如下几个值
再来看div2设置左浮动的现象

因为div3的上一个元素div2设置了左浮动,所以div3占据了元素div2的空间,因为div3的宽高比div2的宽高都大,所以div3被div2挡住了一部分,我们知道标准流中的元素都是没有设置浮动属性的,所以需要清除掉div2元素浮动给div3造成的影响,由于div2是左浮动,因此为div3清除左边的浮动


现象与原来没有设置浮动一样,好,现在div2与div3同时设置左浮动,我想应该可以比较容易的知道如何让div4独占一行了。


清除浮动其他属性值可以自行类推并测试出来。有了上面的基础,我们就可以做出以下比较常见的网页布局。


 1 nbsp;html> 2
  3  4
 <meta> 5
 <title>常见布局</title> 6
 <style> 7
 .head {background-color: red; height: 50px; width: 500px;} 8
 .sidebar {background-color: blue; height: 200px; width: 100px; float: left;} 9
 .main {background-color: gray; height: 200px; width: 400px; float: left;}10
 .foot {background-color: green; height: 30px; width: 500px; clear: left;}11
 </style>12 13 14     <div>head</div>15
 <div>sidebar</div>16
 <div>main</div>17
 <div>foot</div>18 19
The above is the detailed content of A detailed introduction to floating in CSS learning. For more information, please follow other related articles on the PHP Chinese website!

 HTML vs. CSS and JavaScript: Comparing Web TechnologiesApr 23, 2025 am 12:05 AM
HTML, CSS and JavaScript are the core technologies for building modern web pages: 1. HTML defines the web page structure, 2. CSS is responsible for the appearance of the web page, 3. JavaScript provides web page dynamics and interactivity, and they work together to create a website with a good user experience.
 HTML as a Markup Language: Its Function and PurposeApr 22, 2025 am 12:02 AM
The function of HTML is to define the structure and content of a web page, and its purpose is to provide a standardized way to display information. 1) HTML organizes various parts of the web page through tags and attributes, such as titles and paragraphs. 2) It supports the separation of content and performance and improves maintenance efficiency. 3) HTML is extensible, allowing custom tags to enhance SEO.
 The Future of HTML, CSS, and JavaScript: Web Development TrendsApr 19, 2025 am 12:02 AM
The future trends of HTML are semantics and web components, the future trends of CSS are CSS-in-JS and CSSHoudini, and the future trends of JavaScript are WebAssembly and Serverless. 1. HTML semantics improve accessibility and SEO effects, and Web components improve development efficiency, but attention should be paid to browser compatibility. 2. CSS-in-JS enhances style management flexibility but may increase file size. CSSHoudini allows direct operation of CSS rendering. 3.WebAssembly optimizes browser application performance but has a steep learning curve, and Serverless simplifies development but requires optimization of cold start problems.
 HTML: The Structure, CSS: The Style, JavaScript: The BehaviorApr 18, 2025 am 12:09 AM
The roles of HTML, CSS and JavaScript in web development are: 1. HTML defines the web page structure, 2. CSS controls the web page style, and 3. JavaScript adds dynamic behavior. Together, they build the framework, aesthetics and interactivity of modern websites.
 The Future of HTML: Evolution and Trends in Web DesignApr 17, 2025 am 12:12 AM
The future of HTML is full of infinite possibilities. 1) New features and standards will include more semantic tags and the popularity of WebComponents. 2) The web design trend will continue to develop towards responsive and accessible design. 3) Performance optimization will improve the user experience through responsive image loading and lazy loading technologies.
 HTML vs. CSS vs. JavaScript: A Comparative OverviewApr 16, 2025 am 12:04 AM
The roles of HTML, CSS and JavaScript in web development are: HTML is responsible for content structure, CSS is responsible for style, and JavaScript is responsible for dynamic behavior. 1. HTML defines the web page structure and content through tags to ensure semantics. 2. CSS controls the web page style through selectors and attributes to make it beautiful and easy to read. 3. JavaScript controls web page behavior through scripts to achieve dynamic and interactive functions.
 HTML: Is It a Programming Language or Something Else?Apr 15, 2025 am 12:13 AM
HTMLisnotaprogramminglanguage;itisamarkuplanguage.1)HTMLstructuresandformatswebcontentusingtags.2)ItworkswithCSSforstylingandJavaScriptforinteractivity,enhancingwebdevelopment.
 HTML: Building the Structure of Web PagesApr 14, 2025 am 12:14 AM
HTML is the cornerstone of building web page structure. 1. HTML defines the content structure and semantics, and uses, etc. tags. 2. Provide semantic markers, such as, etc., to improve SEO effect. 3. To realize user interaction through tags, pay attention to form verification. 4. Use advanced elements such as, combined with JavaScript to achieve dynamic effects. 5. Common errors include unclosed labels and unquoted attribute values, and verification tools are required. 6. Optimization strategies include reducing HTTP requests, compressing HTML, using semantic tags, etc.


Hot AI Tools

Undresser.AI Undress
AI-powered app for creating realistic nude photos

AI Clothes Remover
Online AI tool for removing clothes from photos.

Undress AI Tool
Undress images for free

Clothoff.io
AI clothes remover

Video Face Swap
Swap faces in any video effortlessly with our completely free AI face swap tool!

Hot Article
Hot Tools

VSCode Windows 64-bit Download
A free and powerful IDE editor launched by Microsoft

MinGW - Minimalist GNU for Windows
This project is in the process of being migrated to osdn.net/projects/mingw, you can continue to follow us there. MinGW: A native Windows port of the GNU Compiler Collection (GCC), freely distributable import libraries and header files for building native Windows applications; includes extensions to the MSVC runtime to support C99 functionality. All MinGW software can run on 64-bit Windows platforms.

mPDF
mPDF is a PHP library that can generate PDF files from UTF-8 encoded HTML. The original author, Ian Back, wrote mPDF to output PDF files "on the fly" from his website and handle different languages. It is slower than original scripts like HTML2FPDF and produces larger files when using Unicode fonts, but supports CSS styles etc. and has a lot of enhancements. Supports almost all languages, including RTL (Arabic and Hebrew) and CJK (Chinese, Japanese and Korean). Supports nested block-level elements (such as P, DIV),

PhpStorm Mac version
The latest (2018.2.1) professional PHP integrated development tool

SublimeText3 English version
Recommended: Win version, supports code prompts!

