


Capture Your Adventures: The Ultimate Guide to Importing GoPro Videos to Your Mac
Immortalize your thrilling adventures with GoPro! This guide provides multiple methods for seamlessly transferring your GoPro footage to your Mac, ensuring your memories are safe and readily accessible.

Want to elevate your GoPro videos? Try Filmage Editor for easy special effects, filters, and more! Available on Setapp.
[Filmage Editor](https://www.php.cn/link/47ca4412458f04d91f92dab70d722fd5 Editor@2x.png)
Method 1: Direct Transfer via SD Card
Newer GoPros store videos on microSD cards. To transfer:
- Remove the microSD card and insert it into an SD card reader (purchase one if your Mac lacks a built-in slot).
- Connect the reader to your Mac.
- Open Finder, locate the SD card drive, and access the DCIM folder.
- Copy the 100GOPRO folders (containing your videos) to your Mac's hard drive.
- Safely eject the SD card from Finder.
Play your MP4 videos with a compatible player like Elmedia Player for smooth HD/Ultra HD playback and easy bookmarking.

Method 2: Effortless Transfer with Image Capture
Avoid removing the microSD card by using your Mac's built-in Image Capture app:
- Connect your GoPro to your Mac with the USB-C cable.
- Open Image Capture (Applications folder).
- Select your GoPro from the left panel.
- Choose a save location and click "Download All" or select individual files.

Creating Stunning Stills with SnapMotion
Once transferred, create captivating stills from your videos using SnapMotion:
- Open SnapMotion.
- Select your video in Finder.
- Play the video and use the camera icon to capture frames. Adjust settings as needed.

Method 3: Wireless Transfer via Wi-Fi or Bluetooth
For a cable-free experience:
- Enable GoPro's Wi-Fi in Preferences.
- Connect your Mac to the GoPro's Wi-Fi network (SSID and password found in GoPro Preferences).
- Use the Quik or Camera Suite app to import videos.
Use NetSpot to troubleshoot slow Wi-Fi transfers. Alternatively, use Bluetooth:
- Enable GoPro's Wi-Fi (Bluetooth is enabled automatically).
- Pair GoPro with your Mac (System Settings > Bluetooth).
- Use Quik or Camera Suite to import.
For seamless Bluetooth device switching, consider ToothFairy.


Recovering Lost GoPro Files
Don't panic if you lose files! Try these recovery methods:
- Check the Trash.
- Restore from Time Machine (if you have a backup).
- Use Disk Drill for comprehensive file recovery.

Choosing the Best Method
Each method offers advantages. For speed with many files, use the microSD card. For convenience, use Image Capture or wireless options. Remember to edit your videos with Filmage Editor before sharing! Try Setapp for a free 7-day trial of these apps.
FAQ
- Mac not recognizing GoPro? Check the SD card, USB cable, macOS version, and drivers.
- GoPro Bluetooth? Yes, enabled through Wireless Connections.
- GoPro editing on Mac? Use Quik or Filmage Editor.
- GoPro desktop app? Yes, Quik.
- GoPro not connecting? Update macOS, replace cable/SD card, and ensure USB Connection is set to MTP in GoPro Preferences.
The above is the detailed content of How to connect GoPro to MacBook. For more information, please follow other related articles on the PHP Chinese website!

 How to password protect a folder on Mac: Your ultimate guideApr 23, 2025 am 11:36 AM
Protecting Your Mac's Digital Treasures: A Guide to Password-Protecting Folders and Files In today's digital age, securing your important files is paramount, even in seemingly safe environments. This guide provides several methods for password-prote
![How to print black and white on Mac [3 methods preset trick]](https://img.php.cn/upload/article/001/242/473/174537895376850.jpg?x-oss-process=image/resize,p_40) How to print black and white on Mac [3 methods preset trick]Apr 23, 2025 am 11:29 AM
How to print black and white on Mac [3 methods preset trick]Apr 23, 2025 am 11:29 AMThis guide shows you how to effortlessly print black and white documents on your Mac, using readily available applications and a few handy tips. My husband's printing business, specializing in colorful band merchandise, relies on black and white for
 How to use Gmail dark mode on your computerApr 23, 2025 am 11:14 AM
Dark mode is all the rage in the digital world. Operating systems and apps are embracing it, and Gmail is no exception. This guide shows you how to enable Gmail's dark mode on desktop, iOS, and Android, and offers alternatives for a truly immersive
 How to cancel iCloud storage and keep your data – SetappApr 23, 2025 am 11:09 AM
iCloud Storage Management: A Comprehensive Guide Even with a single Apple device, iCloud's daily benefits are undeniable. It's the core of Apple's ecosystem, seamlessly syncing third-party apps across devices, offering affordable storage, device tra
 macOS Big Sur issues and how to fix themApr 23, 2025 am 10:30 AM
macOS Big Sur (macOS 11): Troubleshooting Common Issues and Solutions Released in November 2020, macOS Big Sur marked a significant design overhaul for Apple's operating system. While a major upgrade, it also introduced several known issues. This g
 10 best YouTube alternatives tried and testedApr 23, 2025 am 10:01 AM
Beyond YouTube: 10 Exciting Video Platforms to Explore YouTube reigns supreme, but its vastness can sometimes feel overwhelming. This post explores ten compelling alternatives, each offering a unique viewing experience and content focus. Prepare to
 How To Download Instagram Photos On Mac – SetappApr 23, 2025 am 09:56 AM
Instagram: A complete guide to image download and management Since its launch in 2010, Instagram has quickly become the most influential social media platform. Its visual features, mainly based on photos and videos, are extremely attractive and easy to browse. In 2016, Instagram added the “Stories” feature originally launched by Snapchat, further exacerbating the reliance on Instagram as it takes advantage of the sensitivity of time (the story disappears after 24 hours). All in all, Instagram's influence is growing. Currently, it is the best platform to stay connected with friends, follow celebrities, express creativity, and get inspiration from other people’s works. But, if you stumble upon it,
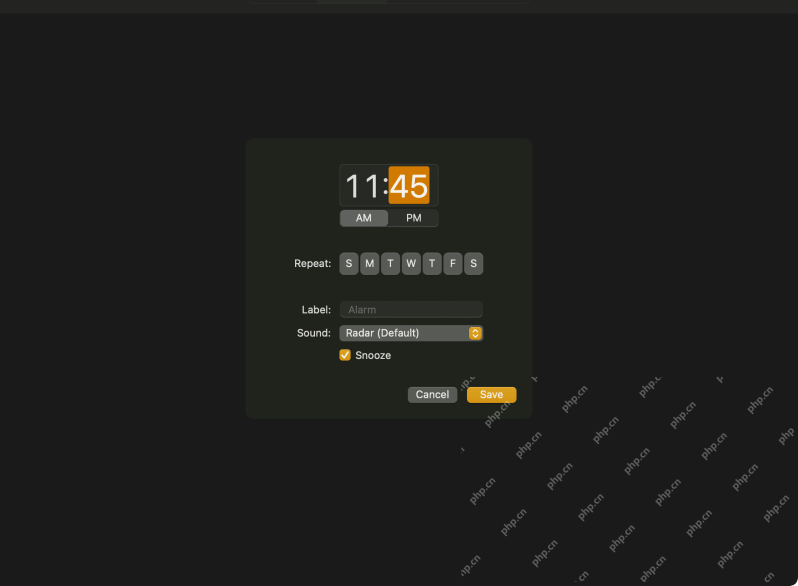 Can You Set Alarm on Mac? How to Put It on MacBook Air/Pro?Apr 23, 2025 am 09:42 AM
Does Mac computers come with alarm clock function? How to set up a Mac computer alarm? Yes, the latest macOS system comes with an alarm clock application. To set up a Mac computer alarm, simply click the icon and select "Open". There are other alternatives for older macOS systems. How to set an alarm on a Mac? If your Mac computer is running macOS Ventura or later, setting up an alarm is very easy. Launch the built-in alarm app and click the alarm at the top of the window to set the time and day of the week you need to remind you, as well as other preferences. Click Save. 1. Use the Apple Clock App For macOS Ventura or later, setting an alarm or timer is easiest


Hot AI Tools

Undresser.AI Undress
AI-powered app for creating realistic nude photos

AI Clothes Remover
Online AI tool for removing clothes from photos.

Undress AI Tool
Undress images for free

Clothoff.io
AI clothes remover

Video Face Swap
Swap faces in any video effortlessly with our completely free AI face swap tool!

Hot Article
Hot Tools

Notepad++7.3.1
Easy-to-use and free code editor

DVWA
Damn Vulnerable Web App (DVWA) is a PHP/MySQL web application that is very vulnerable. Its main goals are to be an aid for security professionals to test their skills and tools in a legal environment, to help web developers better understand the process of securing web applications, and to help teachers/students teach/learn in a classroom environment Web application security. The goal of DVWA is to practice some of the most common web vulnerabilities through a simple and straightforward interface, with varying degrees of difficulty. Please note that this software

MantisBT
Mantis is an easy-to-deploy web-based defect tracking tool designed to aid in product defect tracking. It requires PHP, MySQL and a web server. Check out our demo and hosting services.

SublimeText3 Chinese version
Chinese version, very easy to use

mPDF
mPDF is a PHP library that can generate PDF files from UTF-8 encoded HTML. The original author, Ian Back, wrote mPDF to output PDF files "on the fly" from his website and handle different languages. It is slower than original scripts like HTML2FPDF and produces larger files when using Unicode fonts, but supports CSS styles etc. and has a lot of enhancements. Supports almost all languages, including RTL (Arabic and Hebrew) and CJK (Chinese, Japanese and Korean). Supports nested block-level elements (such as P, DIV),

