


BIOS or UEFI passwords are stored at the hardware level. If you forget your BIOS or UEFI password, you may not be able to operate your computer or change BIOS settings until you clear the forgotten password. If you wish to recover, reset, or remove a lost or forgotten BIOS from your Dell computer, you have the following options:
- Option 1: Remove BIOS passwords using Master Password
- Option 2: Temporarily remove the CMOS battery
- Option 3: Remove the password jumper from the system board
How to Use Master Password to Remove BIOS password
Step 1: Restart the computer and tap F2 key during POST to enter System Setup (BIOS). This should prompt for BIOS password. Type the password that you might have set on your computer and press Enter key once.

Step 2: If unsuccessful, you will prompted with the message 'Invalid Password'. Press Enter key to try again. On three unsuccessful attempts, you will be prompted with the message 'Invalid Password. HDD is Locked'.
Step 3: Make a note of the Service Tag and the Hard-drive S/N mentioned on top of the screen.
Step 4: Contact Dell for Password release code.
Click here to open the Dell Support contact website. Enter your system Service Tag information, and then you will get the master password to clear BIOS password.
Note: The Service Tag will be documented on a small sticker on the bottom, back, or side of your Dell PC. The Service Tag is a 7 digit identifier that is unique to your Dell. The Service Tag is different from the 10 digit Express Service Code.
Step 5: Clearing Password.
Once Dell Support has provided the master password, you will enter this at the prompt and then press Ctrl + Enter to complete the process. The master hard drive password will automatically clear the hard drive password.
Note: If the computer responds with the message Invalid Password, press the Enter key and continue to enter the same password three more times. After the fourth attempt the BIOS should accept the master password, clear the password, and allow access to the hard drive.
How to Temporarily Remove CMOS Battery (Remove the forgotten BIOS password)
All full tower desktop computers use a 3 volt lithium battery, which also used on wrist watches and other small electronic devices. The CMOS battery keeps the time and date, even if the computer is off and unplugged. A CMOS battery usually lasts two to three years. When you remove and replace the CMOS battery, your BIOS will reset. What's more, the BIOS password will be removed.
Here's how to do it on a Dell Latitude laptop:
Step 1: Turn off your PC's power supply and remove all connections.
Step 2: Make sure you're properly grounded to prevent damage to your computer.
Step 3: Open the computer case and lift the battery away from the laptop body.
Step 4: Remove two M2 x 3mm Phillips #0 screws from the base cover.

Step 5: Slide the base cover down slightly and remove it.
Step 6: Locate the CMOS battery and remove the CMOS battery. On most motherboards, the battery holder lays flat on the board itself and has a small metal tab.
- Position your spudger on the edge of the white connector between the connector and the port.
- Pull back on the connector until the plastic head disconnects from the port on the laptop body.
- Separate the wrapped battery stack from the body by pulling up the wire.

Step 5: After removing the battery, wait several minutes (at least five minutes), then reattach the battery to your motherboard and turn the computer back on.
Alternatively, you may want to replace it with a new battery, rather than simply reinserting the old one. To install the battery, press it on the battery holder keeping the positive (flat) side facing you.
How to use the jumper to reset the BIOS password on Dell computer
Step 1: Turn off the computer. Unplug the power cable and remove all connections.
Step 2: With your computer still turned off and unplugged, remove your computer's cover.
Step 3: Locate the password jumper on the motherboard, look for the letters PWD, PSWD or PSWDCLR.
Step 4: Choose an option to remove password jumper:
If there are 2 metals pins under the jumper
1. Remove the jumper from the pins, replace the computer cover, reconnect the power cable and monitor and turn on the computer.
2. After the Windows logon screen appears, turn off the computer.
3. Again, disconnect the power cable and monitor.
4. Press and hold the power button for 10 seconds to release static electricity from the system.
5. Remove your computer cover.
6. Replace the jumper in its original position covering the 2 pins. This will re-enable password feature.
7. Replace the computer cover.
8. Reconnect the power cable and other connections and turn on the computer.

If there are 3 pins under the jumper
- Remembering which two pins are covered, remove the jumper from those pins.
- Reinstall the jumper in a different position. For example, if you removed the jumper from pins 2 and 3, reinstall the jumper over pins 1 and 2.
- Replace the computer cover and reconnect the power cable and monitor.
- Turn on the computer and wait 5 seconds. Then press and hold the Power button until the computer turns off again.
- Disconnect the power cable and monitor again. Press and hold the Power button for 10 seconds to release static electricity from the system.
- Replace the jumper over the original 2 pins.
- Replace the computer cover.
- Reconnect the power cable and other connections and turn on the computer.

The above is the detailed content of How to Reset Forgotten BIOS Password on Dell Laptop. For more information, please follow other related articles on the PHP Chinese website!

 6 Reasons to Try Windows Subsystem for Linux (WSL)Apr 25, 2025 am 06:09 AM
Windows Subsystem for Linux (WSL): Your Gateway to the Linux World While Windows enjoys widespread consumer popularity for its user-friendliness, Linux dominates the professional sphere. Whether you're a curious beginner or seeking seamless Windows-
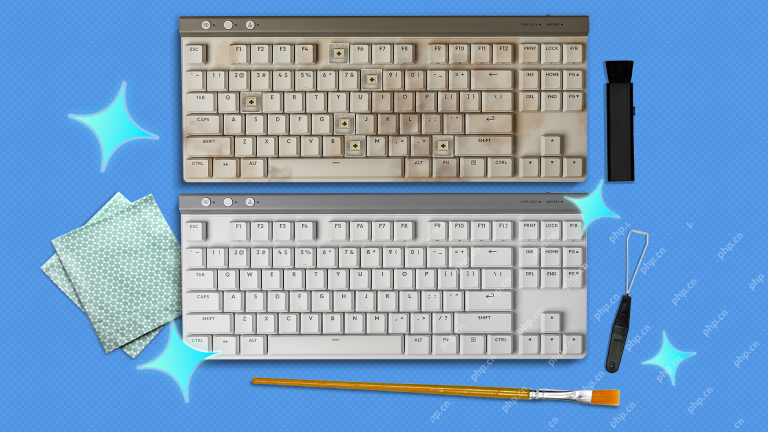 Don't Throw Out That Old Keyboard, Fix Up It Up InsteadApr 25, 2025 am 06:01 AM
How to Clean and Repair a Broken Keyboard I always have some tools ready before starting to repair any computer parts: Precision screwdriver set Cotton swab Isopropanol Magnetic bowl In addition, you need gentle dishwashing liquid, toothpicks, compressed air and keycap puller. Easy to pull out the key caps. After preparing the materials, you must first determine the degree of damage to the keyboard. Be sure to check for damage to the cable first. Just stained with soda and dust? Or are mechanical parts damaged? Or is there a circuit problem? The easiest first step to diagnose a problem is to open Notepad (or other plain text editor) and press each key on the keyboard to make sure they all appear correctly in Notepad. Note any keys that don't work, are difficult to press, or are stuck. Be sure to check all Cs on your keyboard
 Intel Arrow Lake CPUs Are Getting a Speed Boost, but You Need an UpdateApr 25, 2025 am 03:01 AM
Intel's Free Arrow Lake Overclocking Boost: Faster Gaming for Core Ultra CPUs Your Intel Core Ultra 200-series processor might already be a powerhouse, but Intel's latest free update delivers a significant performance boost for gamers. The "Int
 Windows 11 Fixed My Biggest Problem With The TaskbarApr 25, 2025 am 01:10 AM
Windows 11 Taskbar's New "End Task" Button: A Game Changer for App Closing Closing stubborn or frozen apps on Windows has always been a hassle. The simple "Close" button often fails to completely shut down background processes.
 You Should Be Buying Used MonitorsApr 25, 2025 am 01:09 AM
Computer monitors boast impressive longevity, outlasting many other PC components. Unlike components with moving parts like hard drives or fans, monitors, particularly VA and IPS types, have a simple design with no moving parts, resulting in extende
 How to Disable Access to Settings in Windows Apr 24, 2025 pm 08:01 PM
Restricting Access to Windows Settings: Two Proven Methods Many users don't require, and shouldn't have, access to Windows settings that could potentially harm the system. This is especially critical in shared environments or networks where unauthori
 Lenovo's First 2025 ThinkPads Have AMD's Zen 5 And Intel's Arrow Lake ChipsApr 24, 2025 am 09:17 AM
Lenovo Unveils Revamped ThinkPad Lineup with Cutting-Edge Processors Lenovo has announced a major update to its iconic ThinkPad laptop series, introducing new models across the P, L, and X1 ranges. These laptops boast the latest in processor technol
 Samsung's Glasses-Free 3D Gaming Monitors Are Now AvailableApr 24, 2025 am 06:06 AM
Samsung's new Odyssey gaming monitors offer immersive 3D gaming experiences, along with impressive specs. The 3D functionality isn't limited to specific games; Samsung's AI can convert compatible 2D videos to 3D, breathing new life into older conten


Hot AI Tools

Undresser.AI Undress
AI-powered app for creating realistic nude photos

AI Clothes Remover
Online AI tool for removing clothes from photos.

Undress AI Tool
Undress images for free

Clothoff.io
AI clothes remover

Video Face Swap
Swap faces in any video effortlessly with our completely free AI face swap tool!

Hot Article
Hot Tools

SAP NetWeaver Server Adapter for Eclipse
Integrate Eclipse with SAP NetWeaver application server.

DVWA
Damn Vulnerable Web App (DVWA) is a PHP/MySQL web application that is very vulnerable. Its main goals are to be an aid for security professionals to test their skills and tools in a legal environment, to help web developers better understand the process of securing web applications, and to help teachers/students teach/learn in a classroom environment Web application security. The goal of DVWA is to practice some of the most common web vulnerabilities through a simple and straightforward interface, with varying degrees of difficulty. Please note that this software

EditPlus Chinese cracked version
Small size, syntax highlighting, does not support code prompt function

PhpStorm Mac version
The latest (2018.2.1) professional PHP integrated development tool

SublimeText3 Linux new version
SublimeText3 Linux latest version

