在我们日常上网浏览网页的时候,经常会看到一些好看的图片,我们就希望把这些图片保存下载,或者用户用来做桌面壁纸,或者用来做设计的素材。
我们最常规的做法就是通过鼠标右键,选择另存为。但有些图片鼠标右键的时候并没有另存为选项,还有办法就通过就是通过截图工具截取下来,但这样就降低图片的清晰度。好吧~!其实你很厉害的,右键查看页面源代码。
我们可以通过python 来实现这样一个简单的爬虫功能,把我们想要的代码爬取到本地。下面就看看如何使用python来实现这样一个功能。
一、获取整个页面数据
首先我们可以先获取要下载图片的整个页面信息。
getjpg.py
#coding=utf-8
import urllib

def getHtml(url):
  page = urllib.urlopen(url)
  html = page.read()
  return html

html = getHtml("http://tieba.baidu.com/p/2738151262")

print html
Urllib模块提供了读取web页面数据的接口,我们可以像读取本地文件一样读取www和ftp上的数据。首先,我们定义了一个getHtml()函数:
urllib.urlopen()方法用于打开一个URL地址。
read()方法用于读取URL上的数据,向getHtml()函数传递一个网址,并把整个页面下载下来。执行程序就会把整个网页打印输出。
二、筛选页面中想要的数据
Python 提供了非常强大的正则表达式,我们需要先要了解一点python 正则表达式的知识才行。
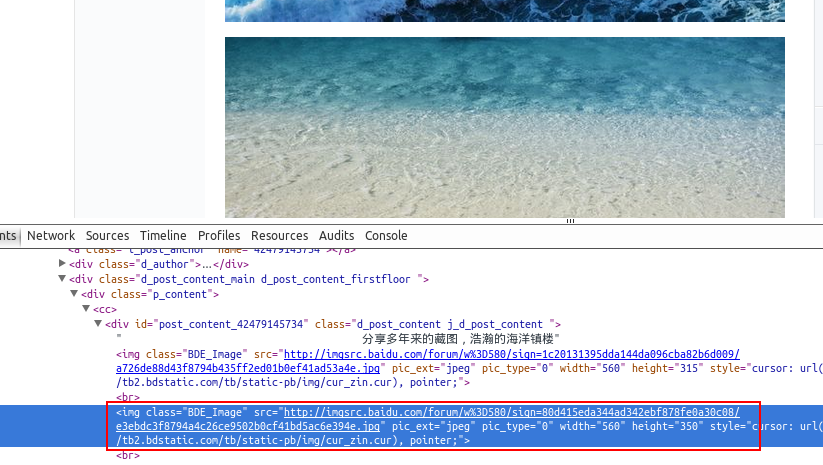
假如我们百度贴吧找到了几张漂亮的壁纸,通过到前段查看工具。找到了图片的地址,如:src=”http://imgsrc.baidu.com/forum......jpg”pic_ext=”jpeg”

修改代码如下:
import re
import urllib

def getHtml(url):
  page = urllib.urlopen(url)
  html = page.read()
  return html

def getImg(html):
  reg = r'src="(.+?\.jpg)" pic_ext'
  imgre = re.compile(reg)
  imglist = re.findall(imgre,html)
  return imglist

html = getHtml("http://tieba.baidu.com/p/2460150866")
print getImg(html)
我们又创建了getImg()函数,用于在获取的整个页面中筛选需要的图片连接。re模块主要包含了正则表达式:
- re.compile() 可以把正则表达式编译成一个正则表达式对象.
- re.findall() 方法读取html 中包含 imgre(正则表达式)的数据.
运行脚本将得到整个页面中包含图片的URL地址。
三、将页面筛选的数据保存到本地
把筛选的图片地址通过for循环遍历并保存到本地,代码如下:
#coding=utf-8
import urllib
import re

def getHtml(url):
  page = urllib.urlopen(url)
  html = page.read()
  return html

def getImg(html):
  reg = r'src="(.+?\.jpg)" pic_ext'
  imgre = re.compile(reg)
  imglist = re.findall(imgre,html)
  x = 0
  for imgurl in imglist:
    urllib.urlretrieve(imgurl,'%s.jpg' % x)
    x+=1


html = getHtml("http://tieba.baidu.com/p/2460150866")

print getImg(html)
这里的核心是用到了urllib.urlretrieve()方法,直接将远程数据下载到本地。
通过一个for循环对获取的图片连接进行遍历,为了使图片的文件名看上去更规范,对其进行重命名,命名规则通过x变量加1。保存的位置默认为程序的存放目录。
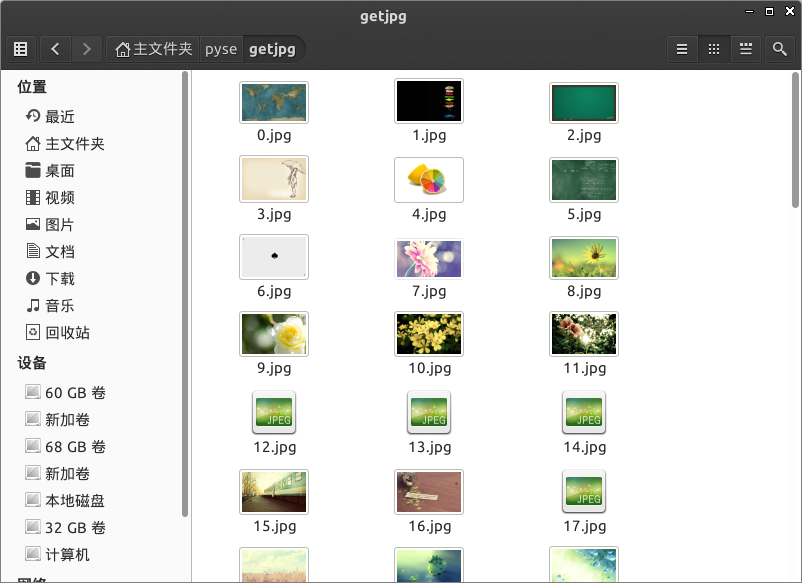
程序运行完成,将在目录下看到下载到本地的文件。
结果展示:

以上就是本文的全部内容,希望对大家实现Python爬虫功能有所帮助。
 How are arrays used in scientific computing with Python?Apr 25, 2025 am 12:28 AM
ArraysinPython,especiallyviaNumPy,arecrucialinscientificcomputingfortheirefficiencyandversatility.1)Theyareusedfornumericaloperations,dataanalysis,andmachinelearning.2)NumPy'simplementationinCensuresfasteroperationsthanPythonlists.3)Arraysenablequick
 How do you handle different Python versions on the same system?Apr 25, 2025 am 12:24 AM
You can manage different Python versions by using pyenv, venv and Anaconda. 1) Use pyenv to manage multiple Python versions: install pyenv, set global and local versions. 2) Use venv to create a virtual environment to isolate project dependencies. 3) Use Anaconda to manage Python versions in your data science project. 4) Keep the system Python for system-level tasks. Through these tools and strategies, you can effectively manage different versions of Python to ensure the smooth running of the project.
 What are some advantages of using NumPy arrays over standard Python arrays?Apr 25, 2025 am 12:21 AM
NumPyarrayshaveseveraladvantagesoverstandardPythonarrays:1)TheyaremuchfasterduetoC-basedimplementation,2)Theyaremorememory-efficient,especiallywithlargedatasets,and3)Theyofferoptimized,vectorizedfunctionsformathematicalandstatisticaloperations,making
 How does the homogenous nature of arrays affect performance?Apr 25, 2025 am 12:13 AM
The impact of homogeneity of arrays on performance is dual: 1) Homogeneity allows the compiler to optimize memory access and improve performance; 2) but limits type diversity, which may lead to inefficiency. In short, choosing the right data structure is crucial.
 What are some best practices for writing executable Python scripts?Apr 25, 2025 am 12:11 AM
TocraftexecutablePythonscripts,followthesebestpractices:1)Addashebangline(#!/usr/bin/envpython3)tomakethescriptexecutable.2)Setpermissionswithchmod xyour_script.py.3)Organizewithacleardocstringanduseifname=="__main__":formainfunctionality.4
 How do NumPy arrays differ from the arrays created using the array module?Apr 24, 2025 pm 03:53 PM
NumPyarraysarebetterfornumericaloperationsandmulti-dimensionaldata,whilethearraymoduleissuitableforbasic,memory-efficientarrays.1)NumPyexcelsinperformanceandfunctionalityforlargedatasetsandcomplexoperations.2)Thearraymoduleismorememory-efficientandfa
 How does the use of NumPy arrays compare to using the array module arrays in Python?Apr 24, 2025 pm 03:49 PM
NumPyarraysarebetterforheavynumericalcomputing,whilethearraymoduleismoresuitableformemory-constrainedprojectswithsimpledatatypes.1)NumPyarraysofferversatilityandperformanceforlargedatasetsandcomplexoperations.2)Thearraymoduleislightweightandmemory-ef
 How does the ctypes module relate to arrays in Python?Apr 24, 2025 pm 03:45 PM
ctypesallowscreatingandmanipulatingC-stylearraysinPython.1)UsectypestointerfacewithClibrariesforperformance.2)CreateC-stylearraysfornumericalcomputations.3)PassarraystoCfunctionsforefficientoperations.However,becautiousofmemorymanagement,performanceo


Hot AI Tools

Undresser.AI Undress
AI-powered app for creating realistic nude photos

AI Clothes Remover
Online AI tool for removing clothes from photos.

Undress AI Tool
Undress images for free

Clothoff.io
AI clothes remover

Video Face Swap
Swap faces in any video effortlessly with our completely free AI face swap tool!

Hot Article

Hot Tools

mPDF
mPDF is a PHP library that can generate PDF files from UTF-8 encoded HTML. The original author, Ian Back, wrote mPDF to output PDF files "on the fly" from his website and handle different languages. It is slower than original scripts like HTML2FPDF and produces larger files when using Unicode fonts, but supports CSS styles etc. and has a lot of enhancements. Supports almost all languages, including RTL (Arabic and Hebrew) and CJK (Chinese, Japanese and Korean). Supports nested block-level elements (such as P, DIV),

VSCode Windows 64-bit Download
A free and powerful IDE editor launched by Microsoft

SublimeText3 Chinese version
Chinese version, very easy to use

Zend Studio 13.0.1
Powerful PHP integrated development environment

ZendStudio 13.5.1 Mac
Powerful PHP integrated development environment


