Heim >Web-Frontend >js-Tutorial >Angular Learning Chat-Benachrichtigung (benutzerdefinierter Service)
Angular Learning Chat-Benachrichtigung (benutzerdefinierter Service)
- 青灯夜游nach vorne
- 2022-12-01 20:45:522802Durchsuche
Dieser Artikel wird Sie dabei unterstützen, Angular weiter zu lernen und die benutzerdefinierten Servicebenachrichtigungen in Angular kurz zu verstehen. Ich hoffe, dass er für alle hilfreich sein wird!

Im vorherigen Artikel haben wir Folgendes erwähnt:
Der Dienst kann nicht nur zur Verarbeitung von API-Anfragen verwendet werden, sondern hat auch andere Verwendungszwecke.
Zum Beispiel die -Benachrichtigung, über die wir in diesem Artikel sprechen werden Implementierung. [Empfohlene verwandte Tutorials: „notification 的实现。【相关教程推荐:《angular教程》】
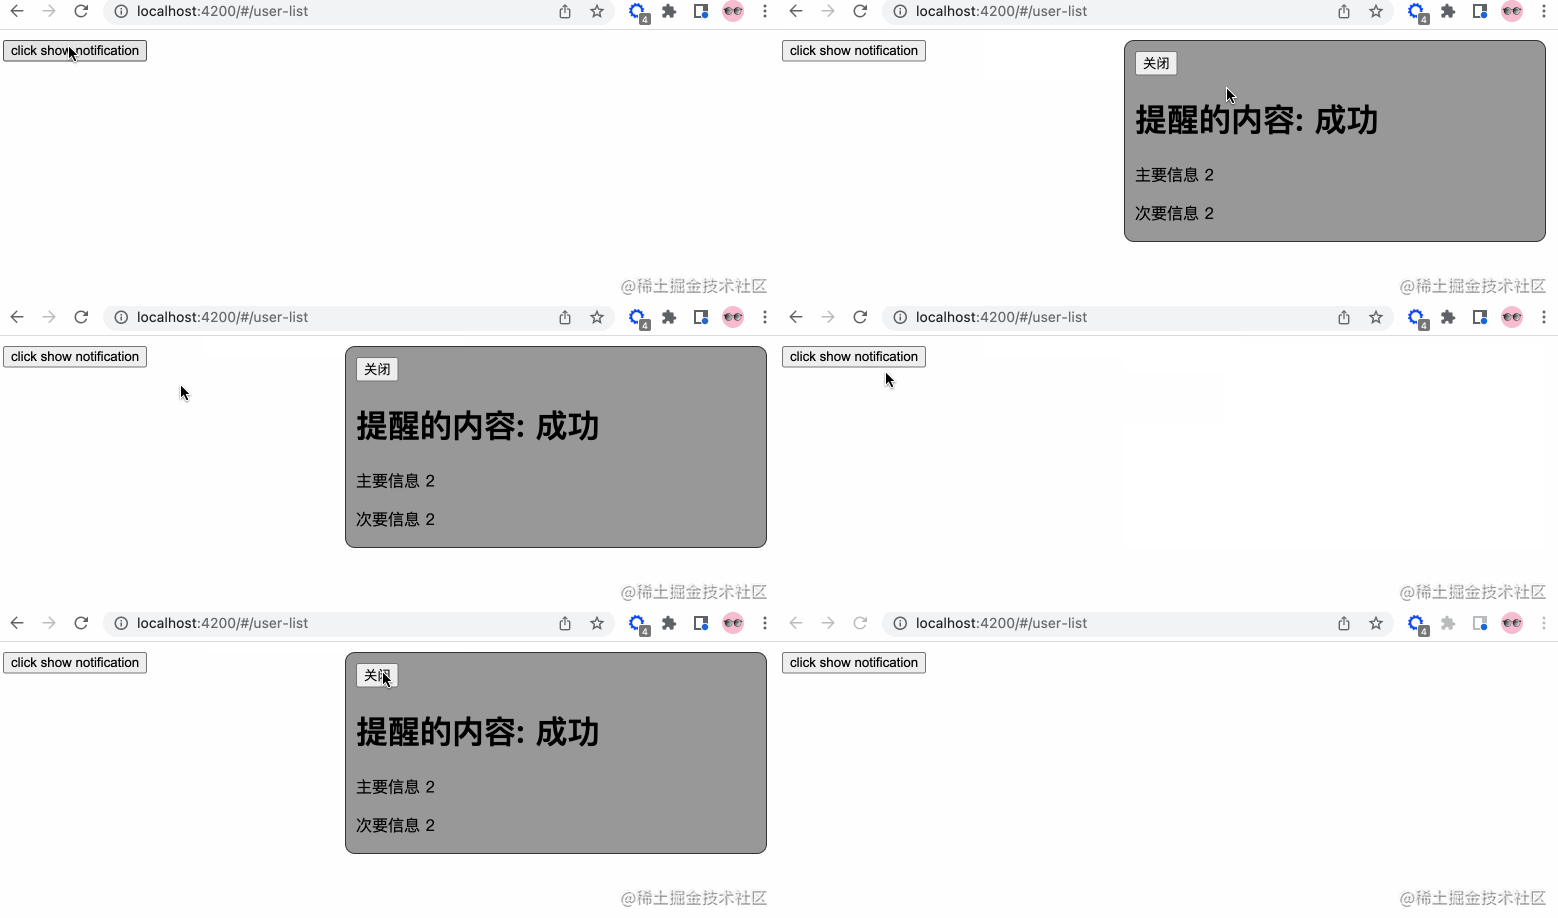
效果图如下:

UI 这个可以后期调整
So,我们一步步来分解。
添加服务
我们在 app/services 中添加 notification.service.ts 服务文件(请使用命令行生成),添加相关的内容:
// notification.service.ts
import { Injectable } from '@angular/core';
import { Observable, Subject } from 'rxjs';
// 通知状态的枚举
export enum NotificationStatus {
Process = "progress",
Success = "success",
Failure = "failure",
Ended = "ended"
}
@Injectable({
providedIn: 'root'
})
export class NotificationService {
private notify: Subject<NotificationStatus> = new Subject();
public messageObj: any = {
primary: '',
secondary: ''
}
// 转换成可观察体
public getNotification(): Observable<NotificationStatus> {
return this.notify.asObservable();
}
// 进行中通知
public showProcessNotification() {
this.notify.next(NotificationStatus.Process)
}
// 成功通知
public showSuccessNotification() {
this.notify.next(NotificationStatus.Success)
}
// 结束通知
public showEndedNotification() {
this.notify.next(NotificationStatus.Ended)
}
// 更改信息
public changePrimarySecondary(primary?: string, secondary?: string) {
this.messageObj.primary = primary;
this.messageObj.secondary = secondary
}
constructor() { }
}是不是很容易理解...
我们将 notify 变成可观察物体,之后发布各种状态的信息。
创建组件
我们在 app/components 这个存放公共组件的地方新建 notification 组件。所以你会得到下面的结构:
notification
├── notification.component.html                     // 页面骨架
├── notification.component.scss                     // 页面独有样式
├── notification.component.spec.ts                  // 测试文件
└── notification.component.ts                       // javascript 文件
我们定义 notification 的骨架:
<!-- notification.component.html -->

<!-- 支持手动关闭通知 -->
<button (click)="closeNotification()">关闭</button>
<h1>提醒的内容: {{ message }}</h1>
<!-- 自定义重点通知信息 -->
<p>{{ primaryMessage }}</p>
<!-- 自定义次要通知信息 -->
<p>{{ secondaryMessage }}</p>
接着,我们简单修饰下骨架,添加下面的样式:
// notification.component.scss

:host {
  position: fixed;
  top: -100%;
  right: 20px;
  background-color: #999;
  border: 1px solid #333;
  border-radius: 10px;
  width: 400px;
  height: 180px;
  padding: 10px;
  // 注意这里的 active 的内容,在出现通知的时候才有
  &.active {
    top: 10px;
  }
  &.success {}
  &.progress {}
  &.failure {}
  &.ended {}
}
success, progress, failure, ended 这四个类名对应 notification service 定义的枚举,可以按照自己的喜好添加相关的样式。
最后,我们添加行为 javascript 代码。
// notification.component.ts

import { Component, OnInit, HostBinding, OnDestroy } from '@angular/core';
// 新的知识点 rxjs
import { Subscription } from 'rxjs';
import {debounceTime} from 'rxjs/operators';
// 引入相关的服务
import { NotificationStatus, NotificationService } from 'src/app/services/notification.service';

@Component({
  selector: 'app-notification',
  templateUrl: './notification.component.html',
  styleUrls: ['./notification.component.scss']
})
export class NotificationComponent implements OnInit, OnDestroy {

  // 防抖时间,只读
  private readonly NOTIFICATION_DEBOUNCE_TIME_MS = 200;

  protected notificationSubscription!: Subscription;
  private timer: any = null;
  public message: string = ''

  // notification service 枚举信息的映射
  private reflectObj: any = {
    progress: "进行中",
    success: "成功",
    failure: "失败",
    ended: "结束"
  }

  @HostBinding('class') notificationCssClass = '';

  public primaryMessage!: string;
  public secondaryMessage!: string;

  constructor(
    private notificationService: NotificationService
  ) { }

  ngOnInit(): void {
    this.init()
  }

  public init() {
    // 添加相关的订阅信息
    this.notificationSubscription = this.notificationService.getNotification()
      .pipe(
        debounceTime(this.NOTIFICATION_DEBOUNCE_TIME_MS)
      )
      .subscribe((notificationStatus: NotificationStatus) => {
        if(notificationStatus) {
          this.resetTimeout();
          // 添加相关的样式
          this.notificationCssClass = `active ${ notificationStatus }`
          this.message = this.reflectObj[notificationStatus]
          // 获取自定义首要信息
          this.primaryMessage = this.notificationService.messageObj.primary;
          // 获取自定义次要信息
          this.secondaryMessage = this.notificationService.messageObj.secondary;
          if(notificationStatus === NotificationStatus.Process) {
            this.resetTimeout()
            this.timer = setTimeout(() => {
              this.resetView()
            }, 1000)
          } else {
            this.resetTimeout();
            this.timer = setTimeout(() => {
              this.notificationCssClass = ''
              this.resetView()
            }, 2000)
          }
        }
      })
  }

  private resetView(): void {
    this.message = ''
  }

  // 关闭定时器
  private resetTimeout(): void {
    if(this.timer) {
      clearTimeout(this.timer)
    }
  }

  // 关闭通知
  public closeNotification() {
    this.notificationCssClass = ''
    this.resetTimeout()
  }

  // 组件销毁
  ngOnDestroy(): void {
    this.resetTimeout();
    // 取消所有的订阅消息
    this.notificationSubscription.unsubscribe()
  }

}
在这里,我们引入了 rxjs 这个知识点,RxJS 是使用 Observables 的响应式编程的库,它使编写异步或基于回调的代码更容易。这是一个很棒的库,接下来的很多文章你会接触到它更多的内容。
这里我们使用了 debounce 防抖函数,函数防抖,就是指触发事件后,在 n 秒后只能执行一次,如果在 n 秒内又触发了事件,则会重新计算函数的执行时间。简单来说:当一个动作连续触发,只执行最后一次。
ps:
throttle节流函数:限制一个函数在一定时间内只能执行一次。
在面试的时候,面试官很喜欢问...
调用
因为这个一个全局的服务,我们在 app.component.html 中调用此组件:
// app.component.html

<router-outlet></router-outlet>
<app-notification></app-notification>
为了方便演示,我们在 user-list.component.html 中添加按钮,方便触发演示:
// user-list.component.html

<button (click)="showNotification()">click show notification</button>
触发相关的代码:
// user-list.component.ts

import { NotificationService } from 'src/app/services/notification.service';

// ...
constructor(
  private notificationService: NotificationService
) { }

// 展示通知
showNotification(): void {
  this.notificationService.changePrimarySecondary('主要信息 1');
  this.notificationService.showProcessNotification();
  setTimeout(() => {
    this.notificationService.changePrimarySecondary('主要信息 2', '次要信息 2');
    this.notificationService.showSuccessNotification();
  }, 1000)
}
至此,大功告成,我们成功模拟了 notificationAngular-Tutorial
Dienst hinzufügen
🎜Wir fügennotification.service.tsapp/services / hinzu. code> Servicedatei (bitte verwenden Sie zum Generieren die Befehlszeile), fügen Sie relevanten Inhalt hinzu: 🎜rrreee🎜Ist das nicht leicht zu verstehen...🎜🎜Wir werden notify in ein beobachtbares Objekt umwandeln und Veröffentlichen Sie dann die einzelnen Statusinformationen. 🎜Komponente erstellen
🎜Wir erstellen eine neueBenachrichtigung in <code>app/components, wo sich öffentliche Komponenten befinden gespeicherte Komponente. Sie erhalten also die folgende Struktur:🎜rrreee🎜Wir definieren das Grundgerüst der Benachrichtigung:🎜rrreee🎜Dann modifizieren wir einfach das Grundgerüst und fügen den folgenden Stil hinzu:🎜rrreee🎜Erfolg, Fortschritt , Fehler, beendet Diese vier Klassennamen entsprechen der vom Benachrichtigungsdienst definierten Aufzählung. Sie können verwandte Stile entsprechend Ihren eigenen Vorlieben hinzufügen. 🎜🎜Schließlich fügen wir den verhaltensbezogenen Javascript-Code hinzu. 🎜rrreee🎜Hier stellen wir den Wissenspunkt von rxjs vor, einer reaktiven Programmierbibliothek, die Observables verwendet, was das Schreiben asynchron macht Oder Rückruf basierte Code ist einfacher. Dies ist eine großartige Bibliothek, und Sie werden in den kommenden Artikeln mehr darüber erfahren. 🎜🎜Hier verwenden wir die Anti-Shake-Funktion debounce, die bedeutet, dass ein Ereignis nach dem Auslösen nur einmal ausgeführt werden kann, wenn das Ereignis erneut ausgelöst wird Innerhalb von n Sekunden wird die Ausführungszeit der Funktion neu berechnet. Vereinfacht ausgedrückt: Wenn eine Aktion kontinuierlich ausgelöst wird, wird nur das letzte Mal ausgeführt. 🎜🎜🎜ps: throttle Drosselfunktion: Beschränken Sie die Ausführung einer Funktion nur einmal innerhalb eines bestimmten Zeitraums. 🎜🎜🎜Während des Interviews fragt der Interviewer gerne...🎜Calling
🎜Da es sich um einen globalen Service handelt, rufen wir an Diese Komponente inapp.component.html: 🎜rrreee🎜Um die Demonstration zu erleichtern, fügen wir eine Schaltfläche in user-list.component.html hinzu, um die Demonstration einfach auszulösen: 🎜 rrreee 🎜Trigger-bezogener Code:🎜rrreee🎜An diesem Punkt sind wir fertig und haben die Funktion der Benachrichtigung erfolgreich simuliert. Wir können zugehörige Servicekomponenten je nach tatsächlichem Bedarf modifizieren und an die Geschäftsanforderungen anpassen. Wenn wir ein System für den internen Gebrauch entwickeln, empfiehlt es sich, ausgereifte UI-Bibliotheken zu verwenden. Sie haben uns bereits dabei geholfen, verschiedene Komponenten und Dienste zu kapseln, was uns viel Entwicklungszeit spart. 🎜🎜【Ende】✅🎜🎜Weitere Kenntnisse zum Thema Programmierung finden Sie unter: 🎜Programmierunterricht🎜! ! 🎜Das obige ist der detaillierte Inhalt vonAngular Learning Chat-Benachrichtigung (benutzerdefinierter Service). Für weitere Informationen folgen Sie bitte anderen verwandten Artikeln auf der PHP chinesischen Website!
In Verbindung stehende Artikel
Mehr sehen- Wie implementiert Angular die Ansichtskapselung? Lassen Sie uns über drei Verpackungsmodi sprechen
- Vertiefte Kenntnisse von NgModule (Modul) in Angular
- Lassen Sie uns darüber sprechen, wie Sie das Angular-DateTime-Picker-Format anpassen
- So verwenden Sie TemplateRef im Angular-Dienst
- Lassen Sie uns über das verzögerte Laden von Modulen und die dynamische Anzeige ihrer Komponenten in Angular sprechen
- Angular Learning spricht über Direktivenanweisungen


