Heim >Web-Frontend >View.js >Vuex-Modul – Einführung in die Verwendung der State-Warehouse-Partitionierung
Vuex-Modul – Einführung in die Verwendung der State-Warehouse-Partitionierung
- 藏色散人nach vorne
- 2022-08-10 16:01:011903Durchsuche
vuex-Zusammensetzung
vuex besteht hauptsächlich aus den folgenden fünf Teilen:
- State // Variablen und Daten speichern
- Getter // Ähnlich wie berechnete Eigenschaften
- Mutation // Die einzige Möglichkeit, den Status zu ändern
- Action / / Asynchroner Aufruf Mutation
- Module // Modularisieren Sie den Store
vuex-Module verwenden
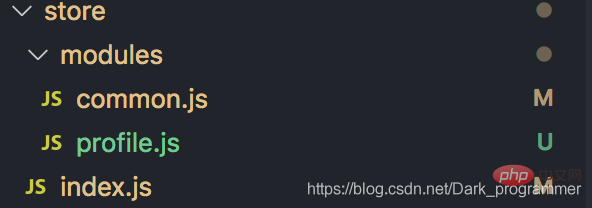
, um Verzeichnisse zu erstellen

In diesem Beispiel habe ich zwei Store-Dateien erstellt, die profile.js和custom.js,一个根文件index.js
custom.js
const customs = {
    namespaced: true, // 创建命名空间
    state: { // 存储变量
        showAlert: false
    },
    mutations: { // 定义修改state方法
        CHANGESHOW: (state, params) => {
            state.showAlert = !state.showAlert        }
    },
    actions: { // 异步调用mutations
        setShow: ({ commit }) => {
            commit('CHANGESHOW')
        }
    },
    getters: { // 将数据过滤输出
        bodyShow: state => state.showAlert    }}export default customs
Profil sind .js
const profile = {
  namespaced: true,
  state: {
    name: 'common name',
    age: 18,
    bool: false
  },
  mutations: {
    CHANGEMSG: (state, params) => {
      state.name = params    },
    CHANGEAGE: (state, params) => {
      state.name = params    },
    CHANGEBOOL: (state) => {
      state.bool = !state.bool    }
  },
  actions: {
    setName: ({ commit }) => {
      commit('CHANGEMSG', 'Vuex common name')
    },
    setAge: ({ commit }) => {
      commit('CHANGEAGE', 81)
    },
    setBool: ({ commit }) => {
      commit('CHANGEBOOL')
    }
  },
  getters: {
    vuexName: state => state.name,
    vuexAge: state => state.age,
    vuexBool: state => state.bool  }}export default common
index.js
import Vue from 'vue'
import Vuex from 'vuex'

// 引入子store
import profile from './modules/profile'
import customs from './modules/customs'

// Vue.use(Vuex)
const store = new Vuex.Store({
  modules: {
    profile,
    customs
  }
})

export default store // 导出store,以便于后续使用
wird in der .vue-Datei verwendet, die verwendet werden muss. Die Methode ist wie folgt
index.vue
<template>
<div>
name: <h5>{{vuexName}}</h5> <button @click='setName'>chenge name</button>
age: <h5>{{vuexAge}}</h5> <button @click='setAge'>chenge age</button>
bool: <h5>{{vuexBool}}</h5> <button @click='setBool'>chenge bool</button>
<br/>
<span @click='setShow' style='display:inline-block;width:200px;height:30px;border:1px solid #999;border-radius:5px;text-align:center;line-height:30px;cursor: pointer;'>click me ,change showAlert</span>
<em>{{bodyShow}}</em>
</div>
</template>
<script>
import { mapActions, mapGetters } from 'vuex'
export default {
computed: {
...mapGetters('profile', ['vuexName', 'vuexAge', 'vuexBool']),
...mapGetters('customs', ['bodyShow'])
},
methods: {
...mapActions('customs', ['setShow']),
...mapActions('profile', ['setName', 'setAge', 'setBool']),
}
</script>
<style>
</style>app.js
import Vue from 'vue';
import VueRouter from 'vue-router';
// style
import './../../sass/app.scss';

// Components
import Main from './Main.vue';
import routes from './routes';
// store
import store from './store';  // 将store挂载到Vue

Vue.use(VueRouter);

const router = new VueRouter({
  routes,
  saveScrollPosition: true,
});

new Vue({ router, store, ...Main }).$mount('#app');
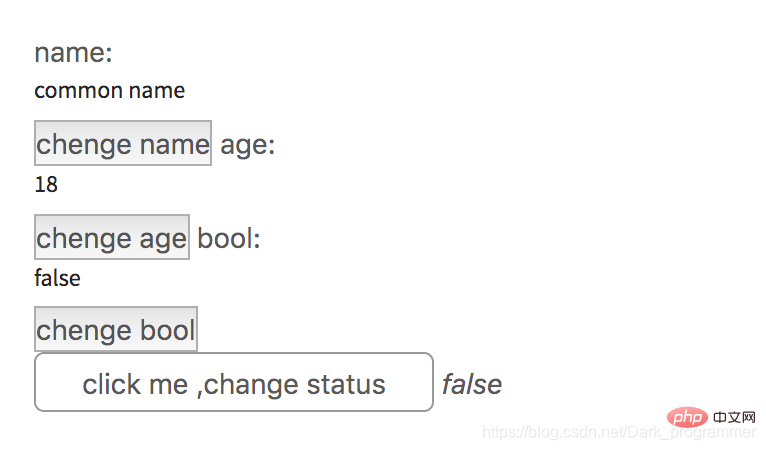
Erstes Rendern ⬇️
Rendern nach Klicken auf die Schaltfläche ⬇️
An diesem Punkt ist die Demonstration des Modulnutzungsprozesses abgeschlossen! [Verwandte Empfehlungen: vue.js Video-Tutorial]
Das obige ist der detaillierte Inhalt vonVuex-Modul – Einführung in die Verwendung der State-Warehouse-Partitionierung. Für weitere Informationen folgen Sie bitte anderen verwandten Artikeln auf der PHP chinesischen Website!
In Verbindung stehende Artikel
Mehr sehen- Leicht zu verstehen! Ausführliche Erläuterung der staatlichen Lagerverwaltung von VUEX
- Ein Artikel, der die grundlegende Verwendung der berechneten Eigenschaften von VUEX-Gettern analysiert
- Detaillierte Erläuterung der Verwendung von Mutation in der Vuex-Zustandsverwaltung
- Detaillierte Erläuterung des asynchronen Aktionsbetriebs der Vuex-Statusverwaltung

