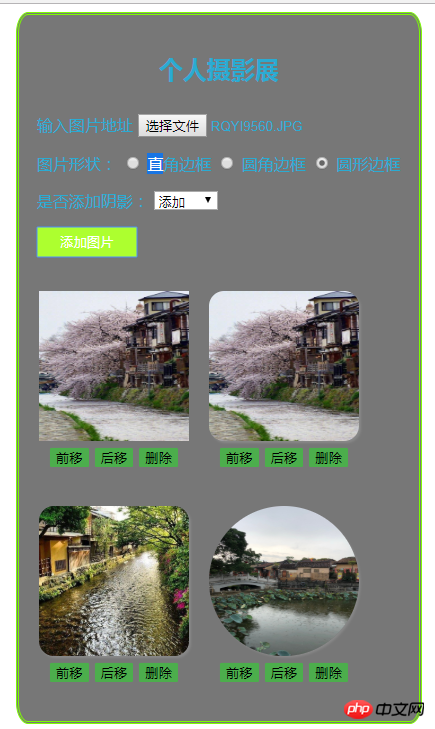
作业:实现一个相册的添加,移动和删除功能
实例
<!doctype html>
<html lang="en">
<head>
    <meta charset="UTF-8">
    <meta name="viewport"
          content="width=device-width, user-scalable=no, initial-scale=1.0, maximum-scale=1.0, minimum-scale=1.0">
    <meta http-equiv="X-UA-Compatible" content="ie=edge">
    <title>纪念相册</title>
    <script src="../lib/jquery.js"></script>
    <style>
        .warp{
            width:400px;
            height: auto;
            background-color: #777777;
            border: 3px double lawngreen;
            color: #2aabd2; /*字体颜色*/
            border-radius:3%;
            margin:auto;
        }
        .header{
            padding: 18px;
        }
        .warp .header h2 {
            text-align: center;
            margin-bottom: 30px;
        }
        .add{
            width: 100px;
            height: 30px;
            border: none;
            cursor: pointer;/*添加个手*/
            background-color: greenyellow;
            color: white;/*俗话说的前景色*/
        }
        .add:hover{
            background-color: black;
            font-size: 1.2rem;
        }
        .main{
            overflow: hidden;
            /*包裹子元素*/
        }
        .main ul{
            padding: 0;
            margin: 0;
        }
        .main ul li {
            list-style-type: none;/*清除list的默认样式*/
            float: left;
            margin-left: 20px;
            margin-bottom:15px;
            width: 150px;
            height: 200px;
            text-align: center;
        }
        .main ul li button {
            margin: 3px;
            border: none;
            border-radius: 5%;
            background-color: #4cae4c;
            box-shadow: #2aabd2;
        }
        .main ul li button:hover{
            background-color: lawngreen;
            color: white;
            cursor: pointer;
        }
    </style>
</head>
<body>
    <div class="warp">
        <div class="header">
            <h2>个人摄影展</h2>
            <p>
                <label for="img_url">输入图片地址</label>
               <!-- <input type="text" name="img_url" id="img_url" placeholder="图片地址">-->
                <input type="file" name="img_url" id="img_url" placeholder="图片地址">
            </p>
            <p>
                图片形状:
                <input type="radio" id="rect" name="border" value="0"> <label for="rect">直角边框</label>
                <input type="radio" id="radius" name="border" value="10%"> <label for="radius">圆角边框</label>
                <input type="radio" id="circle" name="border" value="50%"> <label for="circle">圆形边框</label>
            </p>
            <p>
                是否添加阴影:
                <select name="shadow" id="">
                    <option value="0">不添加</option>
                    <option value="1">添加</option>
                </select>
            </p>
            <p>
                <button class="add">添加图片</button>
            </p>
        </div>
        <!--图片展示区域-->
        <div class="main">
            <ul>

            </ul>
        </div>
    </div>
    <script>
        $(function () {
            $('button.add').on('click',function () {
                //1.拿到用户的图片

                //判断用户是否选择图片
                let img_url = $('#img_url').val();
                if (img_url.length === 0) {
                    alert('请选择一张图片!');
                    $(img_url).focus();
                    return false;
                }

                //2.如果用户添加了图片
                /*获取图片的边框*/
                let img_type = $(':radio:checked').val();
                let shadow = 'none' //默认不添加阴影
                if ( $(':selected').val() === "1"){ //被选中的
                    shadow = '2px 2px 2px #888';
                }


                /*console.log('http://js.net/0918/img/'+img_url.split('\\')[2]);*/
                img_url = 'http://js.net/0918/img/'+img_url.split('\\')[2];//将地址分割成对象集,取的文件名部分

                //3.创建图片元素,并添加
                let img = $('<img>').prop('src',img_url).width(150).height(150).css({
                    'border-radius':img_type,'box-shadow':shadow
                });
                let before = $('<button></button>').text('前移');
                let after = $('<button></button>').text('后移');
                let remove = $('<button></button>').text('删除');

                let contaier = $('<li>');
                //将图片和按钮添加到li中
                contaier.append(img,before,after,remove);
                contaier.appendTo('ul');//添加到ul中
                //为li下的button添加事件
                //前移事前
                before.click(function () {
                    let current = $(this).parent();//当前button的父元素是li,移动li就等于整体移动了图片
                    let prev = current.prev();//获取li的前一个元素,也就是另一个li (li里包含了一张图片)
                    prev.before(current); //在当前元素的前元素插入当天元素及实现了前移
                });
                //后移事件
                after.click(function () {
                    let current = $(this).parent();//获取img和li的父元素 li
                    let next = current.next();
                    next.after(current);
                });

                //删除事件

                remove.click(function () {
                    if(confirm('真的要删除吗?')){
                        $(this).parent().remove();//删除一个li
                    }
                    return false;
                })
            })

        })
    </script>

</body>
</html>
运行实例 »
点击 "运行实例" 按钮查看在线实例
本地效果截图:


