伪类选择器
伪是形容词,表示假的, 类,指代权重是 class 级别,权重大于 tag
- 结构伪类: 根据元素位置获取元素
- 状态伪类: 根据状态来获取元素
一. 结构伪类:用于选择子元素,所以应该给它一个查询的起点
实例代码简写:!+ul.list>li*8{item$}
完整代码如下来做解析演示:
<!DOCTYPE html><html lang="zh-CN"><head><meta charset="UTF-8" /><meta http-equiv="X-UA-Compatible" content="IE=edge" /><meta name="viewport" content="width=device-width, initial-scale=1.0" /><title>Document</title></head><body><ul class="list"><!-- 简写基础上加一个first类来更好的进行演示 --><li class="first">item1</li><li>item2</li><li>item3</li><li>item4</li><li>item5</li><li>item6</li><li>item7</li><li>item8</li></ul></body></html>
单个的伪类选择器
- 如何选择第一个 item,以往选择与伪类选择区别
<style>/* 以往操作 */.list .first {background-color: black;}/* 伪类操作 */.list > li:nth-of-type(1) {background-color: violet;}/* 伪类简化操作 *//*注意事项:冒号前面加空格正常显示,冒号后面加空格或者都加空格会不显示,冒号前后不加空格,就是全部继承*/.list :nth-first-of-type {background-color: violet;}</style>
- 如何选择最后一个 item
<style>.list :nth-last-of-type {background-color: rgb(78, 142, 184);}</style>
- 如何选择任意一个 item
.list > li:nth-of-type(x)
x 是指代某一个,假如这个是 5,那么就是.list > li:nth-of-type(5)
则代码为
<style>.list > li:nth-of-type(5) {background-color: red;}</style>
另外选择第 5 个, 相当于倒数第 4 个
可以用倒数选择的伪类:nth-last-of-type
<style>.list > li:nth-last-of-type(4) {background-color: red;}</style>
单个效果图例:
一组的伪类选择器
:nth-of-type(an+b)1. a: 系数, [0,1,2,...]2. n: [0,1,2,3,....]3. b: 偏移量, 从0开始注: 计算出来的索引,必须是有效, 从1开始
- 匹配单个的时候 a=0,0 乘任何数都 0,所以可简化,只写偏移量
即::nth-of-type(b)这个 b=1 的时候选择 1,b=2 的时候选择 2 - 匹配一组的时候 a=1,1 乘任何数不变, 所以 1 可以不写
即::nth-of-type(n),这个是选择整组
<style>/* 这个是选择整组 */.list > li:nth-of-type(n) {background-color: red;}/* 实际使用可以用另外一种 */.list > * {background-color: red;}</style>
- 实际开发过程, 使用 n + b(偏移量)来匹配元素
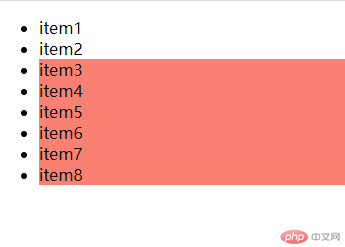
/* 匹配第3个子元素加后面的所有兄弟元素 */使用n + 3 从3开始的时候选择加以后所有的<style>.list > :nth-of-type(n + 3) {background-color: salmon;}</style>
n +3 效果图例:
n + 3 匹配原理:
n: 从0开始取, n+3 匹配的全过程1. n=0: 0+3=3, 匹配第3个2. n=1: 1+3=4, 匹配第4个3. n=2: 2+3=5, 匹配第5个4. n=3: 3+3=6, 匹配第6个5. n=4: 4+3=7, 匹配第7个6. n=5: 5+3=8, 匹配第8个7. n=6: 6+3=9, 索引越界,匹配失败,结束计算n+3 => [3,4,5,6,7,8], 匹配到6个
- 匹配前三个或者最后三个怎么处理?
匹配前三个使用:nth-of-type(-n + 3)<style>.list > :nth-of-type(-n + 3) {background-color: salmon;}</style>匹配后三个使用:nth-last-of-type(-n + 3)<style>.list > :nth-last-of-type(-n + 3) {background-color: salmon;}</style>
后三个效果图例:
- 匹配奇数或者偶数
a=2 : 匹配奇偶位置的元素
<style>/* 2n+0: 偶数位元素 */.list > :nth-of-type(2n) {background-color: lightgreen-;}/* 2n+1: 奇数位元素 */.list > :nth-of-type(2n + 1) {background-color: lightgreen-;}/* 2n简写: even, 2n+1简写: odd *//* 后面加:hover则是鼠标悬停的时候 *//* 应用在表格悬停变色比较常用 *//* .list :nth-of-type(even):hover {background-color: yellow;} */</style>
二. 状态伪类(表单)
| 序号 | 选择器 | 描述 |
|---|---|---|
| 1 | :enabled | 有效的,允许提交的表单元素 |
| 2 | :disabled | 禁用的表单元素 |
| 3 | :checked | 选中的表单元素 |
| 4 | :hover | 当鼠标悬浮在元素上方时,向元素添加样式 |
| 5 | :focus | 获取焦点的时候 |
| 6 | :active | 向被激活的元素添加样式 |
| 7 | :link | 向未被访问的链接添加样式 |
| 8 | :visited | 向已被访问的链接添加样式 |
| 9 | :root | 根元素,通常是 html |
| 10 | :empty | 选择没有任何子元素的元素(含文本节点) |
| 11 | :not | 排除与选择器参数匹配的元素 |
字体图标如何引入
一. font-class 引用
- 第 1 步:引入项目下面生成的 fontclass 代码:
<link rel="stylesheet" href="./font_icon/iconfont.css" /> - 第 2 步:挑选相应图标并获取类名,应用于页面:
<span class="iconfont icon-category"></span> - 第 3 步:设置字体图标样式:
<style>.iconfont.icon-category {font-size: 30px;color: blue;}</style>
二. Symbol 引用
- 第 1 步:引入项目下面生成的 symbol 代码:
<script src="./font_icon/iconfont.js"></script> - 第 2 步:挑选相应图标并获取类名,应用于页面:
<svg class="icon" aria-hidden="true"><use xlink:href="#icon-category"></use></svg>
- 第 3 步:设置字体图标样式:
<style>.icon {width: 1em;height: 1em;vertical-align: -0.15em;fill: currentColor;overflow: hidden;}</style>
引入效果图例:
盒模型的 5 个属性
| 序号 | 属性 | 说明 |
|---|---|---|
| 1 | width | 宽度 |
| 2 | height | 高度 |
| 3 | border | 边框 |
| 4 | padding | 内边距,呼吸区 |
| 5 | margin | 外边距 |
注:padding 和 margin 是透明的,所以只能设置宽度,但是 border 不是透明的,除了宽度还可以设置样式,前景色等
盒模型实例演示:
<div class="box"></div><style>.box {width: 200px;height: 200px;border: 10px;background-color: violet;border: 10px dashed currentColor;background-clip: content-box;/* 盒模型的四个方向可以单独设置,按顺时针,上,右,下,左三个值:上,左右,下;两个值:上下,左右;一个值均等 */padding: 20px 10px 15px 5px;/* 收缩内容区大小,使用户设置width,height就是盒子的实际大小,以方便计算与布局 *//* 使其完成目标:width = width + padding + border = 200px */box-sizing: border-box;}</style>
样式图例:
- 样式重置的简化通用方案
* {padding: 0;margin: 0;box-sizing: border-box;}
盒模型属性常用单位
| 序号 | 单位 | 说明 |
|---|---|---|
| 1 | px | 像素,绝对单位,与设备相关,1 英寸=96px |
| 2 | em | 永远和当前或父级的 font-size 进行绑定 |
| 3 | rem | 永远和 html(根元素)中的 font-size 绑定 |
| 4 | vw | 将视口宽度分为 100 份, 1vw = 1/100,响应式 |
| 5 | vh | 将视口高宽分为 100 份, 1vh = 1/100,响应式 |
- em 和 rem 区别实例演示
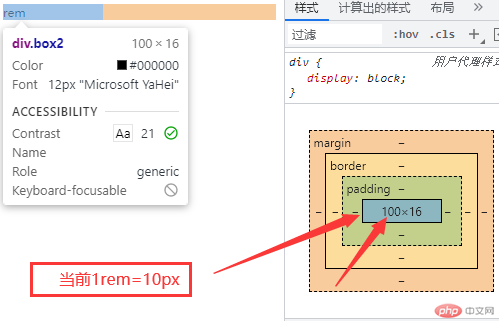
<!DOCTYPE html><html lang="zh-CN"><head><meta charset="UTF-8" /><meta http-equiv="X-UA-Compatible" content="IE=edge" /><meta name="viewport" content="width=device-width, initial-scale=1.0" /><title>Document</title></head><body><div class="box1">em</div><div class="box2">rem</div></body></html><style>* {font-size: 10px;}/* 当前10em=500px */.box1 {font-size: 50px;width: 10em;}/* 当前10rem=100px */.box2 {width: 10rem;}</style>
- em样式图例说明:

- rem样式图例说明:


