常用数组函数的应用、ajax和json的认识
一、常用的数组函数
1.push()方法在数组尾部添加一个新的元素,需要注意的是,该方法返回值是得到的新数组的长度。
- 语法
arr.push(element1, element2, element3,…)
console.log(arr.push(1, 2, 3)); // 3console.log(arr); // [1, 2, 3]
2.pop()方法从数组中删除最后一个元素。
- 语法
arr.pop()
console.log(arr.pop()); // 3
3.unshift()方法向数组的头部添加一个或多个元素,并返回新的数组长度。
- 语法
arr.unshift(element1, element2, element3,…)
arr.unshift(1, 2, 3); // 3console.log(arr); // [1, 2, 3]
unshift方法不会创建新的数组,而是改变原来的数组。
4.join()按照指定分隔符将所有数组元素组合成为一个字符串。
- 语法
arr.join(separator)
其中,separator为分隔符,默认是使用逗号作为分隔符的,同时,该方法返回的是一个字符串,通过分隔符把arr中的每个元素连接起来。
arr = ["电脑", "手机", "相册"];let res = arr.join('-');console.log(res); // 电脑-手机-相册
在JS中,字符串也可以当做数组来操作:
let str = "Hello";console.log(str[0], str[1], str[2], str[3], str[4]); // H e l l o
5.concat()通过合并现有数组来创建一个新的数组。
- 语法
arr.concat(array1,array2,…,arrayX)
console.log("hello ".concat("world")); // hello worldconsole.log([1, 2, 3].concat([4, 5], [6, 7])); // [ 1, 2, 3, 4, 5, 6, 7 ]console.log([1, 2, 3].concat(123, ["php", true], { x: 1, y: 2 })); // [ 1, 2, 3, 123, "php", true, {x: 1,y: 2} ]
6.slice()从已有的数组中选定元素并返回一个新数组。
- 语法
arr.slice(start, end)
- 参数说明:
| 参数 | 说明 |
|---|---|
| start | 必填参数,规定从什么地方开始取。若是负数,将从数组尾部开始计算,-1表示数组的最后一个元素,-2表示数组的倒数第二个元素,以此类推。 |
| end | 这是一个可选参数,规定了从何处结束取值,并且取的位置不包含该值,如果没有指定该参数,则从start一直取到末尾。 |
arr = [1, 2, 3, 4, 5];console.log(arr.slice(0, 3)); //[ 1, 2, 3 ]console.log(arr.slice(3)); // [4, 5]console.log(arr.slice(-2)); // [4, 5]
7.splice()方法可以从数组添加/删除指定的元素,并且返回的是一个存储了被删除项目的数组。
- 语法
arr.splice(index, num, item1,item2,…,itemX)
- 参数说明
| 参数 | 说明 |
|---|---|
| index | 必填参数,规定了从何处添加/删除数组,若是负数,将从数组尾部开始计算,-1表示数组的最后一个元素,-2表示数组的倒数第二个元素,以此类推。 |
| num | 必填参数,规定了要删除的项目数量,如果为0,则表示不删除项目。 |
| item1,item2,…,itemX | 向数组中添加的新项目,该参数为可选参数 |
splice()方法的返回值是一个数组,里面包含了被删除的元素。
arr = [1, 2, 3, 4, 5];res = arr.splice(2); // [ 3, 4, 5 ]
可以利用该方法更新一个数组里面的元素,例如:
arr = [1, 2, 3, 4, 5];res = arr.splice(1, 2, 88, 99);console.log(res); // [2, 3]
从上面代码可以获取res的值为一个数组,就是被删掉的元素2,3,同时原来的数组arr被修改成了[1, 88, 99, 4, 5]
8.sort()可以对数组元素进行排序。
arr.sort(orderby)
| 参数 | 说明 |
|---|---|
| orderby | 可选参数,规定了排序方式,注意:该参数必须是一个函数。 |
- 解释:
sort()方法在参数留空的时候,默认是按照字母表的顺序排序的,如果要说的更准确的话,应该说它是按照元素的字符编码的顺序进行排序的。
如果是按照其他方法排序的话,就需要传一个函数进行比较了,该函数有两个参数a和b,然后我们比较这两个参数的差值即可得到排序:
当a - b < 0时,则a应该出现在b的前面,返回一个小于0的值;
当a - b = 0时,则返回0;
当a - b > 0时,则返回一个大于0的值
arr = ["p", "b", "a"];// 默认按照字符表顺序排序console.log(arr.sort()); // [ "a", "b", "p" ]
现在我们新创建一个数组并对其进行排序:
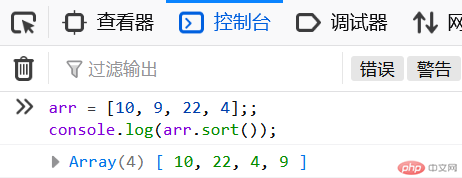
arr = [10, 9, 22, 4];console.log(arr.sort);
通过测试,可以发现,数组内部的元素并没有按照数值大小从小到大的顺序排列,结果如图:
要实现这个功能,就必须在sort()方法内部传一个函数:
function sortArray(a, b) {return a - b;}console.log(arr.sort(sortArray));
以上方法可以使用箭头函数直接写在sort()方法内部:
console.log(arr.sort((a, b) => a - b));
这样就实现了排序,结果如图:

9.forEach()方法可以遍历数组。
- 语法
arr.forEach(function (item, index, array), this)
| 参数 | 说明 |
|---|---|
| function (item, index, array) | 必填参数,每个元素调用的函数。item 当前遍历的元素;index 当前元素的索引;array 当前遍历的数组。 |
| thisValue | 可选参数,传递给函数的值使用this的值。 |
10.filter()方法可以过滤出符合指定条件的元素,兵返回一个新的数组,该方法不会改变原始数组,而是创建一个新的数组。
arr.filter(function (item, index, array), thisValue)
| 参数 | 说明 |
|---|---|
| function (item, index, array) | 必填参数,每个元素调用的函数。item 当前遍历的元素;index 当前元素的索引;array 当前遍历的数组。 |
| thisValue | 可选参数,传递给函数的值使用this的值。 |
- 案例:获取数组里面的所有偶数值:
arr = [1, 2, 3, 4, 5, 6, 7, 8, 9, 10, 11, 12, 13];res = arr.filter(item => !(item % 2));console.log(res); // [ 2, 4, 6, 8, 10, 12 ]
二、json的认识
JSON是什么?
- JSON: JavaScript Object Notation(JS 对象表示法)
- JSON 独立于任何编程语言, 几乎所有编程语言都提供了访问 JSON 数据的 API 接口
- JSON 是一种语法,用来序列化其它语言创建的数据类型
- JSON 仅支持 6 种数据类型:对象,数组,数值,字符串,布尔值,null
- JSON 只是借用了 JS 中的一些数据表示语法,与 JS 并无关系
2.1 JSON.stringify()
JSON.stringify()方法将一个JavaScript对象或值转换为JSON字符串,如果指定了一个replacer函数,则可以选择性地替换值,或者指定的replacer是数组,则可选择性地仅包含数组指定的属性。
- 语法
JSON.stringify(value[, replacer [, space]])
- 参数说明
| 参数 | 说明 |
|---|---|
| value | 需要转为JSON字符串的值 |
| replacer | 可选参数。如果该参数是一个函数,则在序列化过程中,被序列化的值的每个属性都会经过该函数的转换和处理;如果该参数是一个数组,则只有包含在这个数组中的属性名才会被序列化到最终的 JSON 字符串中;如果该参数为 null 或者未提供,则对象所有的属性都会被序列化。 |
| space | 可选参数。指定缩进用的空白字符串,用于美化输出(pretty-print);如果参数是个数字,它代表有多少的空格;上限为10。该值若小于1,则意味着没有空格;如果该参数为字符串(当字符串长度超过10个字母,取其前10个字母),该字符串将被作为空格;如果该参数没有提供(或者为 null),将没有空格。 |
- 只传一个参数:
console.log(JSON.stringify(3.14), typeof JSON.stringify(3.14)); // 3.14 stringconsole.log(JSON.stringify("php.cn")); // "php.cn"console.log(JSON.stringify({ x: 5, y: 6 })); // {"x":5,"y":6}console.log(JSON.stringify(true), typeof JSON.stringify(true)); // true stringconsole.log(JSON.stringify(null), typeof JSON.stringify(null)); // null stringtrue string
- 传两个参数:
replacer参数可以是一个函数,也可以是一个数组。如果传入的是一个函数,那么这个函数有两个参数,key(键)和value(值)。
- 案例
console.log(JSON.stringify({a: 1, b: 2, c: 3}, (key, value) => {if (value < 2) {return undefined;}return value;}));
- 效果图:
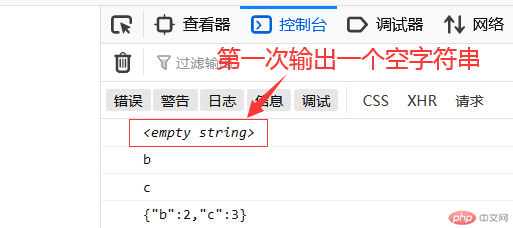
在开始时, replacer函数会被传入一个空字符串作为 key 值,代表着要被stringify的这个对象。随后每个对象或数组上的属性会被依次传入。
函数应当返回JSON字符串中的value, 如下所示:
- 如果返回一个 Number, 转换成相应的字符串作为属性值被添加入 JSON 字符串。
- 如果返回一个 String, 该字符串作为属性值被添加入 JSON 字符串。
- 如果返回一个 Boolean, “true” 或者 “false” 作为属性值被添加入 JSON 字符串。
- 如果返回任何其他对象,该对象递归地序列化成 JSON 字符串,对每个属性调用
replacer方法。除非该对象是一个函数,这种情况将不会被序列化成JSON字符串。
如果返回 undefined,该属性值不会在 JSON 字符串中输出。
如果 replacer 是一个数组,数组的值代表将被序列化成 JSON 字符串的属性名。
console.log(JSON.stringify({ a: 1, b: 2, c: 3 }, ["a", "b"])); // {"a":1,"b":2}
- 传入第三个参数
console.log(JSON.stringify({ a: 1, b: 2, c: 3 }, null, 2));console.log(JSON.stringify({ a: 1, b: 2, c: 3 }, null, "****"));
- 效果图

JSON对象属性必须加双引号,字符串也必须加双引号。
2.2 JSON.parse()
- 语法
JSON.parse(text[, reviver])
| 参数 | 说明 |
|---|---|
| text | 必填参数。将要被转换成JS对象的字符串 |
| reviver | 可选参数。转换器, 如果传入该参数(函数),可以用来修改解析生成的原始值,调用时机在 parse 函数返回之前。 |
let obj = JSON.parse(`{"a":1,"b":2,"c":3}`);console.log(typeof obj); // objectconsole.log(obj.a); // 1
如果指定了reviver函数,则解析出的 JavaScript 值(解析值)会经过一次转换后才将被最终返回(返回值)。JSON对象是由内向外解析的。
obj = JSON.parse('{"1": 1, "2": 2, "3": {"4": 4, "5": {"6": 6}}}', function (k, v) {// 打印k(属性)值,可以发现它的值以此为:1 2 4 6 5 3,// 从而得知遍历顺序是从内向外的,直到最后一个是空字符串console.log(k);// 返回原始属性值,相当于没有传递revier参数。return v;});console.log(obj);
- 效果图

三、ajax的请求
3.1 什么是同步和异步请求
同步请求:就是在发送一个请求之后,需要等待服务器响应返回,才能够发送下一个请求。
异步请求:和同步请求相对,异步不需要等待响应,随时可以发送下一次请求。+
3.2 什么是AJAX
AJAX(全称:Asynchronous JavaScript and XML,异步JavaScript和XML) 是一种在无需重新加载整个网页的情况下,能够更新部分网页的技术。
3.3 AJAX请求步骤
- 创建 xhr 对象:
const xhr = new XMLHttpRequest() - 配置 xhr 参数:
xhr.open(type, url) - 处理 xhr 响应:
xhr.onload = (...) => {...} - 发送 xhr 请求:
xhr.send(...)
xhr对象常用方法:
| 方法 | 说明 |
|---|---|
| open(method,url,async) | 规定请求类型,url以及是否异步处理请求。 <br> - method:请求的类型;GET 或 POST <br > url:文件在服务器上的位置 <br >async:true(异步)或 false(同步) |
| send(string) | 将请求发送到服务器。 <br> **string:仅用于POST请求。 |
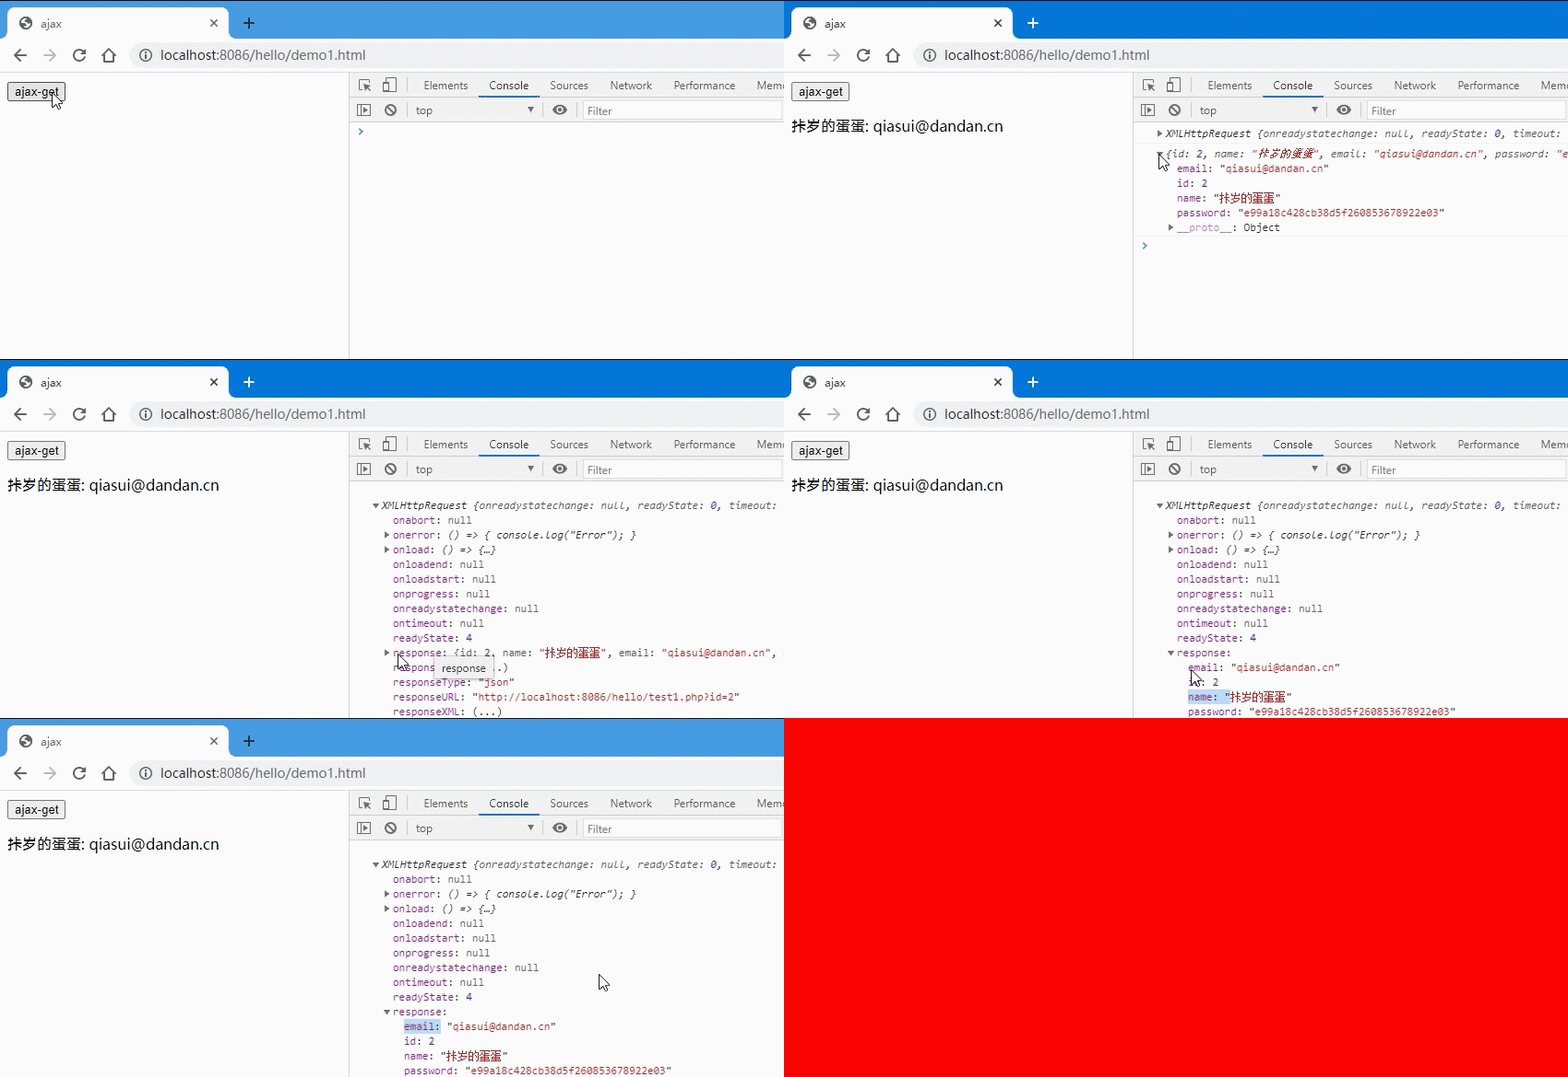
以下是一个GET请求的案例:
<button>ajax-get</button><p></p><script>btn = document.querySelector('button');// xhr 请求步骤btn.onclick = () => {// 1. 创建xhr对象:let xhr = new XMLHttpRequest();console.log(xhr);// 2.配置xhr参数:xhr.open("get", "test1.php?id=2");xhr.responseType = "json";// 3.处理xhr响应:xhr.onload = () => {console.log(xhr.response);// 将dom响应渲染到页面中let user = `${xhr.response.user}: ${xhr.response.email}`;document.querySelector("p").innerText = user;};xhr.onerror = () => {console.log(xhr.);};// 4.发送xhr请求:xhr.send(null);}</script>
- 效果图:
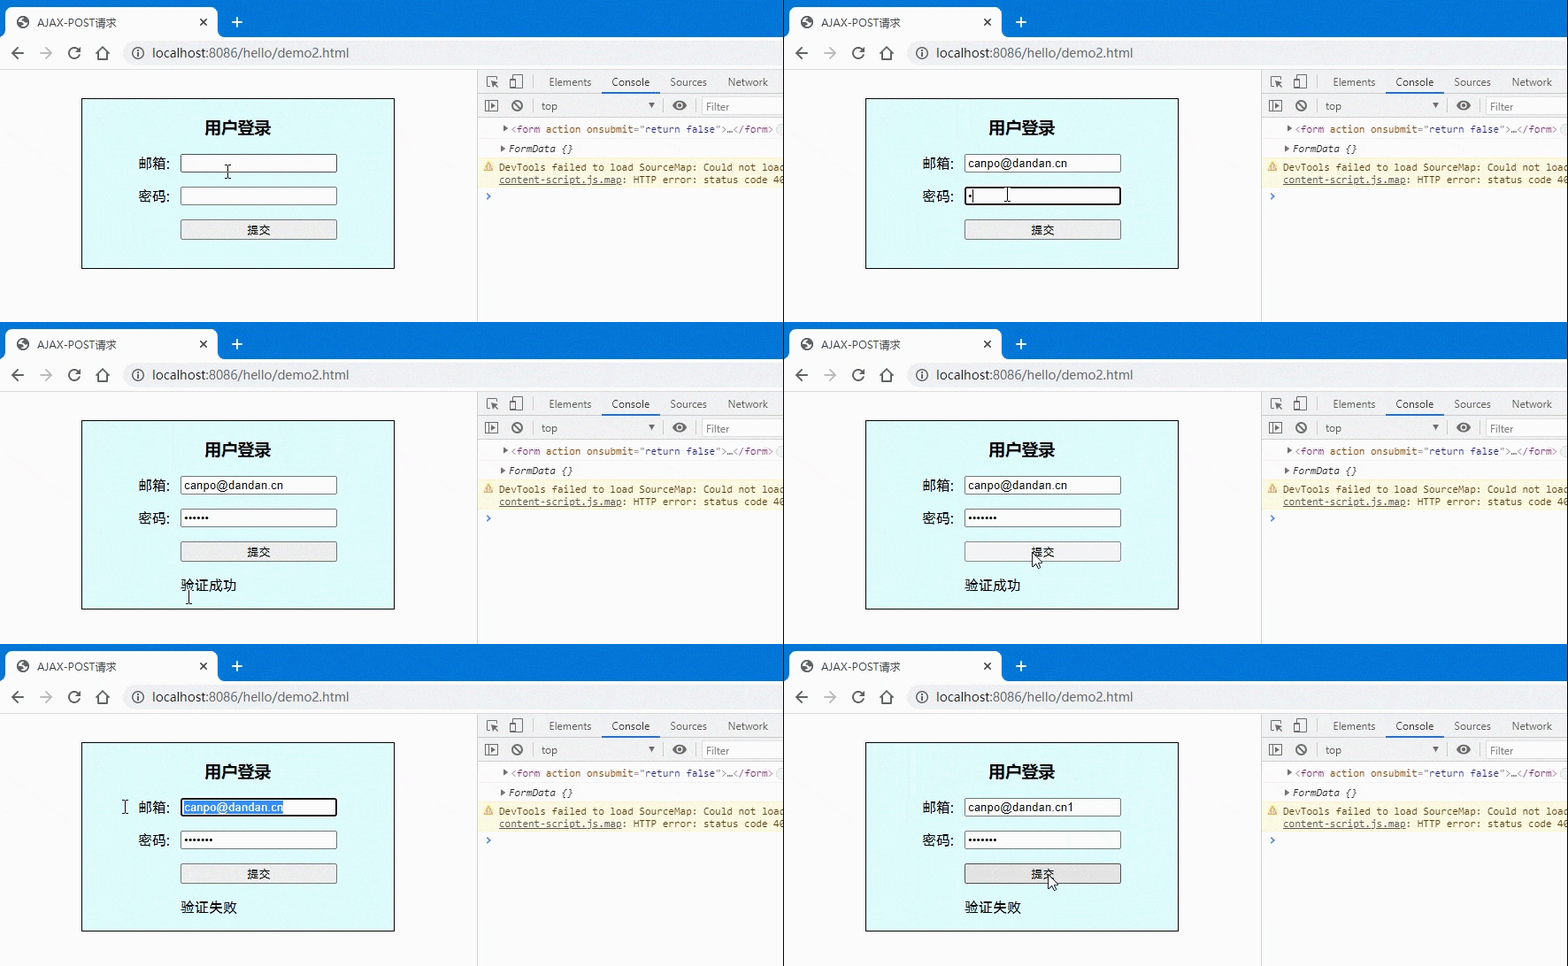
以下方法是一个POST请求的案例:
<!DOCTYPE html><html lang="en"><head><meta charset="UTF-8"><meta name="viewport" content="width=device-width, initial-scale=1.0"><title>AJAX-POST请求</title></head><style>.login {width: 20em;border: 1px solid;padding: 0 1em 1em;background-color: lightcyan;margin: 2em auto;display: grid;place-items: center;}.login form {display: grid;grid-template-columns: 3em 1fr;gap: 1em 0;}/* 按钮与提示信息显示在第二列 */.login form button,.tips {grid-area: auto / 2;}</style><body><div class="login"><h3>用户登录</h3><form action="" onsubmit="return false"><label for="email">邮箱:</label><input type="email" name="email" id="email" /><label for="password">密码:</label><input type="password" name="password" id="password" /><button>提交</button><span class="tips"></span></form></div><script>const form = document.forms[0];console.log(form);const btn = document.querySelector(".login button");const tips = document.querySelector(".tips");// let formData = new FormData(form);// formData.append("email", form.email.value);// formData.append("password", form.password.value);// console.log(formData.get("email"), formData.get("password"));console.log(new FormData(form))btn.onclick = ev => {// 1.创建xhr对象:const xhr = new XMLHttpRequest();// 2.配置xhr参数:xhr.open('post', 'test2.php');// 3.处理xhr响应:xhr.onload = () => tips.innerHTML = xhr.response;xhr.onerror = () => console.log("Error");// 4.发送xhr请求xhr.send(new FormData(form));}</script></body></html>
- 效果图:
3.4 AJAX跨域请求
3.4.1 什么是cors
CORS(Cross-Origin Resource Sharing 跨源资源共享),当一个请求url的协议、域名、端口三者之间任意一与当前页面地址不同即为跨域。
同源策略: 为请求的安全,浏览器禁止通过脚本发起一个跨域的请求,只允许通过脚本发起基于同源的请求。
同源指: 协议相同,域名/主机名相同,端口相同。
- 协议不同
http://www.abc.com http
https://www.abc.com https
- 主机不同
https://www.a.com
https://www.b.com
- 端口不同
https://a.cn:8080
https://a.cn:9090
<button>ajax-get-cors</button><p></p><script>const btn = document.querySelector("button");btn.onclick = ev => {// 1. 创建 xhr 对象:const xhr = new XMLHttpRequest();// 2. 配置 xhr 参数:xhr.open("get", "http://localhost:8087/cors1.php");// 3. 处理 xhr 响应:xhr.onload = () =>(document.querySelector("p").innerHTML = xhr.response);// 4. 发送 xhr 请求:xhr.send(null);};</script>
以上案例,通过页面地址为:http://localhost:8086/hello/demo3.html请求了地址http://localhost:8087/cors1.php的数据,结果被拦截了:

在服务器端开启跨域许可header('Access-Control-Allow-Origin: http://localhost:8086')即可允许跨域访问了。如果想让任何来源都允许访问,可以使用通配符“”,`header(‘Access-Control-Allow-Origin: ‘)`。

3.4.2 JSONP跨域原理
JSONP(JSON with Padding),从另外一个域请求文件会引起跨域问题,但时请求一些标签内置的src属性却没有这个跨域问题,因此JSONP利用了这个优势,使用script标签替代XMLHttpRequest对象。
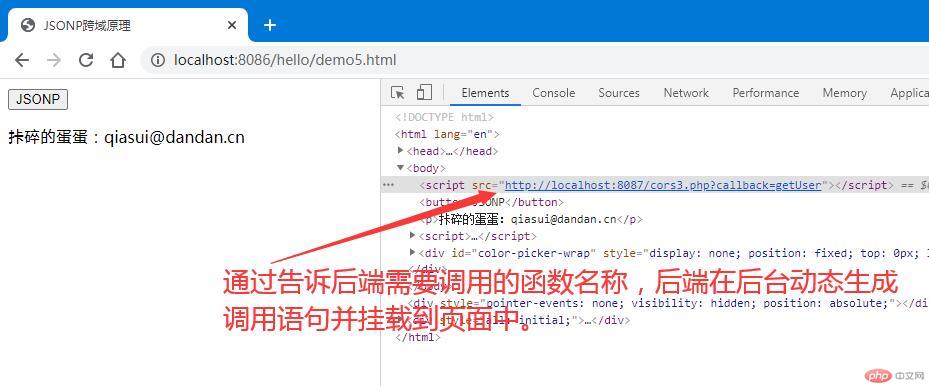
以下是一个利用JSONP进行跨域资源请求的实例:
- 前端HTML代码:
<button>JSONP</button><p></p><script>const btn = document.querySelector('button');function getUser(data) {console.log(data);let user = `${data.name}:${data.email}`;document.querySelector('p').innerHTML = user;}// 正常情况下,我们这个data数据应该是从服务器获取的,但是如果出现了跨域问题就不好解决了,// 因此我们可以通过把这个json格式的数据从前端将这个前端需要调用的函数名称告诉服务器上的php,// 让php动态生成一个函数调用语句并返回从服务器返回函数调用语句:// getUser({ name: "残破的蛋蛋", email: "canpo@dandan.cn" });btn.onclick = () => {// 动态生成一个允许跨域请求的html元素let script = document.createElement('script');// 设置生成的script标签的src属性script.src = 'http://localhost:8087/cors3.php?callback=getUser';// 将生成的script标签挂在到页面中去document.body.insertBefore(script, document.body.firstElementChild);};</script>
后端PHP代码:
// JSONP不需要授权给前端,只要返回一个使用json做为参数的函数调用语句就可以。将前端需要的数据以json格式放到这个函数的参数中就行了,必须要知道前端js要调用的函数名称。$callback = $_GET['callback'];// 服务器中需要返回的数据$data = '{ "name": "残破的蛋蛋", "email": "canpo@dandan.cn" }';// 在后端生成一条js函数调用语句: getUser({ name: "天蓬老师", email: "tp@php.cn" });echo $callback . '(' .$data. ')';
- 效果图:
