作业内容:实例演示父子组件之间通信方式
一、父级数据传递给子级<!DOCTYPE html><html lang="en"><head><meta charset="UTF-8" /><meta name="viewport" content="width=device-width, initial-scale=1.0" /><title>父组件向子组件传参</title><script src="https://cdn.jsdelivr.net/npm/vue/dist/vue.js"></script></head><body><div id="app"><!-- 父组件是通过自定义属性的方式将参数传到子组件中的 --><btn-inc :my-home="sichuan" :my-count="count"></btn-inc></div><script>const vm = new Vue({el: document.querySelector("#app"),data() {return {sichuan: "天府之国四川",count: 0,};},// 局部组件components: {btnInc: {props: ["myHome", "myCount"],//组件之间的数据传递是单向的,不允许在子组件中更新父组件中的数据template: `<div><span>{{myHome}}</span></div>`,data() {return {num: this.myCount,};},},},});console.log(vm.count);// 子组件中更新父组件的数据是通过事件完成</script></body></html>
父组件是通过自定义属性的方式将参数传到子组件中的
图示:
二、子组件向父组件传参
<!DOCTYPE html><html lang="en"><head><meta charset="UTF-8" /><meta name="viewport" content="width=device-width, initial-scale=1.0" /><title>子组件向父组件传参</title><script src="https://cdn.jsdelivr.net/npm/vue/dist/vue.js"></script></head><body><div id="app"><!-- 子组件中更新父组件的数据是通过事件完成 --><btn-inc :my-home="sichuan" :my-count="count" @click-count="handle"></btn-inc></div><script>const vm = new Vue({// 子组件向父组件传参是通过声明同名事件来实现el: document.querySelector("#app"),data() {return {sichuan: "天府之国四川",count: 0,};},// 局部组件components: {btnInc: {props: ["myHome", "myCount"],// 组件之间的数据传递是单向的,不允许在子组件中更新父组件中的数据// $emit(父组件中要使用的方法名称,子组件要传给父组件的值 )template: `<div><button @click="$emit('click-count',15 )">点赞: + {{myCount}}</button><span>{{myHome}}</span></div>`,},},// 父组件更新数据的方法methods: {handle(value) {console.log(this.count);this.count += value;this.sichuan = "燕京之都";},},});</script></body></html>
子组件中更新父组件的数据是通过事件完成
知识要点:
- 父组件 向 子组件 传参: 自定义属性
- 子组件 向 父组件 传参: 自定义方法
图示:
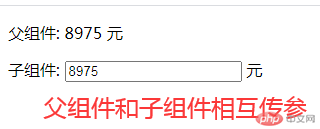
三、父组件和子组件之间双向传参
<!DOCTYPE html><html lang="en"><head><meta charset="UTF-8" /><meta name="viewport" content="width=device-width, initial-scale=1.0" /><title>父组件和子组件之间双向传参</title><script src="https://cdn.jsdelivr.net/npm/vue/dist/vue.js"></script></head><body><div id="app"><p>父组件: {{price}} 元</p><p><span>子组件:</span><my-input :my-price="price" @input-text="handle"></my-input> 元</p></div><script>const vm = new Vue({el: document.querySelector("#app"),data() {return {price: 8975,};},// 局部组件components: {"my-input": {props: ["my-price"],template: `<input type="text" :value="myPrice" @input="foo" />`,methods: {foo(ev) {this.$emit("input-text", ev.target.value);},},},},methods: {handle(value) {console.log(value);this.price = value;},},});</script></body></html>
图示:

