自选10个数组函数进行练习;
实例演示JSON二个函数,以及所有参数的功能;
熟练使用get,post发起ajax请求;
理解跨域的原理,并写出cors,jonp的源码并做出总结;
预习jQuery和Vue知识;
一、JS数组函数
栈方法:后进先出
队:先进先出
push 写进 pop()在数组的尾部进行增删
unshift() shift()在数组的头部进行增删
join(): 指定分割符返回字符串 与split()相反
concat() 数组合并
slice() 返回数组中的部分成员 创建数组副本
splice(开始索引,删除的数量,插入的数据。。) 数组的增删改,它的本职工作时删除元素
排序 sort()
map()
过滤 filter()
reduce(callback(perv,curr),0)
声明空数组:
let arr = [];
1.1push(),pop()在数组的尾部进行增删
<script>let arr = [10,20,30,40,50,60,77,88];let pusha= arr.push(99,100);console.log(arr,pusha);// "10,20,30,40,50,60,77,88"let arr1 = [10,20,30,40,50,60,77,88];let popc= arr1.pop();console.log(arr1,popc);//[ 10,20,30,40,50,60,77,88 ] 被删除者:88</script>
图示: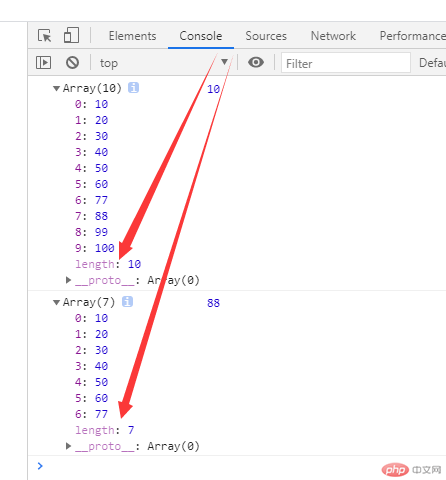
1.2shift() 删除数组开头第一项
<script>let arr= [6,8,14,19,20];let shifta= arr.shift();console.log(arr,shifta);</script>
图示:
1.3unshift()数组的开头添加一个或多个元素
<script>let arr = [1,2,3,4,5];let unshfita=arr.unshift(9,23);console.log(unshfita,arr);</script>
图示: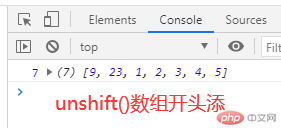
1.4join(): 与字符串的split()相反,将数组转为字符串返回
<script>arr = ["china", "girl", "beautifu"];let joina = arr.join("--");console.log(joina);//输出 china--girl--beautifu//可以把字符串用数组方式输出let str = "beautifu";console.log(str[0], str[1], str[2],str[3],str[4]);//输出 b e a u t</script>
图示: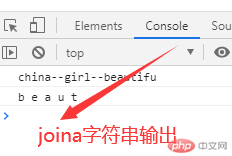
1.5concat()数组合并
<script>console.log("china".concat(" beautiful"));//输出 chinabeautifulconsole.log([1, 2, 3].concat("we").concat({ a: 1, b: 2,c:3 }));//输出[1, 2, 3, "we", {…}]不论内容是什么,都会被合并成数组</script>
图示: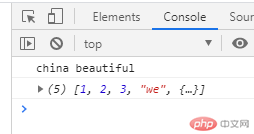
1.6slice(): 返回数组中的部分成员
<script>arr = [1, 2, 3, 4, 5,6,7];console.log(arr.slice(0, 5));//输出[1,2,3,4,5]:从索引0位置开始,取5个元素console.log(arr.slice(-4));//输出[4,5,6,7]:从结尾位置开始,取4个元素</script>
图示: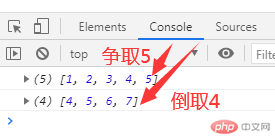
1.7splice(开始索引,删除的数量,插入的数据…): 数组的增删改
<script>arr = [10, 20, 30, 40, 50];console.log(arr.splice(4));//4从索引4的位置开始,后边的都删除console.log([10, 20, 60, 70, 80]);//4从索引2的位置开始,后边的都删除res = arr.splice(2, 2, ...[66, 120]);console.log(arr);//第一个2表示从索引2位置开始,第二个2表示替换几个元素res = arr.splice(1, 0, ...[72, 39]);//第二个数字为0表示不替换,只新增</script>
图示: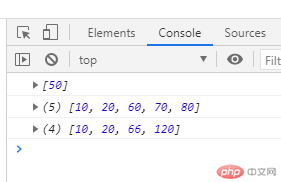
1.8排序 sort()
<script>arr = ["p", "b", "a"];console.log(arr);// 默认按字母表顺序arr.sort();console.log(arr);arr = [10, 9, 22, 4];console.log(arr);// arr.sort();arr.sort((a, b) => a - b);console.log(arr);</script>图示:")
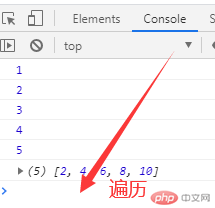
1.9遍历
<script>arr = [1, 2, 3, 4, 5];// 没有返回值arr.forEach(item => console.log(item));// map对数组每个成员都调用回调进行处理并返回这个数组res = arr.map(item => item * 2);console.log(res);</script>
1.10过滤
<script>arr = [1, 2, 3, 4, 5];res = arr.filter(item => !(item % 2));console.log(res);</script>

1.11reduce归纳
<script>arr = [1, 2, 3, 4, 5];res = arr.reduce((prev, curr) => {// console.log(prev, curr);return prev + curr;});res = arr.reduce((prev, curr) => prev + curr);// 第二个参数是累加的初始值res = arr.reduce((prev, curr) => prev + curr, 5000);console.log(res);</script>

二、JSON二个函数以及所有参数的功能
2.1 JSON 是什么
- JSON: JavaScript Object Notation(JS 对象表示法)
- JSON 独立于任何编程语言, 几乎所有编程语言都提供了访问 JSON 数据的 API 接口
- JSON 是一种语法,用来序列化其它语言创建的数据类型
- JSON 仅支持 6 种数据类型:对象,数组,数值,字符串,布尔值,null
- JSON 只是借用了 JS 中的一些数据表示语法,与 JS 并无关系
2.2JSON 数据类型
| 序号 | 类型 | 描述 |
| 1 | 简单值 |数值,字符串,布尔,null |
| 1 |复合值 | 对象,数组 ||
注意: 不支持
undefined(因为除 JS 外,其它语言中没有这个东西)
2.3JS 解析 JSON 的 API
| 序号 | 方法 | 描述 |
| —— | ————————— | ———————————————- |
| 1 |JSON.stringify()| 将 JS 对象,序列化为 JSON 字符串 |
| 2 |JSON.parse()| 将 JSON 字符串,解析为 JS 对象 |
<script>//字符串 必须加引号console.log(JSON.stringify("china.girl"),typeof JSON.stringify("china.girl"))//true 不用加引号console.log(JSON.stringify(true),typeof JSON.stringify(true))//null 不用加引号console.log(JSON.stringify(null),typeof JSON.stringify(null))// object//JSON 对象的属性必须加双引号,字符串也必须加引号console.log(JSON.stringify({x:'a',y:'b'}))//arratconsole.log(JSON.stringify([1,2,3]),typeof JSON.stringify([1,2,3]))</script>
图示: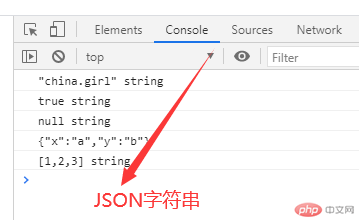
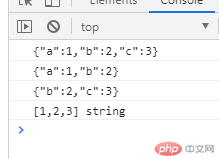
对json格式字符串的特殊操作,主要通过后面二个参数;第二个参数支持数组和函数
<script>console.log(JSON.stringify({a:1,b:2,c:3}))console.log(JSON.stringify({a:1,b:2,c:3},['a','b']))//函数console.log(JSON.stringify({a:1,b:2,c:3},(k,v)=>{// 将需要过滤掉的数据直接返回undefinedif(v<2) return undefinedreturn v}))console.log(JSON.stringify([1,2,3]),typeof JSON.stringify([1,2,3]))</script>
<script>//数组console.log(JSON.stringify({ a: 2, b: 3, c: 4 ,d:5}, ["a", "b", "c"]));//输出{"a":2,"b":3,c:4}//Json 数组格式console.log(JSON.stringify({"a":2,"b":3,"c":4}));//输出{"a":2,"b":3,"c":4}//函数console.log(JSON.stringify({ a: 2, b: 3, c: 4 }, (k, v) => {// 将需要过滤掉的数据直接返回undefinedif (v < 2) return undefined;return v;}));//输出{"b":3,"c":4}</script>
图示: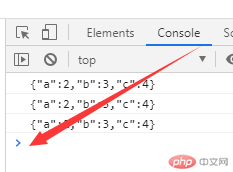
第三个参数,用来格式化输出的json字符串
<script>console.log(JSON.stringify({ a: 1, b: 2, c: 3 }, null, "****"));</script>//第三个参数输出{****"a": 1,****"b": 2,****"c": 3}
图示: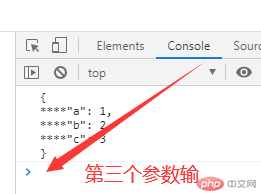
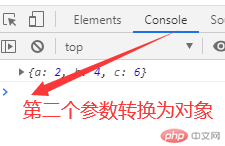
第二个参数可以对JSON的数据进行处理后再返回
//第二个参数可以对JSON的数据进行处理后再返回obj = JSON.parse(`{"a":1,"b":2,"c":3}`,(k,v)=>{//JSON 对象是由内向外解释if(k==="") return vreturn v*2})console.log(obj)
图示:
三、get,post发起ajax请求
3.1ajax-get请求
<body><button>ajax-get</button><p></p><script>const btn = document.querySelector("button");btn.onclick = () => {// 1. 创建 xhr 对象:const xhr = new XMLHttpRequest();// 2. 配置 xhr 参数:xhr.open("get", "test1.php?id=1");xhr.responseType = "json";// 3. 处理 xhr 响应:// 成功xhr.onload = () => {console.log(xhr.response);// dom:将响应结果渲染到页面let user = `${xhr.response.name} ( ${xhr.response.email} )`;document.querySelector("p").innerHTML = user;};xhr.onerror = () => console.log("Error");// 4. 发送 xhr 请求:xhr.send(null);};</script></body>
php代码:
<?php$users = [ // 以二维数组模拟数据表信息['id'=>1, 'name'=>'天蓬','email'=>'tp@php.cn','password' => md5('123456')],['id'=>2, 'name'=>'灭绝','email'=>'mj@php.cn','password' => md5('abc123')],['id'=>3, 'name'=>'西门','email'=>'xm@php.cn','password' => md5('abc888')],];$id = $_GET['id']; // 查询条件$key = array_search($id,array_column($users,'id')); // 在id组成的数组中查询是否存在指定的id,并返回对应的键名echo json_encode($users[$key]); // 根据键名返回指定的用户信息
3.2ajax-post请求
<body><div class="login"><h3>用户登录</h3><form action="" onsubmit="return false"><label for="email">邮箱:</label><input type="email" name="email" id="email" /><label for="password">密码:</label><input type="password" name="password" id="password" /><button>提交</button><span class="tips"></span></form></div><script>const form = document.querySelector(".login form");const btn = document.querySelector(".login button");const tips = document.querySelector(".tips");// let data = new FormData();// data.append("email", form.email.value);// data.append("password", form.password.value);// console.log(data.get("email"), data.get("password"));btn.onclick = ev => {ev.preventDefault();// 1. 创建 xhr 对象:const xhr = new XMLHttpRequest();// 2. 配置 xhr 参数:xhr.open("post", "test2.php");// 3. 处理 xhr 响应:xhr.onload = () => (tips.innerHTML = xhr.response);// 4. 发送 xhr 请求:xhr.send(new FormData(form));};</script></body>
php代码:
<?php$users = [ // 使用二维数组模拟用户数据表信息['id'=>1, 'name'=>'天蓬','email'=>'tp@php.cn','password' => md5('123456')],['id'=>2, 'name'=>'灭绝','email'=>'mj@php.cn','password' => md5('abc123')],['id'=>3, 'name'=>'西门','email'=>'xm@php.cn','password' => md5('abc888')],];$email = $_POST['email']; // 将通过post获取的数据保存到临时变量中$password = md5($_POST['password']);// 使用数组过滤器查询是否存在指定的用户并返回结果$res = array_filter($users,function($user) use ($email,$password){return $user['email'] === $email && $user['password'] === $password;});echo count($res) === 1 ? '验证成功' : '验证失败'; // 将结果做为请求响应返回到前端
图示:
四、跨域
CORS : 跨域资源共享
跨域请求可以是get,也可以是post ,只不过get 居多
cors-post 时,需要再服务器端进行头部设置
jsonp 只能时 get
cors :跨域资源共享
同源策略:为请求安全,浏览器禁止通过脚本发起一个跨域的请求
只允许通过脚本发起基于同源的请求
同源指:协议相同,域名/主机名相同,端口相同
4.1ajax-get-cors跨域资源共享
<body><button>ajax-get-cors</button><p></p><script>// cors: 跨域资源共享const btn = document.querySelector("button");btn.onclick = ev => {// 1. 创建 xhr 对象:const xhr = new XMLHttpRequest();// 2. 配置 xhr 参数:xhr.open("get", "http://world.io/cors1.php");// 3. 处理 xhr 响应:xhr.onload = () =>(document.querySelector("p").innerHTML = xhr.response);// 4. 发送 xhr 请求:xhr.send(null);};</script></body>
cors: 跨域资源共享
同源策略: 为请求的安全,浏览器禁止通过脚本发起一个跨域的请求
只允许通过脚本发起基于同源的请求
同源指: 协议相同,域名/主机名相同,端口相同
http://www.abc.com http
https://www.abc.com https
协议不同
https://www.a.com
https://www.b.com
主机不同
https://a.cn:8080
https://a.cn:9090
端口不同
4.2ajax-post-cors
<button>ajax-post-cors</button><p class="tips"></p><script>// cors: 跨域资源共享const btn = document.querySelector("button");const tips = document.querySelector(".tips");btn.onclick = ev => {// 1. 创建 xhr 对象:const xhr = new XMLHttpRequest();// 2. 配置 xhr 参数:xhr.open("post", "http://world.io/cors2.php");// 3. 处理 xhr 响应:xhr.onload = () => (tips.innerHTML = xhr.response);// 4. 发送 xhr 请求:let formData = new FormData();formData.append("email", "admin@php.cn");formData.append("password", "123456");xhr.send(formData);};</script>//跨域文件头设置 *为全部同意,可以设置单独的域名只允许这个域名header('Access-Control-Allow-Origin: *')

