1、Vue组件注册
1.1、全局组件注册
<script src="../vue.js"></script><div class="app1"><component-a></component-a></div><hr /><div class="app2"><component-a></component-a></div><script>// 自定义组件:可以理解为自定义DOM结构// 1、定义模板内容const htmlcontent ={// 注意:template中组件模板应该只包含一个根元素,可以使用一对<div></div>进行包裹template: `<div><p>我是一个全局组件</p><p>在任何Vue实例中我都可以使用</p></div>`,};// 2、注册组件:Vue.component(组件标签名称, 对象/数据/模板)Vue.component("component-a",htmlcontent);// 创建一个 Vue 实例:app1const app1 = new Vue({el: ".app1", //挂载点});// 创建一个 Vue 实例:app2const app2 = new Vue({el: ".app2",});</script>
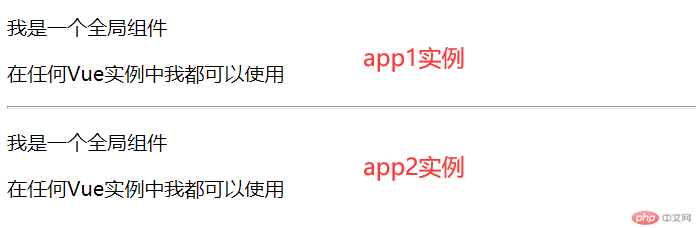
全局组件注册可在任意Vue实例挂载点渲染
1.2、局部组件注册
<script src="../vue.js"></script><div class="app1"><component-a></component-a></div><hr /><div class="app2"><component-a></component-a></div><script>// 定义组件const ComponentA = {template: `<div><p>我是一个局部组件</p><p>我只能在app1实例中使用</p></div>`,};// 自定义组件:可以理解为自定义DOM结构// 创建一个 Vue 实例:app1const app1 = new Vue({el: ".app1", //挂载点// 注册组件:components: {"component-a": ComponentA,},});// 创建一个 Vue 实例:app2const app2 = new Vue({el: ".app2",});</script>
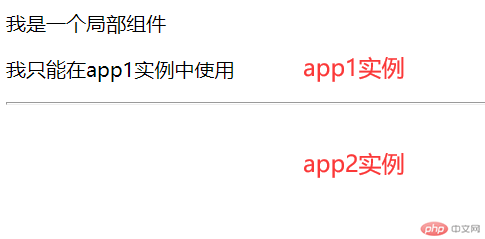
局部组件, 则无法在其它挂载的区域内渲染;
1.3、组件模板写法优化
<script src="../vue.js"></script><div class="app"><component-a></component-a></div><!-- 定义组件(html不会渲染template标签:源码可以看到) --><template id="ComponentA"><div><p>我是一个局部组件</p><p>我只能在app实例中使用</p></div></template><script>// 创建一个 Vue 实例:appconst app = new Vue({el: ".app", //挂载点components: {"component-a": {template: "#ComponentA",},},});</script>
使用
<template>标签方向定义模板,html不会渲染,相当于不显示;
2、Vue组件参数传递(props 通信)
props 可以是数组或对象,用于接收来自父组件的数据。props 可以是简单的数组,或者使用对象作为替代,对象允许配置高级选项,如类型检测、自定义验证和设置默认值。
2.1、使用自定义属性向组件传参【数组】
<script src="../vue.js"></script><div class="app"><component-a name="aRwanG" age="三十岁"></component-a></div><template id="ComponentA"><div><span>{{ name }}</span><span>{{ age }}</span></div></template><script>// 创建一个 Vue 实例:appconst app = new Vue({el: ".app", //挂载点components: {"component-a": {template: "#ComponentA",//props组件通信props: ["name", "age"],},},});</script>
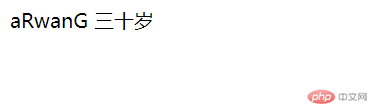
2.2、使用自定义属性向组件传参【对象】(验证类型)
<script src="../vue.js"></script><div class="app"><component-a name="aRwanG" v-bind:age="age"></component-a></div><template id="ComponentA"><div><span>{{ name }}</span><span>{{ age }}</span></div></template><script>// 创建一个 Vue 实例:appconst app = new Vue({el: ".app",// 注册子组件components: {"component-a": {template: "#ComponentA",//props组件通信(使用对象)props: {name: String, //声明字符类型age: Number, //声明数字类型},},},// 父组件数据data: {age: 18,},});</script>// 输出:aRwanG 18
name为属性直接赋值,age为绑定父组件数据,并分别为name和age声明类型,当类型错误时会报错(还是会渲染结果)
2.3、使用 data() 向组件传参【对象】
<script src="../vue.js"></script><div class="app"><component-a></component-a></div><template id="ComponentA"><div><span>{{ name }}</span><span>{{ age }}</span></div></template><script>//子组件const son = {"component-a": {template: "#ComponentA",//data()对象可以直接在组件使用data() {return {name:"peter-zhu",age:18}},}};// 创建一个 Vue 实例:appconst app = new Vue({el: ".app", //挂载点components: son});</script><!-- 输出:peter-zhu 18 -->
2.4、使用 data() + 属性 向组件传参
<script src="../vue.js"></script><div class="app"><component-a v-bind:email="email"></component-a></div><template id="ComponentA"><div><span>{{ name }}</span><span>{{ age }}</span><span>{{ email }}</span></div></template><script>//子组件const son = {"component-a": {template: "#ComponentA",//props组件通信(获取父组件data的Email)props:["email"],//data()对象可以直接在组件使用data() {return {name:"peter-zhu",age:18}},}};// 创建一个 Vue 实例:appconst app = new Vue({el: ".app", //挂载点components: son,data:{email:"peter@php.cn"}});</script><!-- 输出:peter-zhu 18 peter@php.cn -->
2.5、父组件向子组件传参(2.4已经举例说明)
<script src="../vue.js"></script><div class="app"><component-a :user="user"></component-a></div><template id="ComponentA"><div><span>{{ user.name }}</span><span>{{ user.age }}</span><span>{{ user.email }}</span></div></template><script>// 注册: 全局组件Vue.component("component-a", {template: "#ComponentA",// props组件通信// 子组件中接收一个父组件传递过来的user对象props: ["user"],});// 创建一个 Vue 实例:appconst app = new Vue({el: ".app", //挂载点data: {user: {name: "peter-zhu",age: 18,email: "peter@php.cn",},},});</script><!-- 输出:peter-zhu 18 peter@php.cn -->
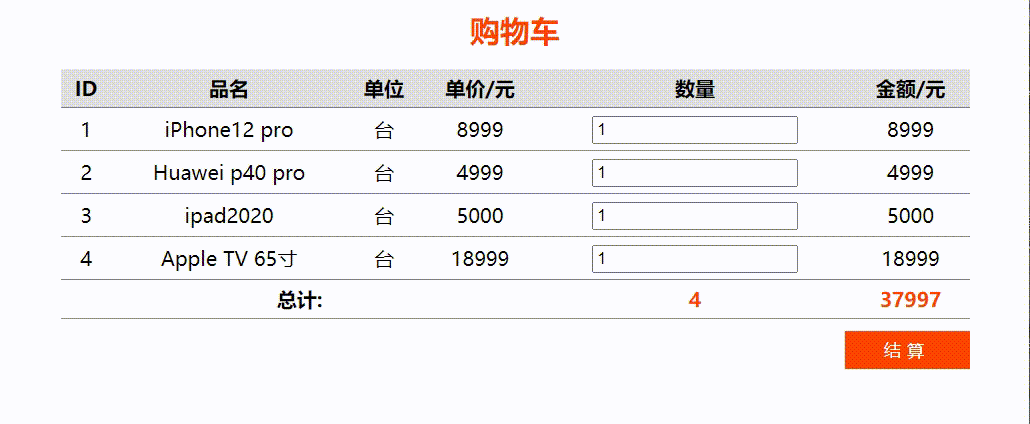
3、父子组件通讯例子-购物车
<!DOCTYPE html><html lang="en"><head><meta charset="UTF-8" /><meta name="viewport" content="width=device-width, initial-scale=1.0" /><script src="../vue.js"></script><style>table {border-collapse: collapse;width: 90%;text-align: center;margin: auto;}table caption {margin-bottom: 15px;font-size: 1.5rem;}table th,table td {/* border: 1px solid #888; */border-bottom: 1px solid #888;padding: 5px;}table thead tr:first-of-type {background-color: rgb(222, 222, 222);}button {width: 150px;height: 30px;outline: none;border: none;background-color: #f40;color: white;letter-spacing: 5px;}button:hover {background: #999;background-color: coral;cursor: pointer;}.my {color: #f40;font-weight: 700;}</style><title>父子组件通讯例子-购物车</title></head><body><div id="app"><v-table :goods="goods" :tn="tNum" :tp="tPrice" @tp-count="totalPrice" @tn-count="totalNum"></v-table></div><template id="goods"><div><table><caption class="my">购物车</caption><thead><tr><th>ID</th><th>品名</th><th>单位</th><th>单价/元</th><th>数量</th><th>金额/元</th></tr></thead><tbody><tr v-for="item of goods"><td>{{item.id}}</td><td>{{item.name}}</td><td>{{item.unit}}</td><td>{{item.price}}</td><td><input type="number" v-model="item.num" @change="Count" /></td><td>{{item.num * item.price}}</td></tr></tbody><tfoot><tr><td colspan="4" style="font-weight: 700">总计:</td><td class="my">{{ tn }}</td><td class="my">{{ tp }}</td></tr></tfoot></table><div style="width: 90%; margin: 10px auto"><button style="float: right; width: 100px">结算</button></div></div></template><script>Vue.component("v-table", {template: "#goods",props: ["goods", "tn","tp"],methods: {Count() {// 向父组件发送消息,调用父组件的方法this.$emit("tp-count");this.$emit("tn-count");},},});const app = new Vue({el: "#app",data: {goods: [{ id: 1, name: "iPhone12 pro", unit: "台", price: 8999, num: 1 },{ id: 2, name: "Huawei p40 pro", unit: "台", price: 4999, num: 1 },{ id: 3, name: "ipad2020", unit: "台", price: 5000, num: 1 },{ id: 4, name: "Apple TV 65寸", unit: "台", price: 18999, num: 1 },],tPrice: 0,tNum: 0,},mounted() {this.totalNum();this.totalPrice();},methods: {//计算总价格totalPrice() {this.tPrice = 0;this.goods.forEach((item) => {this.tPrice += item.num * item.price;});return this.tPrice;},//计算总商品数totalNum() {this.tNum = 0;this.goods.forEach((item) => {this.tNum += parseFloat(item.num) ;});return this.tNum;},},});</script></body></html>
总结:
1、组件间的通讯总算有了一定了解
2、this.$emit()方法有个大坑,就是不支持驼峰命名法,折腾了几个小时—哭
3、本来想加上复选框的,结果又折腾了几个小时,没弄成功—哭哭
4、这个作业想着简单,做起来太难了~~~~