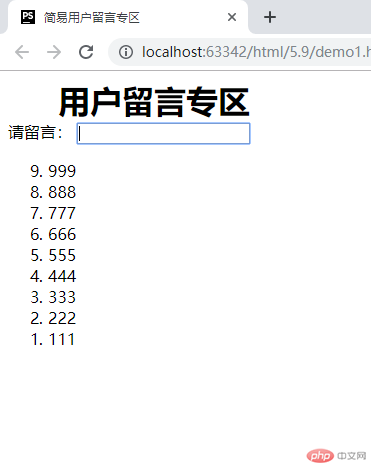
利用DOM元素创建一个用户留言显示区:
实例
<!DOCTYPE html>
<html lang="en">
<head>
    <meta charset="UTF-8">
    <title>简易用户留言专区</title>
</head>
<body>
<div >
    <h1 style="margin:0 50px">用户留言专区</h1>
    <label for="comment">请留言:</label>
    <!--留言输入框-->
    <input type="text" id="comment" onkeydown="addComment(this)" style="width: auto">
    <!--留言显示区-->
<!--    reversed有序列表的数字倒序排列-->
    <ol class="list" reversed></ol>

</div>
<script>
    function addComment(comment) {
        // 在控制台中输出keyCode来查看回车键对应的值是13
        // console.log(event.keyCode);
        if (event.keyCode === 13){//用if语句判断是否按了回车键
            //定义item在页面创建一个新标签<li>
            var item = document.createElement("li");
            // item.innerText = comment.value;//为标签内添加文本内容
            item.append(comment.value); // 也可用append()为标签添加文本内容

            // 获取ul标签
            var list = document.querySelector(".list");

            // 用If语句检测如果当前留言列表为空, 则直接插入到到尾部,否则就插入到第一条留言之前
            if (list.childElementCount === 0) {
                list.appendChild(item)
            }else {
                // 如果列表已有留言,则插入到新一条之前
                var first = list.firstElementChild;
                // list.insertBefore(item,first);
                list.prepend(item,first);//在元素的开头位置插入一个li
            }
            // list.appendChild(item);//在ul列表中最后的位置上添加一个li

            // 清空文本框
            comment.value = '';
        }
    }
</script>
</body>
</html>
运行实例 »
点击 "运行实例" 按钮查看在线实例
页面显示效果:
利用DOM生成一个表格:
实例
<!DOCTYPE html>
<html lang="en">
<head>
    <meta charset="UTF-8">
    <title>用JavaScript控制表单</title>
    <style>
        table,th,td{
            border: 1px solid #666;
        }

        table {
            width: 500px;
            text-align: center;
            border-collapse: collapse;
        }

        table caption {
            font-size: 1.2rem;
            margin-bottom: 20px;
        }

        /*在nth-of-type(1)前添加父元素,否则thead,tbody中的第一行都会生效*/
        thead tr:nth-of-type(1) {
            background-color: lightblue;
        }

    </style>
</head>
<body>
<table id="cart1">
    <caption>购物车1</caption>
    <thead>
    <tr>
        <th>编号</th>
        <th>品名</th>
        <th>数量</th>
        <th>单价</th>
    </tr>
    </thead>

    <tbody>
    <tr>
        <td>1</td>
        <td>手机</td>
        <td>1</td>
        <td>3000</td>
    </tr>
    <tr>
        <td>2</td>
        <td>电脑</td>
        <td>1</td>
        <td>5000</td>
    </tr>
    <tr>
        <td>3</td>
        <td>手机</td>
        <td>1</td>
        <td>3000</td>
    </tr>
    </tbody>
</table>

<hr>

<table id="cart2">
    <caption>购物车2</caption>
    <thead>
    <tr>
        <th>编号</th>
        <th>品名</th>
        <th>数量</th>
        <th>单价</th>
    </tr>
    </thead>
    <tbody></tbody>
</table>

<hr>

<table id="cart3">
    <caption>购物车3</caption>
    <thead>
    <tr>
        <th>编号</th>
        <th>品名</th>
        <th>数量</th>
        <th>单价</th>
    </tr>
    </thead>
    <tbody></tbody>
</table>

<script>
    // 获取页面元素cart1
    var cart1 = document.getElementById('cart1');

    //children[]用来选择元素中的子元素,抓取的子元素下有子元素可以继续用children[]来抓取
    // 在table的第3个子元素的第2个子元素下的第2个子元素的内容中
    console.log(cart1.children[2].children[1].children[1].innerHTML);
    // 单价, 在第3个子元素的内容中
    console.log(cart1.children[2].children[1].children[3].innerHTML);
    // 单元格的数据是可以更新的, 电脑涨价了: 6000
    cart1.children[2].children[1].children[3].innerHTML = 8000;

    /*
          table对象定义一些属性,可以快速获取指定的子元素
          1. tHead: <thea>
          2. tBodies: <tbody>...复数
          3. tFoot: <tfoot>
          4. rows: 所有行
          5. cells: 所有列
      */
    //tBodies:返回包含表格中所有 tbody 的一个数组。
    //rows:返回包含表格中所有行的一个数组。
    //cells:返回包含表格中所有单元格的一个数组。
    console.log(cart1.tBodies[0].rows[1].cells[3].innerHTML);

    // 定义数据:id:编号,name:品名,count:数量,price:单价
    var data = [
        {id: 1, name: '草莓',count: 80, price: 10},
        {id: 2, name: '桃子',count: 40, price: 20},
        {id: 3, name: '苹果',count: 60, price: 8}
     ];

    // 获取id为cart2的元素
    var cart2 = document.getElementById('cart2')
    // 获取cart2里的tbody(网页主体内存在4个tbody标签,选取第三个)
    var tbody = cart2.children[2];
    data.forEach(function (value) {
        var tr = document.createElement('tr');//在页面内创建tr标签
        tr.innerHTML = '<td>' + value.id + '</td>';//创建tr表单内的td标签和内容
        tr.innerHTML += '<td>' + value.name + '</td>';
        tr.innerHTML += '<td>' + value.count + '</td>';
        tr.innerHTML += '<td>' + value.price + '</td>';
        tbody.appendChild(tr);//在tbody内添加tr表单
    })


    // 用table属性写表单
    var cart3 = document.getElementById('cart3');//获取页面中cart3标签创建定义
    var tbody = cart3.tBodies[0];
    for (var i = 0; i < data.length; i ++) {
        var tr = document.createElement('tr');
        Object.keys(data[i]).forEach(function (key) {
            tr.innerHTML += '<td>' + data[i][key] + '</td>';

        });
        tbody.appendChild(tr);
    }

</script>
</body>
</html>
运行实例 »
点击 "运行实例" 按钮查看在线实例
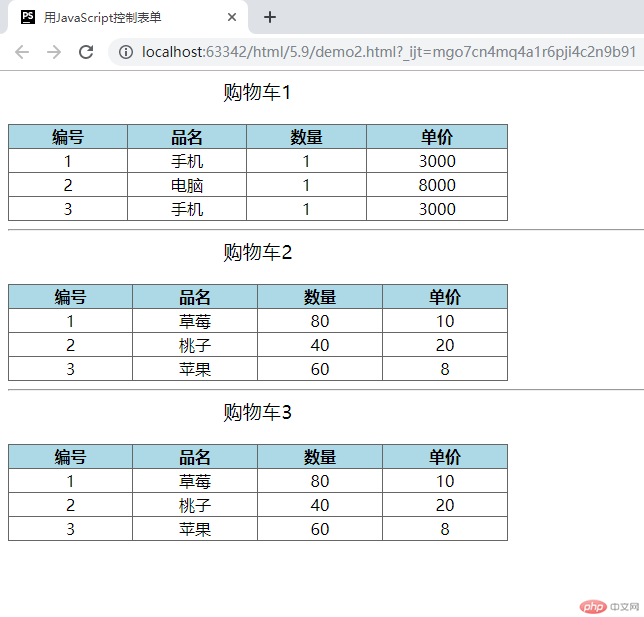
页面实际显示效果:


