


Here's a comprehensive guide on how to create your own email rules in the new Outlook and the web version of Outlook 365.
If you've become accustomed to using rules in classic Outlook to manage your email flow, you'll be pleased to know that the new Outlook also includes this feature. Despite some differences in the setup process and a slightly reduced set of options, you can still create rules to automate the sorting of your emails and keep a tidy inbox.
- New Outlook rules
- Create rule in new Outlook and web
- Set up rule for specific emails
- Manage rules
- Edit rule
- Disable and enable rule
- Remove rule
- Change order of rules
- Run rule manually
- New Outlook rules not working
- Client-side rules are out
- Rules are specific to each account
- Rules for Gmail and Yahoo accounts are not supported
New Outlook rules
Like the classic Outlook desktop app, the new Outlook lets you set up rules to manage your emails, but with a few less options. To grasp the nuances, you need to understand the difference between the server-side and client-side rules, and what you can and can't do with them.
Server-side rules work directly on the server, so they run whether or not Outlook is open on your computer. These are the kind of rules you'll find in Outlook on the web and the new Outlook app, which is pretty much a web client in disguise (a wrapper over the web client). They're great for organizing your emails - flagging the important ones, sorting them into categories, or moving to folders, all done on the server as soon as your emails come in.
But here's the catch: client-side rules, like printing emails or setting reminders, aren't available in the new Outlook or Outlook 365 online. That's because these rules need the Outlook client running on your computer to work. For example, you can't play a sound or print an email if you've logged into your Outlook account from a different computer that doesn't have a printer or speakers. Even if you could, in theory, set up such a rule, it won't work because there won't be any technical way to execute it.
So, while classic Outlook with an Exchange server has both server-side and client-only rules, in the new Outlook only server-side rules are available.

Examples of new Outlook rules:
- Block emails with certain words in new Outlook - filter spam emails by moving messages with certain words to the Junk folder.
- Set an out-of-office reply in new Outlook - notify senders that you are away with an automatic out-of-office reply.
- Forward or redirect mail - automatically forward or redirect all mail that you receive or specific messages only.
How to create a rule for Inbox in new Outlook and web
In the new Outlook and Outlook on the web (also known as Outlook 365 online), rules are applied to incoming messages that you receive.
To create an email rule for your Inbox, this is what you need to do:
- Click the Settings gear icon in the upper-right corner of the Outlook window. Alternatively, you can click Mail > View tab > View Settings.
- In the Settings menu, choose Mail > Rules.
- If you have multiple accounts, select the one for which you want to create a rule from the dropdown list at the top.
- Click on the plus icon to add a new rule.

- In the rules menu that opens, you need to define three essential components: a rule name, conditions, and actions.
-
Name the rule. Enter a shot descriptive name in the first box, for example "Forward messages".
-
Specify conditions. From the dropdown menu next to number 2, choose a condition. You can add more conditions by clicking the Add another condition link. For example, if you want to forward emails sent by a specific person, choose the "From" condition.
-
Define actions. Use the dropdown menu next to number 3 to select an action to apply to emails that meet your conditions. You can also add multiple actions by selecting Add another action. Actions are grouped into three categories:
- Organize: Move, copy, delete, or pin to the top.
- Mark message: as read, junk, with importance or assign a category.
- Route: forward, forward as attachment, or redirect.
For instance, select "Forward to" as an action, and then specify the email address of the recipient.
-
Add exceptions (optional). Outlook email rules can also include exceptions to conditions. Click Add an exception to specify an exception. For example, you may choose not to forward emails containing the word "confidential" in the subject or body.
- If you don't want to execute any more rules for a message after a certain rule is applied, select the Stop processing more rules checkbox. Find more about how this feature works: Stop processing more rules in Outlook.
- If you want to apply the rule to all existing emails meeting the condition, select the Run this rule checkbox. It's important to note that this option is limited to specific Outlook email rule types, such as move to folder, flag, or categorize, and is unavailable for forwarding rules.
- Finally, press Save to save the newly created rule or Discard to cancel any changes.


Done! You've successfully created a rule in the new Outlook, allowing you to manage your email flow according to your specified criteria.
Tip. In Outlook.com, the process of creating an email rule is essentially the same. While slight differences in the option names may exist, they don't hinder the understanding of overall functionality or the rule creation process.
How to make a rule for specific emails in new Outlook and web
The new Outlook also has a convenient feature to swiftly create a rule directly from an existing email, which is particularly useful for managing all messages from a specific sender. Here's how to do it:
- In your Inbox or any other folder, right-click the email for which you want to set up a rule.
- From the context menu, select Rules > Create rule.
- Choose the folder where you want all messages from that sender to be moved and click OK. If you wish to do something else, click More options.
- If you've chosen to create a rule that moves emails to the designated folder, a confirmation message will appear. To immediately apply the rule to all existing messages in the target folder, put a tick in the Run this rule now checkbox. Then, click OK to close the popup dialog, or click View rules to see the full description of the email rule that Outlook has just created for you.
- If you've opted for more options, you'll be directed to the rules menu where the first two settings - rule name and condition – are preconfigured (you are free to modify these as needed). Your task is to specify the action you wish to apply to messages from that specific sender.
- Optionally, add exceptions, and then save the rule.


With these simple steps, you can promptly organize your inbox by creating rules directly from messages.
How to manage rules in new Outlook and web
To change, remove, or rearrange existing rules in new Outlook and Outlook 365 online, open the rule menu (Settings > Mail > Rules). From there, you can perform various actions:
Change the rule
To edit an existing rule, click the pencil icon next to the rule. This will open the Rules Settings menu where you can modify the rule's conditions and behavior.
Temporarily disable / enable rule
To turn off the rule when you don't need it, toggle the switch box to the left of the rule. When you need the rule again, simply toggle it back on.
Delete the rule
To permanently delete the rule, click the trashcan icon.
Change the rules order
In the new Outlook, email rules are applied to incoming messages based on their order in the rules list.
To adjust the order in which rules are executed, use the Up or Down arrows to move a rule up or down in the list.
Run the rule manually
By default, rules trigger on incoming emails after creation. To apply a rule to the messages that are already in your inbox, click the Run button next to the rule.

Rules are not working in new Outlook and web
Having trouble with rules in the new Outlook and web app? There can be various reasons behind it. Sometimes, rules don't work because they’re set up wrong, conflict with other rules, or they're just turned off. But a couple of big reasons stand out in the new Outlook and web version.
Client-side rules are unavailable
In the transition from classic Outlook to the new Outlook or web platform, you'll find out that client-side rules (such as follow-up or print emails) are not supported, as they rely on the Outlook client running on your computer. Since the new Outlook and web version don't use the client, these rules get disabled and show an error message indicating their incompatibility. Unfortunately, there is no workaround to make client-side rules function in the new Outlook or web app.

Email rules are specific to each account
If you've got more than one account, you need to set up rules for each one separately. You can check which account you're setting rules for in the top right corner of the Settings menu.

Rules cannot be created for Gmail and Yahoo accounts
In the new Outlook, you can't make rules for Gmail or Yahoo accounts because Outlook's rules are designed to work with emails hosted on Microsoft's servers, while external email services like Gmail or Yahoo have a different infrastructure and their own set of rules and filters.

While these are the primary issues affecting rules in the new Outlook and web, there might be other reasons why your rules don't work. For further troubleshooting, please check out Why rules are not working in Outlook: reasons and fixes.
And there you have it – a straightforward guide to setting up and fine-tuning your own rules in both the new Outlook and Outlook 365 Online. Feel free to play around with different criteria and actions to find the perfect combination that works for you. A bit of experimentation and adjustment here and there, and you'll be navigating your inbox like a pro, leaving more time for the things you love instead of sorting emails.
以上是如何在New Outlook和Web中创建电子邮件规则的详细内容。更多信息请关注PHP中文网其他相关文章!


 Google电子表格Countif函数带有公式示例Apr 11, 2025 pm 12:03 PM
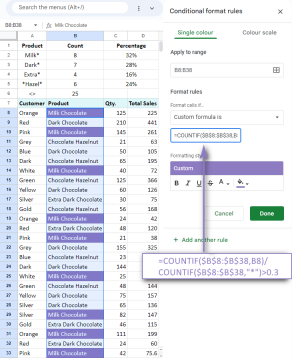
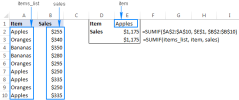
Google主张Countif:综合指南 本指南探讨了Google表中的多功能Countif函数,展示了其超出简单单元格计数的应用程序。 我们将介绍从精确和部分比赛到Han的各种情况
 Excel共享工作簿:如何为多个用户共享Excel文件Apr 11, 2025 am 11:58 AM
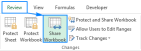
本教程提供了共享Excel工作簿,涵盖各种方法,访问控制和冲突解决方案的综合指南。 现代Excel版本(2010年,2013年,2016年及以后)简化了协作编辑,消除了M的需求
 如何将Excel转换为JPG-保存.xls或.xlsx作为图像文件Apr 11, 2025 am 11:31 AM
本教程探讨了将.xls文件转换为.jpg映像的各种方法,包括内置的Windows工具和免费的在线转换器。 需要创建演示文稿,安全共享电子表格数据或设计文档吗?转换哟
 excel名称和命名范围:如何定义和使用公式Apr 11, 2025 am 11:13 AM
本教程阐明了Excel名称的功能,并演示了如何定义单元格,范围,常数或公式的名称。 它还涵盖编辑,过滤和删除定义的名称。 Excel名称虽然非常有用,但通常是泛滥的
 标准偏差Excel:功能和公式示例Apr 11, 2025 am 11:01 AM
本教程阐明了平均值的标准偏差和标准误差之间的区别,指导您掌握标准偏差计算的最佳Excel函数。 在描述性统计中,平均值和标准偏差为interinsi
 Excel中的平方根:SQRT功能和其他方式Apr 11, 2025 am 10:34 AM
该Excel教程演示了如何计算正方根和n根。 找到平方根是常见的数学操作,Excel提供了几种方法。 计算Excel中正方根的方法: 使用SQRT函数:
 Google表基础知识:了解如何使用Google电子表格Apr 11, 2025 am 10:23 AM
解锁Google表的力量:初学者指南 本教程介绍了Google Sheets的基础,这是MS Excel的强大而多才多艺的替代品。 了解如何轻松管理电子表格,利用关键功能并协作


热AI工具

Undresser.AI Undress
人工智能驱动的应用程序,用于创建逼真的裸体照片

AI Clothes Remover
用于从照片中去除衣服的在线人工智能工具。

Undress AI Tool
免费脱衣服图片

Clothoff.io
AI脱衣机

Video Face Swap
使用我们完全免费的人工智能换脸工具轻松在任何视频中换脸!

热门文章
热工具

禅工作室 13.0.1
功能强大的PHP集成开发环境

WebStorm Mac版
好用的JavaScript开发工具

适用于 Eclipse 的 SAP NetWeaver 服务器适配器
将Eclipse与SAP NetWeaver应用服务器集成。

安全考试浏览器
Safe Exam Browser是一个安全的浏览器环境,用于安全地进行在线考试。该软件将任何计算机变成一个安全的工作站。它控制对任何实用工具的访问,并防止学生使用未经授权的资源。

mPDF
mPDF是一个PHP库,可以从UTF-8编码的HTML生成PDF文件。原作者Ian Back编写mPDF以从他的网站上“即时”输出PDF文件,并处理不同的语言。与原始脚本如HTML2FPDF相比,它的速度较慢,并且在使用Unicode字体时生成的文件较大,但支持CSS样式等,并进行了大量增强。支持几乎所有语言,包括RTL(阿拉伯语和希伯来语)和CJK(中日韩)。支持嵌套的块级元素(如P、DIV),

