ExpandableListView(可折疊清單)的基本使用
本節引言:
本節要講解的Adapter類別控制項是ExpandableListView,就是可折疊的列表,它是ListView的子類, 在ListView的基礎上它把應用程式中的列表項目分成幾組,每組裡又可包含多個列表項目。至於樣子, 類似QQ聯絡人列表,他的用法與ListView非常相似,只是ExpandableListVivew顯示的列表項 需由ExpandableAdapter提供。 下面我們就來學習這個控制的基本使用! 官方API:ExpandableListView
1.相關屬性
- android:childDivider:指定各組內子類別表項之間的分隔條,圖片不會完全顯示, 分離子列表項目的是一條直線
- android:childIndicator:顯示在子列表旁邊的Drawable對象,可以是一個圖像
- android:childIndicatorEnd:子清單項目指示符的結束限制位置
- android:childIndicatorLeft:子清單項目指示符的左邊約束位置
- android:childIndicatorRight:子清單項目指示符的右邊約束位置
- android:childIndicatorStart#:子清單項目指示符的開始約束位置
- android:groupIndicator:顯示在群組清單旁邊的Drawable對象,可以是一個圖像
- android:indicatorEnd:群組清單項目指示器的結束約束位置
- ## android:indicatorLeft:群組清單項目指標的左邊約束位置
- android:indicatorRight:群組清單項目指標的右邊約束位置
- # android:indicatorStart:群組清單項目指示器的開始約束位置
#2.實作ExpandableAdapter的三種方式
1. 擴充功能BaseExpandableListAdpter實作ExpandableAdapter。
2. 使用SimpleExpandableListAdpater將兩個List集合包裝成ExpandableAdapter
3. 使用simpleCursorTreeAdapter將Cursor中的資料包裝成SimpleCuroTreeAdapter 本節範例使用的是第一個,擴充BaseExpandableListAdpter,我們需要重寫該類別中的相關方法, 下面我們透過一個程式碼範例來體驗下!
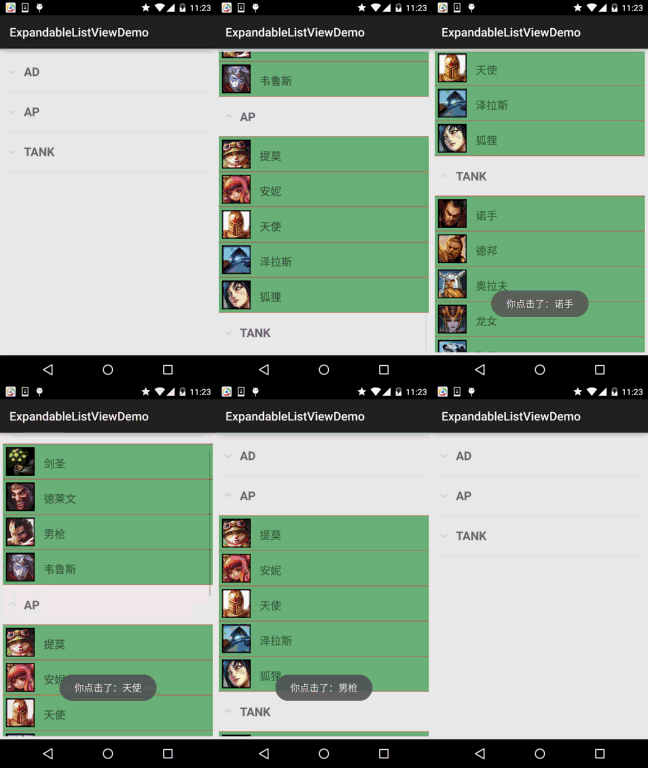
3.程式碼範例我們來看下實作的
效果圖

BaseExpandableListAdpter,其實和之前寫的普通的BaseAdapter是類似的, 但BaseExpandableListAdpter則分成了兩個部分:群組和子列表,具體看程式碼你就知道了!
另外,有一點要注意的是,重寫isChildSelectable()方法需要回傳true,不然不會觸發 子Item的點擊事件!下面我們來寫寫:
首先是群組和子清單的佈局:
##item_exlist_group.xml:
android:layout_width="match_parent "
android:layout_height="match_parent"
android:orientation="horizontal"
android:# @+id/tv_group_name"
android:layout_width="match_parent"
android:layout_height=" android:paddingLeft="30dp"
android :text="AP"
android:textStyle="bold"
android:textSize="20sp" />
</Linear#ay
##item_exlist_item.xml:
android:layout_height="match_parent"
android:layout_height="match_parent"
android:layout_height="match_parent"
o #androidd android:padding="5dp"
android:background="../style/images/android-tutorial-expandablelistview.html">
##
android:layout_width="48dp"
android:layout_height="48dp"#> android:focusable="false"/ >
¢ android: layout_marginLeft="15dp "
android:layout_marginTop="15dp"
android:focusable="false"
/>
#
然後是自訂的Adapter類別:
MyBaseExpandableListAdapter.java:
* 由 Jay 創立於 2015 年 9 月 25 日 0025。 */
public 類別 MyBaseExpandableListAdapter 擴充 BaseExpandableListAdapter {
private ArrayList
私有 ArrayList
私有 Context mContext;
public MyBaseExpandableListAdapter(ArrayList
this.mContext = mContext;
}
## turn gData.size();
}
@Override
public int getChildrenCount(int groupPosition) {
return # public Group getGroup(int groupPosition) {
return gData.get(groupPosition);
}
@Over>>
return iData. get (groupPosition).get(childPosition);
}
# @Override
public long getGroupId()
@ Override
public long getChildId(int groupPosition, int childPosition) {
return childPosition;# Ids() {
return false;
}
//取得用於顯示給定分組的檢視。 這個方法只回傳分組的檢視物件
@Override
public View getGroupView(int groupPosition, boolean isExpanded, View ConvertView, ViewGroup Parent) {
ViewHolderGroup group convertView = LayoutInflater.from(mContext).inflate (
R.layout.item_exlist_group, parent, false);## groupHolder.tv_group_name = (TextView) convertView.findViewById(R.id.tv_group _name);
convertView .setTag(groupHolder);
}else{
,Holder = ( groupHolder.tv_group_name.setText(gData.get(groupPosition).getgName() ) ;
return convertView;
}
//取得顯示給定子位置的資料使用「檢視」 Position, boolean isLastChild, View convertView, ViewGroup parent) {
ViewHolderItem itemHolder;
convertView = LayoutInflater.from(mContext).inflate(
R.layout.item_exlist_item, parent, false);
itemHolder = new ViewHolderItem();
icon);
itemHolder.tv_name = (TextView) 轉換View.findViewById ( R.id.tv_name);
convertView.setTag(itemHolder);
}else{
itemHolder = (ViewHolderItem) convertView.getTag();
).get(childPosition).getiId());
itemHolder.tv_name.setText(iData.get(groupPosition).get(childPosition).getiName());
return convertView;
}
return convertView;
}
@Override
public boolean isChildSelectable(int groupPosition, int childPosition) {
return {
private TextView tv_group_name;
}
private static class ViewHolderItem{
private ImageView img_icon #PS:儲存子清單的數據不一定要用ArrayList<ArrayList>這種,根據自己的需求 定義~
#最後是MainActivity的佈局以及Java程式碼:
佈局檔:activity_main.xml:
#<RelativeLayout xmlns:android="http://schemas.android.com/apk/res/android"
xmlns:tools="http://schemas.android.com/tools"
android: 。 android:id="@+id/exlist_lol"
android:layout_width="match_parent"
android:layout_height="match_parent"#N ;
</RelativeLayout>
MainActivity.java:
private ArrayList
private ArrayList
private ArrayList
private Context mContext;
private ExpandableListView exlist_lol;
private Override
protected void onCreate(Bundle savedInstanceState) {
super.onCreate(savedInstanceState);
setContentView(R.layout.activity_main);# exlist_lol = (ExpandableListView) findViewById(R.id.exlist_lol);
//資料準備
gData = new ArrayList
gData.add(new Group( "AD");
gData.add(new Group("AP"));
gData.add(new Group #I)))))))))))))))]9方處理> ;();
//AD組
lData.add(new Item(R.mipmap.iv_lol可mipmap) .iv_lol_icon4,"德萊文"));
lData.add(new Item(R.mipmap.iv_lol_icon13,"男槍"));# iv_lol_icon14, "韋魯斯"));
iData.add(lData);
//AP組
lData.add(new Item( R. mipmap.iv_lol_icon1, "提摩"));
#lData.add(new Item(R.mipmap.iv_lol_icon7, "安妮"));
lData.add(new Item(R.mipmap.iv_lol_icon8, "天使")));
##> (R.mipmap.iv_lol_icon9, "澤拉斯"));
lData.add(new Item(R.mipmap.iv_lol_icon11, "狐狸//TANK組
lData = new ArrayList<Item>();
lData.add(new new Item( R.mipmap.iv_lol_icon5, "德邦"));
lData.add(new Item(R.mipmap.iv_lol_icon6, "奧拉夫")) iv_lol_icon10, "龍女"));
lData.add(new Item(R.mipmap.iv_lol_icon12, "狗熊"));## #. Adapter = new MyBaseExpandableListAdapter(gData,iData,mContext);
exlist_lol.setAdapter(myAdapter);
ExpandableListView.OnChildClickListener() {
@ Override
public boolean onChildClick(ExpandableListView parent, View v, int Toast.makeText(mContext, "你點選了:" + iData.get(groupPosition).get(childPosition ).getiName(), Toast.LENGTH_SHORT).show();
return ## }
}
4.程式碼下載:
ExpandableListViewDemo.zip
#本節小結:
好的,本節要為大家介紹了ExpandableListView的基本使用,嘿嘿,有點意思~ 這裡只是一個範例,其他的根據自己的需求自行擴展~謝謝


