Basic use of AutoCompleteTextView (automatically complete text box)
Introduction to this section:
This section continues to learn the Adapter class control. This time it brings AutoCompleteTextView (automatically complete text box). I believe if you are careful, you will find that you can define the style of the item yourself for the controls that are connected to the Adapter, right? Or let’s talk about the layout of each Item~ You can play it however you want~ Well, without further ado, let’s start this section~ By the way, post the official API: AutoCompleteTextView
1. Related attributes:
- android:completionHint: Set the prompt title in the drop-down menu
- android:completionHintView: Define the drop-down menu displayed in the prompt view
- android:completionThreshold: Specify How many characters must the user enter before the prompt will be displayed?
- android:dropDownAnchor: Set the positioning "anchor" component of the drop-down menu. If no attribute is specified, This TextView will be used as the positioning "anchor" component
- android:dropDownHeight: Set the height of the drop-down menu
- android:dropDownWidth: Set the drop-down menu The width of the menu
- android:dropDownHorizontalOffset: Specifies the horizontal spacing between the drop-down menu and the text
- android:dropDownVerticalOffset: Specifies the drop-down menu and the text The vertical spacing between
- android:dropDownSelector: Set the click effect of the drop-down menu
- android:popupBackground: Set the background of the drop-down menu
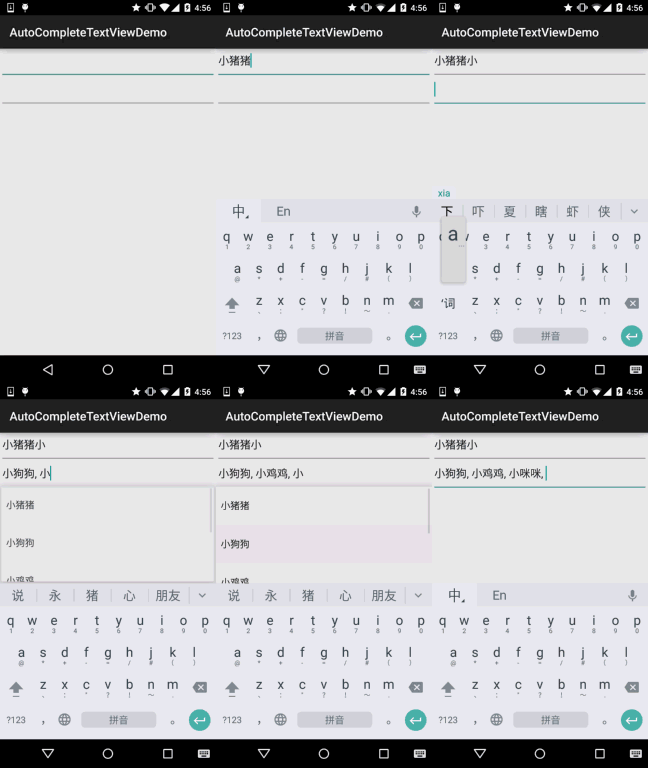
In addition, there is actually a MultiAutoCompleteTextView (auto-complete text box for multiple prompt items) It has similar functions to this AutoCompleteTextView, and the properties are also the same. What are the specific differences? Let’s experience it in the following code~ The other two are whole-word matches, for example, little piggy: If you enter small ->, it will prompt Piggy, but if you enter Piggy->, it will not prompt Piggy!
2. Code example:
Running renderings:

Implementation code :
There is no need to customize the layout here, just use ArrayAdapter to implement it!
Layout file: activity_main.xml:
xmlns:tools="http://schemas.android.com/tools"
android:layout_width="match_parent"
android:layout_height="match_parent"
android:orientation="vertical"
tools:context=".MainActivity">
<AutoCompleteTextView
android:id="@+id/atv_content"
android:layout_width="match_parent"
android:layout_height="48dp"
android:completionHint="请输入搜索内容"
android:completionThreshold="1"
android:dropDownHorizontalOffset="5dp" />
<MultiAutoCompleteTextView
android:id="@+id/matv_content"
android:layout_width="match_parent"
android:layout_height="48dp"
android:completionThreshold="1"
android:dropDownHorizontalOffset="5dp"
android:text="" />
</LinearLayout>
MainActivity.java:
private AutoCompleteTextView atv_content;
private MultiAutoCompleteTextView matv_content;
private static final String[] data = new String[]{
"小猪猪", "小狗狗", "小鸡鸡", "小猫猫", "小咪咪"
};
@Override
protected void onCreate(Bundle savedInstanceState) {
super.onCreate(savedInstanceState);
setContentView(R.layout.activity_main);
atv_content = (AutoCompleteTextView) findViewById(R.id.atv_content);
matv_content = (MultiAutoCompleteTextView) findViewById(R.id.matv_content);
ArrayAdapter<String> adapter = new ArrayAdapter<String>(MainActivity.
this, android.R.layout.simple_dropdown_item_1line, data);
atv_content.setAdapter(adapter);
ArrayAdapter<String> adapter2 = new ArrayAdapter<String>(getApplicationContext(), android.R.layout.simple_dropdown_item_1line, data);
matv_content.setAdapter(adapter);
matv_content.setTokenizer(new MultiAutoCompleteTextView.CommaTokenizer());
}
}
Partial code analysis:
- android:completionThreshold="1": Here we set the prompt to be displayed after entering a word
- android :completionHint="Please enter the search content": This is the text displayed at the bottom of the box, if you think it is ugly You can set a View with android:completionHintView!
- android:dropDownHorizontalOffset="5dp": Set the horizontal margin to 5dp
- matv_content.setTokenizer(new MultiAutoCompleteTextView.CommaTokenizer()); setTokenizer is to set the separator for it
3. Sample code download:
AutoCompleteTextViewDemo.zip
Summary of this section:
This section introduces you to AutoCompleteTextView (automatically complete text box), which is very simple~ Everyone can expand by themselves according to actual development needs~Okay, that’s all, thank you~


