AlertDialog(對話框)詳解
本節引言:
本節繼續帶給大家是顯示提示訊息的第三個控制項AlertDialog(對話框),同時它也是其他 Dialog的的父類!例如ProgressDialog,TimePickerDialog等,而AlertDialog的父類別是:Dialog! 另外,不像前面學習的Toast和Notification,AlertDialog並不能直接new出來,如果你打開 AlertDialog的原始碼,會發現建構方法是protected的,如果我們要建立AlertDialog的話,我們 需要使用到該類別中的靜態內部類別:public static class Builder,然後來呼叫AlertDialog 裡的相關方法,來對AlertDialog進行定制,最後調用show()方法來顯示我們的AlertDialog對話框! 好的,下面我們就來學習AlertDialog的基本用法,以及客製化我們的AlertDialog! 官方文件:AlertDialog
1.基本使用流程
- Step 1:建立AlertDialog.Builder物件;
- Step 2:呼叫setIcon()設定圖標,setTitle()或setCustomTitle()設定標題;
- Step 3:設定對話方塊的內容:setMessage()還有其他方法來指定顯示的內容;
- Step 4:呼叫setPositive/Negative/NeutralButton()設定:確定,取消,中立按鈕;
- Step 5:呼叫create()方法建立這個對象,再呼叫show()方法將對話框顯示出來;
##2.幾種常用的對話方塊使用範例
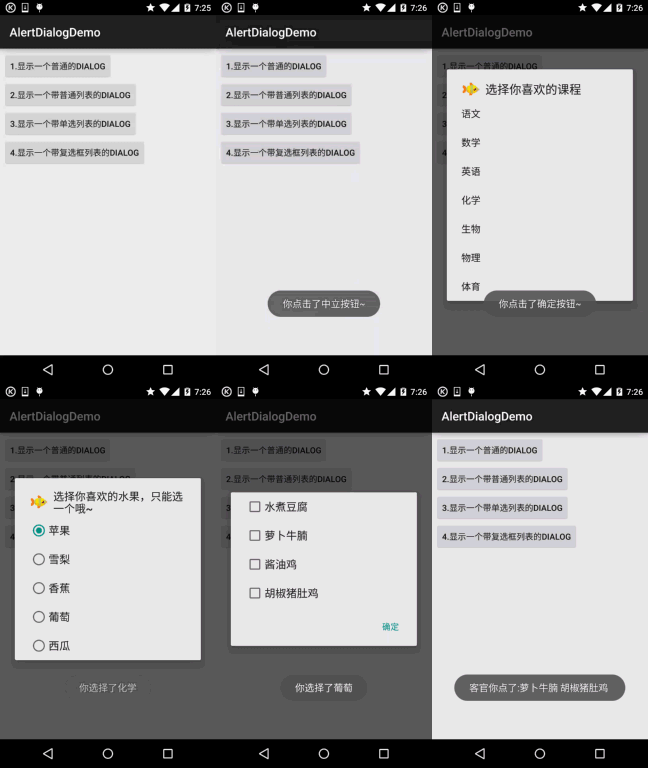
執行效果圖:

核心程式碼 :
MainActivity.java:
私有按鈕 btn_dialog_one;
私有上下文mContext;
# boolean[] checkItems;
AlertDialog alert = null;
私有 AlertDialog alert @Override
protected void onCreate(Bundle savedInstanceState) {
super.onCreate(savedInstanceState);
= MainActivity.this;
bindView();
}
private void bindView() {
b200.one btn_dialog_two = (Button) findViewById(R.id. btn_dialog_two) );
btn_dialog_third btn_dialog_third btn_dialog_third btn_dialog_third our);
btn_dialog_one.setOnClickListener(this) ;
btn_dialog_two ? ) {
switch (v.getId()) {
newase R.id.btn_dialog_one:
alert = null;
Builder(mContext );
alert = builder.setIcon(R.mipmap.ic_icon_fish)
.setMessage("這是一個最普通的AlertDialog,\n有三個按鈕,分別是取消,中立與確定")
.setNegativeButton("取消", new @Override
{
Toast.makeText(mContext, Toast.makeText(mContext, "你點選了取消按鈕~", Toast.LENGTH_SHORT).show();
})
) @Override
public void onClickCDialog Toast.makeText(mContext, "你點選了確定按鈕~", Toast.LENGTH_SHORT).show();
}
})
DialogInterface.OnClickListener() {
public void onClick(DialogInterface dialog, int whi ch) {
text , "你點選了中立按鈕~", Toast.LENGTH_SHORT).show();
}).create(); //創建AlertDialog物件
//顯示對話框
地 final String[] lesson = new String[]{"語文", "數學", "英文", "化學", "生物", "物理", "體育"};
alert log.Builder(mContext);
alert = builder.setIcon(R.mipmap.ic_icon_fish)
.setItems(lesson, new DialogInter甲.OnClickListener() {
public void onClick(DialogInterface dialog, int which) {
+ lesson[which], Toast.LENGTH_SHORT).show();
}) .create();
alert.show();
# case R.id.btn_dialog_three:
[]{"蘋果", "雪梨", "香蕉", "葡萄", "西瓜"};
) AlertDialog.Builder(mContext);
alert = builder .setIcon(R.mipmap.ic_icon_fish)
.setTitle("選擇喜歡的水果,只能選一個~")
@Override
Interface dialog, int which) {
TH_SHORT).show();
).create();
alert.show();
case R.id.btn_dialog_four:
豆腐", "蘿蔔牛腩", "醬油雞", "胡椒豬肚雞"};
//定義一個用來記錄 = new boolean[]{false, false, false, false};
alert = null;
## alert = builder.setIcon(R.mipmap.ic_icon_fish)
{
public void onClick(DialogInterfacedialog,intwhich,booleanisChecked) {
checkItems[which] = isChecked;
}
})
.setPositiveButton("確定", new DialogInterface.OnClickListener() {
@Override
public void onClick(DialogInterface對話框, int ) {
我 for (int i if (checkItems[i])
Toast.makeText(getApplicationContext(), "客官你點了:" + 結果, Toast.LENGTH_ SHORT).show();##Toast.LENGTH_ SHORT).show();##Toast.LENGTH_ SHORT).show();##Toast.LENGTH_ SHORT).show();##Toast.LENGTH_ SHORT).show();##Toast.LENGTH_ SHORT).show();##Toast.LENGTH_ SHORT).show();##Toast.LENGTH_ SHORT)。 }
})
.create();
alert.show();
break;
}
}
}
佈局就是四個簡單的按鈕,這裡就不貼出來了,用法非常簡單~無非就是創建一個Builder物件後, 進行相關設置,然後create()產生一個AlertDialog對象,最後呼叫show()方法將AlertDialog 顯示出來而已!另外,細心的你可能會發現我們點擊對話框的外部區域,對話框就會消失,我們 可以為builder設定setCancelable(false)即可解決這個問題!
3.透過Builder的setView()自訂顯示的AlertDialog
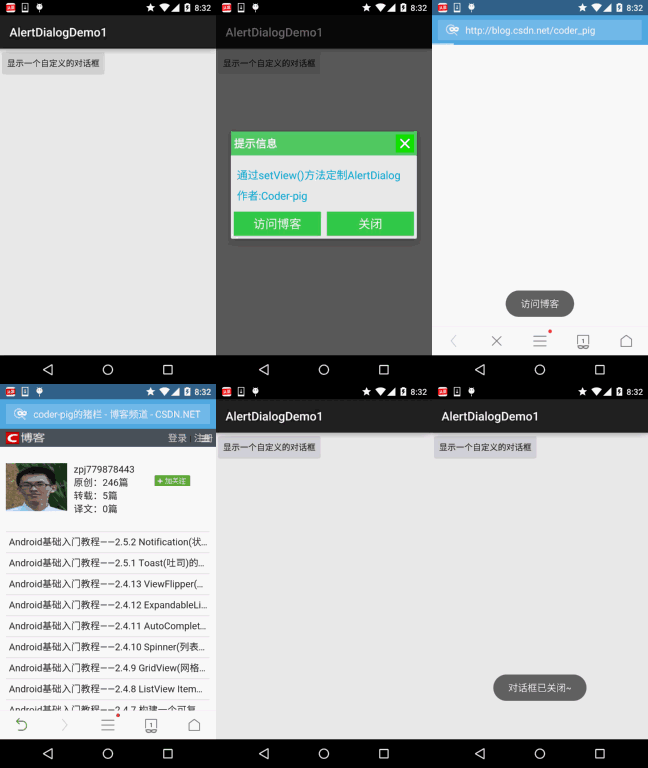
#我們可以自訂一個與系統對話方塊不同的佈局,然後呼叫setView()將我們的佈局載入到 AlertDialog上,上面我們來實現這個效果:
運行效果圖:

關鍵程式碼:
首先是兩個不同按鈕的selctor的drawable檔案:
btn_selctor_exit.xml:
<item android:state_pressed="true" android:drawable="@mipmap/iv_icon_exit_pressed"/>
<item android:drawable="@mipmap/iv_icon_exit_normal"/>##<##>
#<?xml version="1.0" encoding="utf-8"?>
<selector xmlns:android="http://schemas.android.com/apk/res/android"></selector>
#
接著是自訂的Dialog佈局:view_dialog_custom.xml:
android:id="@+id/RelativeLayout1"
android:layout_width="match_parent"
and #
and? android:layout_alignParentLeft="true "
android:layout_alignParentTop="true"
android:background="../style/images/android-tutorial-alertdialog.html"
## android:layout_width="match_parent"
android 「
android:text="提示資訊"
android:text="提示資訊"
android:text="提示資訊"
android:text="12:text "
android:textSize="18sp"
and android:id="@+id /btn_cancle"
android: layout_width="30dp"
android:layout_height="30dp"
roid:background="../style/images/btn_selctor _退出」 />
<LinearLayout
and? android:layout_alignParentLeft="true"
android:layout_below="@+id/titlelayout"
android:layout_centerInParent="true"
android:layout_width=" wrap_content"
android:layout_height="wrap_content"
android:text="透過setView()方法客製化AlertDialog"
android :textColor="#04AEDA"
android:textSize="18sp" />
# ## android:layout_height="wrap_content "
android:layout_marginLeft="10dp"
android:layout_marginTop="10dp"
android:textColor="#04AEDA"
安卓:textSize=" 18sp" />
#
android:layout_marginTop="10dp"
android:orientation="horizontal">
android:layout_width= " match_parent"
android:layout_height="40dp"
="1"
android:background="../style/images/btn_selctor_choose"
and? # <按鈕
android:id= " @+id/btn_close"
android:layout_width="match_parent"
:layout_margin="5dp"
android:layout_weight="1"
android :background="/style/images/btn_selctor_choose"
android:text="關閉"
:textSize="20sp" />
#
最後是MainActivity.java:
私有按鈕btn_show;
# 私有視圖 view_custom;
私有AlertDialog .Builder builder = null;
@Override
protected void onCreate(Bundle saved setContentView(R.layout.activity_main);
mContext = MainActivity.this;
btn_show = (Button) findViewById(R.id.btn_show);
# Dialog.Builder(mContext);
//在其中一個載入自訂的View,同時設定下
final LayoutInflater inflater = MainActivity.this.getLayoutInflaterInflater inflater = MainActivity.this.getLayoutInflater();#. late(R.layout.view_dialog_custom, null,false);
builder.setView(view_custom);
builder.setCancelable(false);
#c view_custom.findViewById(R.id.btn_cancle).setOnClickListener( new View.OnClickListener() {
@Override
alert.dismiss();
}
});
## findViewById (R.id.btn_blog).setOnClickListener(new View.OnClickListener() {
Toast.makeText(getApplicationContext(), "訪問部落格", Toast.LENGTH_SHORT).show();
Urico#uri Intent intent = new Intent(Intent.ACTION_VIEW, uri);
}
});
view_custom .findViewByCyIdIId. R.id.btn_close).setOnClickListener(new View.OnClickListener() {
@Override
Toast.makeText(getApplicationContext(), "對話方塊已關閉~" , Toast.LENGTH_SHORT).show();
alert.dismiss();
btn_show.setOnClickListener(new View.OnClickListener() {
@覆蓋
public void onClick(View v) {
});
}
}
#4.範例程式碼下載
AlertDialogDemo.zip
AlertDialogDemo1.zip


