Basic use of several other common dialog boxes
Introduction to this section:
In the previous section we studied the parent class of Dialog: AlertDialog, and in this section we will learn a few commonly used ones. The basic uses of Dialog, they are: ProgressDialog (progress bar dialog box), DatePickerDialog (Date selection dialog box) and TimePickerDialog (time selection dialog box)~, without further ado, let’s start this section~
1. Basic use of ProgressDialog (progress bar dialog box)
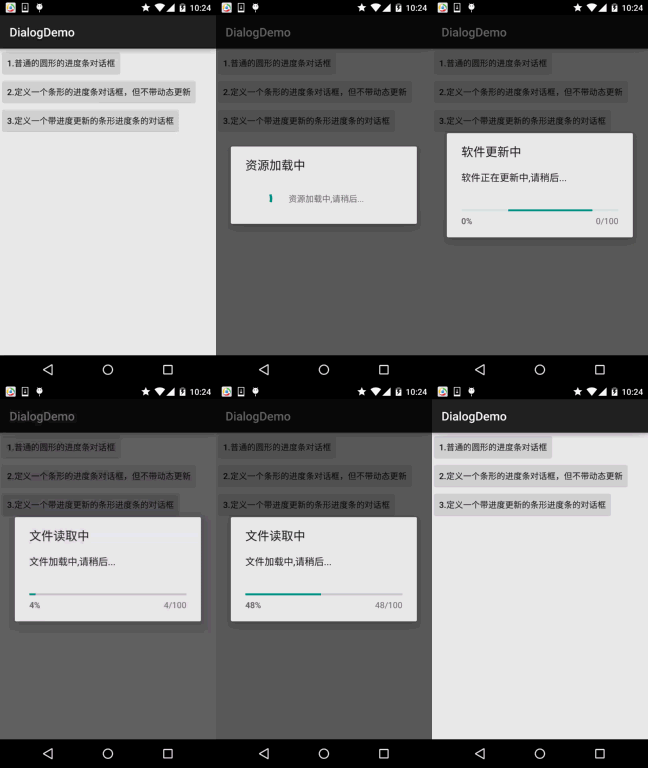
There are two ways to create a progress bar dialog box:
- 1. Directly call the static method show() provided by ProgressDialog to display
- 2. Create a ProgressDialog, then set the parameters of the dialog box, and finally show() it out
Code example:
Running renderings:

Key implementation code:
MainActivity .java:
private Button btn_one;
private Button btn_two;
private Button btn_three;
private ProgressDialog pd1 = null;
private ProgressDialog pd2 = null;
private final static int MAXVALUE = 100;
private int progressStart = 0;
private int add = 0;
private Context mContext = null;
//Define a Handler for updating progress. Because the interface can only be updated by the main thread, Handler must be used to pass information
final Handler hand = new Handler()
{
Override
public void handleMessage(Message msg) Set progress bar The current value of MAXVALUE)
avedInstanceState) {
super.onCreate(savedInstanceState);
setContentView(R.layout.activity_main);
mContext = MainActivity.this;
bindViews();
}
private void bindViews() {
btn_one = (Button) findViewById(R.id.btn_one);
btn_two = (Button) findViewById(R.id .btn_two);
btn_three = (Button) findViewById(R.id.btn_three);
btn_one.setOnClickListener(this);
btn_two.setOnClickListener(this);
btn_three.set OnClickListener(this) ;
}
@Override
public void onClick(View v) {
switch (v.getId()){
case R.id.btn_one:
// The parameters of the words here are in turn, context, title, content, whether the progress is displayed, whether the cancellation button can be turned off
ProgressDialog.show (mainactivity.this, "Resource loading", "Resource loading, please feel a little bit, a little, After ... ", false, true);
Break; ## Case R.id.btn_two:
PD1 = New ProgressDialog (mcontext);
// Set the title, content, whether to use it Cancel button is turned off and whether to show progress
pd1.setTitle("Software is being updated");
pd1.setMessage(" true ); ate(true);
//Call the show() method to display the ProgressDialog
pd1.show(); progressStart = 0;
add = 0;
// Set some attributes in order
PD2 = New ProgressDialog (MainActivity.this);
PD2.Setmax (Maxvalue);
PD2.Settitle ("" " );
PD2.SetprogressStyle (ProgressDialog. Style_horizontal);
// Whether the progress is displayed here, set to False is displayed!
pd2.setIndeterminate(false);
pd2.show();
# public void run()
{
WHILE (ProgressStart & LT; MaxValue)
{
// The algorithm here is determined by the changes in the progress bar. Send the information code to the handle to update the interface
. .start();
break;
## //Set a time-consuming method here:
private int usetime() {
add++;
try{
Thread.sleep(100);
}catch ( InterruptedException e) {
e.printStackTrace();
}
The code is relatively simple, and we have already learned about Progress before, so I won’t go into details here~
2.DatePickerDialog (date selection dialog box) and TimePickerDialog (time selection dialog box) Box)
Let me explain something first: Date/TimePickerDialog is only for users to select date and time. For the system time of the android system, The date has no impact. Google has not announced the API for system date and time settings. If you want to set it in the app, you have to recompile the android system source code, which is very troublesome!
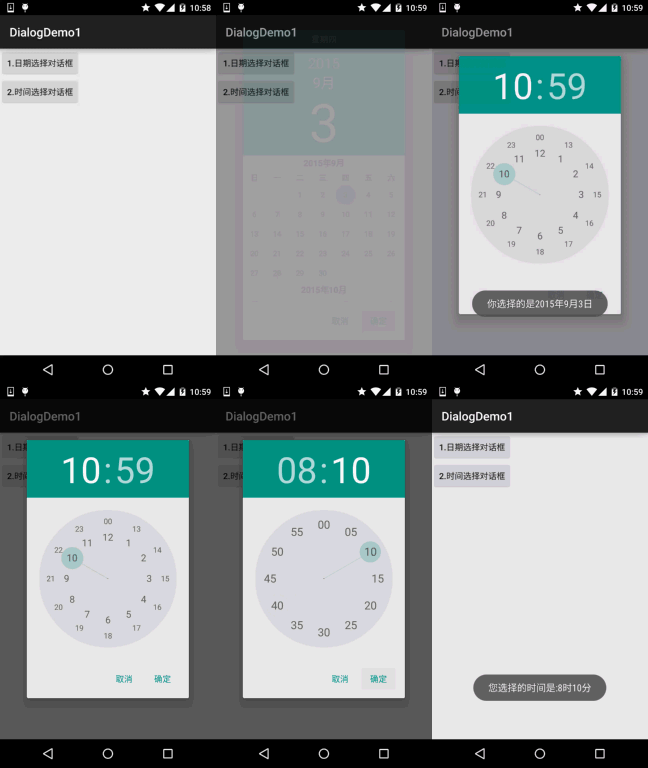
The construction methods of both of them are very similar: DatePickerDialog(Context; DatePickerDialog.OnDateSetListener() listener; year; month; day)
TimePickerDialog( Context; TimePickerDialog.OnTimeSetListener() listener; hours, minutes, whether to use the 24-hour clock)
##Code example:
Running renderings :

:
MainActivity.java:
private Button btn_date;
private Button btn_time;
private String result = "";
@Override
protected void onCreate(Bundle savedInstanceState) {
super.onCreate(savedInstanceState);
setContentView(R.layout.activity_main);
bindViews();
}
private void bindViews() {
btn_date = (Button) findViewById(R.id.btn_date);
btn_time = (Button) findViewById(R.id.btn_time);
btn_date.setOnClickListener(this);
btn_time.setOnClickListener(this);
}
@Override
public void onClick(View v) {
result = "";
switch (v.getId()){
case R.id.btn_date:
Calendar cale1 = Calendar.getInstance();
new DatePickerDialog(MainActivity.this,new DatePickerDialog.OnDateSetListener() {
@Override
public void onDateSet(DatePicker view, int year, int monthOfYear,
int dayOfMonth) {
//这里获取到的月份需要加上1哦~
result += "你选择的是"+year+"年"+(monthOfYear+1)+"月"+dayOfMonth+"日";
Toast.makeText(getApplicationContext(), result, Toast.LENGTH_SHORT).show();
}
}
,cale1.get(Calendar.YEAR)
,cale1.get(Calendar.MONTH)
,cale1.get(Calendar.DAY_OF_MONTH)).show();
break;
case R.id.btn_time:
Calendar cale2 = Calendar.getInstance();
new TimePickerDialog(MainActivity.this, new TimePickerDialog.OnTimeSetListener() {
@Override
public void onTimeSet(TimePicker view, int hourOfDay, int minute) {
result = "";
result += "您选择的时间是:"+hourOfDay+"时"+minute+"分";
Toast.makeText(getApplicationContext(), result, Toast.LENGTH_SHORT).show();
}
}, cale2.get(Calendar.HOUR_OF_DAY), cale2.get(Calendar.MINUTE), true).show();
break;
#The code is also very simple, so I won’t explain it~
DialogDemo1.zip
Summary of this section:Okay, this section introduces three commonly used Dialogs. Compared with the previous 4.x version, these native controls of 5.0 , It's obviously much prettier~ That's all, thank you~


