Detailed explanation of AlertDialog (dialog box)
Introduction to this section:
This section continues to bring you the third control AlertDialog (dialog box) that displays prompt information, and it is also the third control for displaying prompt information. Dialog's parent class! For example, ProgressDialog, TimePickerDialog, etc., and the parent class of AlertDialog is: Dialog! In addition, unlike the Toast and Notification learned earlier, AlertDialog cannot be directly new. If you open In the source code of AlertDialog, you will find that the construction method is protected. If we want to create AlertDialog, we You need to use a static inner class in this class: public static class Builder, and then call AlertDialog Related methods in to customize AlertDialog, and finally call the show() method to display our AlertDialog dialog box! Okay, let's learn the basic usage of AlertDialog and customize our AlertDialog! Official document: AlertDialog
1. Basic usage process
- Step 1: Create AlertDialog.BuilderObject;
- Step 2: Call setIcon() to set the icon, setTitle() or setCustomTitle()Set title;
- Step 3: Set the content of the dialog box: setMessage() There are other methods to specify the displayed content;
- Step 4: Call setPositive/Negative/NeutralButton()Set: OK, Cancel, Neutral button;
- Step 5: Call ## The #create() method creates this object, and then calls the show() method to display the dialog box;
2. Several commonly used Dialog usage example
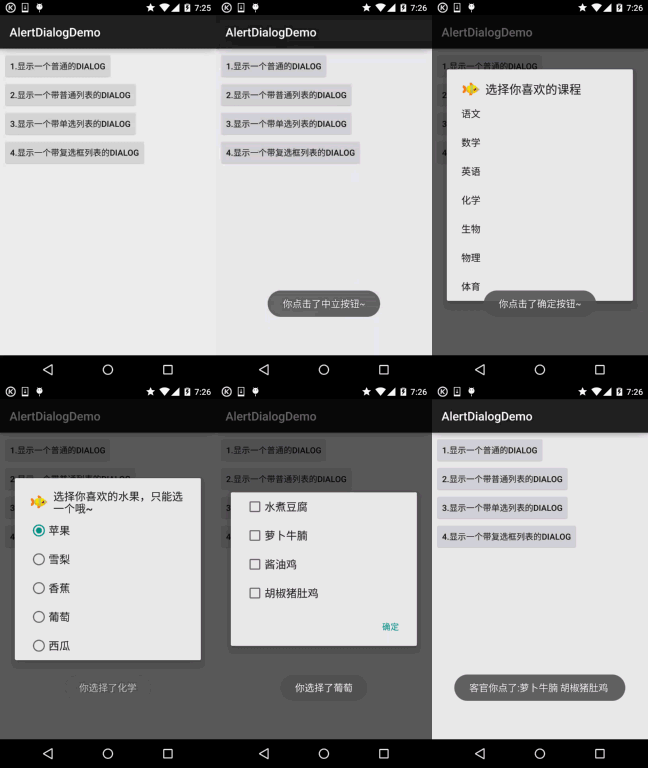
Running rendering:

:
MainActivity.java: The layout is just four simple buttons. I won’t post them here. The usage is very simple~It’s nothing more than creating a Builder object.
Make relevant settings, then create() to generate an AlertDialog object, and finally call the show() method to save the AlertDialog
Just show it! In addition, if you are careful, you may find that when we click on the outer area of the dialog box, the dialog box will disappear, and we
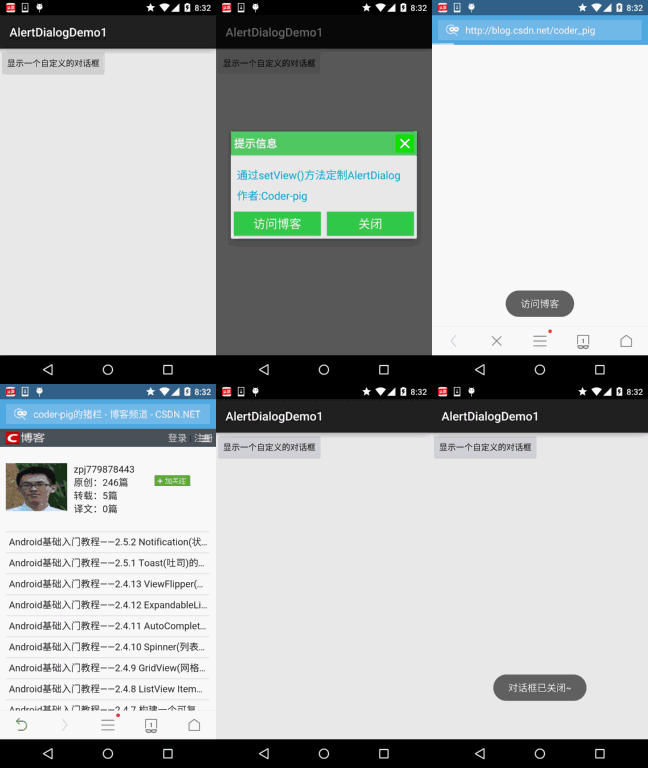
You can set setCancelable(false) for the builder to solve this problem! We can customize a layout that is different from the system dialog box, and then call setView() to set our The layout is loaded into
On AlertDialog, let’s achieve this effect above: Running renderings: Key code: The first is the drawable file of the selctor of two different buttons: btn_selctor_exit.xml: btn_selctor_choose.xml: Then comes the custom Dialog layout: view_dialog_custom.xml: Finally MainActivity.java: AlertDialogDemo.zip AlertDialogDemo1.zip 好的,本节给大家介绍了一下AlertDialog的基本使用,写了几个调用AlertDialog的例子,
最后还通过setView方法自定义了一下我们的AlertDialog!是不是还意犹未尽呢?但这说不上
真正的自定义控件,我们把自定义控件放到进阶系列,到时后会有个专题来和大家探讨
下自定义控件~敬请期待~就说这么多,谢谢~
private Button btn_dialog_one;
private Button btn_dialog_two;
private Button btn_dialog_three;
private Button btn_dialog_four;
private Context mContext;
private boolean[] checkItems;
private AlertDialog alert = null;
private AlertDialog.Builder builder = null;
@Override
protected void onCreate(Bundle savedInstanceState) {
super.onCreate(savedInstanceState);
setContentView(R.layout.activity_main);
mContext = MainActivity.this;
bindView();
}
private void bindView() {
btn_dialog_one = (Button) findViewById(R.id.btn_dialog_one);
btn_dialog_two = (Button) findViewById(R.id.btn_dialog_two);
btn_dialog_three = (Button) findViewById(R.id.btn_dialog_three);
btn_dialog_four = (Button) findViewById(R.id.btn_dialog_four);
btn_dialog_one.setOnClickListener(this);
btn_dialog_two.setOnClickListener(this);
btn_dialog_three.setOnClickListener(this);
btn_dialog_four.setOnClickListener(this);
}
@Override
public void onClick(View v) {
switch (v.getId()) {
//普通对话框
case R.id.btn_dialog_one:
alert = null;
builder = new AlertDialog.Builder(mContext);
alert = builder.setIcon(R.mipmap.ic_icon_fish)
.setTitle("System prompt: ")
.setMessage("This is the most common AlertDialog,\nwith three buttons, namely Cancel, Neutral and OK")
.setNegativeButton("Cancel", new DialogInterface.OnClickListener() Public void onClick(DialogInterface dialog, int which) {
"You clicked the cancel button~", Toast.LENGTH_SHORT).show();
}
)
.setPositiveButton ("OK", new DialogInterface.OnClickListener() {
@Override
Public Void ONCLICK (Dialoginterface Dialog, Int Which) {
Toast.maketext (mcontext, "You click the OK button ~", toast.Length_Short) .Show ();
}
})
.setneutralbutton ("Neutral", New Dialoginterface.onClickListener () {
@override
Public Void Onclick (DialoginterFace Dialog, in T Whi) {
Toast.maketext (mcontext , "You clicked the neutral button~", Toast.LENGTH_SHORT).show();
}
).create(); . alert.show(); //Show Dialog box
Break;
// General list dialog box
Case r.id.btn_dialog_two:
Final String [] lesson = New String [] {"Chinese", "Mathematics", "English", "English", "English", "English" ", "Chemistry", "Biology", "Physics", "Sports"};
alert = null;
builder = new AlertDialog.Builder(mContext);
alert = builder.setIcon(R.mipmap.ic_icon_fish)
.setTitle("Choose your favorite course")
.setItems(lesson, new DialogInterface.OnClickListener() {
@Override
void onClick(DialogInterface dialog, int which) {
use use use use use use use use use use use use using through through through through through out through out through out through out through out through out through ’'s '‐ ‐‐‐‐‐‐‐‐‐ void onClick(DialogInterface dialog, int _ .create (); final String[] fruits = new String []{"Apple", "Sydney", "Banana", "Grape", "Watermelon"};
alert = null;
builder = new AlertDialog.Builder(mContext); builder .setIcon(R.mipmap.ic_icon_fish)
.setTitle("Choose the fruit you like, you can only choose one~")
.setSingleChoiceItems(fruits, 0, new DialogInterface.OnClickListener() {
public void onClick(DialogInterface dialog, INT Which) {
Toast.maketext (getApplicationContext (), "You chose"+fruits [which], toast.length_short) .show ();
}). Create ();
Alert.show ();
Break;
// Multiple Optional List Dialogue box
Case R.id.btn_dialog_four:
Final String [] Menu = New String [] {"boiled water boiled Tofu", "Radish Beef Brisket", "Soy Sauce Chicken", "Pepper Pork Belly Chicken"};
//Define a boolean array to record the status of a list item
Tofu, false, false, false};
alert = null;
builder = new AlertDialog.Builder(mContext);
alert = builder.setIcon(R.mipmap.ic_icon_fish)
.setMultiChoiceItems(menu, checkItems, new DialogInterface.OnMultiChoiceClickListener() {
@Override
public void onClick(DialogInterface dialog, int which, boolean isChecked) {
checkItems[which] = isChecked;
}
})
.setPositiveButton("确定", new DialogInterface.OnClickListener() {
@Override
public void onClick(DialogInterface dialog, int which) {
String result = "";
for (int i = 0; i < checkItems.length; i++) {
if (checkItems[i])
result += menu[i] + " ";
}
Toast.makeText(getApplicationContext(), "客官你点了:" + result, Toast.LENGTH_SHORT).show();
}
})
.create();
alert.show();
break;
}
}
}3. Customize the displayed AlertDialog through Builder's setView()

<selector xmlns:android="http://schemas.android.com/apk/res/android">
<item android:state_pressed="true" android:drawable="@mipmap/iv_icon_exit_pressed"/>
<item android:drawable="@mipmap/iv_icon_exit_normal"/>
</selector>
<selector xmlns:android="http://schemas.android.com/apk/res/android">
<item android:state_pressed="true" android:drawable="@mipmap/bg_btn_pressed"/>
<item android:drawable="@mipmap/bg_btn_normal"/>
</selector>
<RelativeLayout xmlns:android="http://schemas.android.com/apk/res/android"
android:id="@+id/RelativeLayout1"
android:layout_width="match_parent"
android:layout_height="match_parent"
android:orientation="vertical">
<RelativeLayout
android:id="@+id/titlelayout"
android:layout_width="match_parent"
android:layout_height="wrap_content"
android:layout_alignParentLeft="true"
android:layout_alignParentTop="true"
android:background="../style/images/android-tutorial-alertdialog.html"
android:padding="5dp">
<TextView
android:layout_width="match_parent"
android:layout_height="wrap_content"
android:layout_centerVertical="true"
android:text="提示信息"
android:textColor="#ffffff"
android:textSize="18sp"
android:textStyle="bold" />
<Button
android:id="@+id/btn_cancle"
android:layout_width="30dp"
android:layout_height="30dp"
android:layout_alignParentRight="true"
android:background="../style/images/btn_selctor_exit" />
</RelativeLayout>
<LinearLayout
android:id="@+id/ly_detail"
android:layout_width="wrap_content"
android:layout_height="wrap_content"
android:layout_alignParentLeft="true"
android:layout_below="@+id/titlelayout"
android:layout_centerInParent="true"
android:orientation="vertical">
<TextView
android:layout_width="wrap_content"
android:layout_height="wrap_content"
android:layout_marginLeft="10dp"
android:layout_marginTop="20dp"
android:text="通过setView()方法定制AlertDialog"
android:textColor="#04AEDA"
android:textSize="18sp" />
<TextView
android:layout_width="wrap_content"
android:layout_height="wrap_content"
android:layout_marginLeft="10dp"
android:layout_marginTop="10dp"
android:text="作者:Coder-pig"
android:textColor="#04AEDA"
android:textSize="18sp" />
</LinearLayout>
<LinearLayout
android:layout_width="match_parent"
android:layout_height="wrap_content"
android:layout_below="@+id/ly_detail"
android:layout_marginTop="10dp"
android:orientation="horizontal">
<Button
android:id="@+id/btn_blog"
android:layout_width="match_parent"
android:layout_height="40dp"
android:layout_margin="5dp"
android:layout_weight="1"
android:background="../style/images/btn_selctor_choose"
android:text="访问博客"
android:textColor="#ffffff"
android:textSize="20sp" />
<Button
android:id="@+id/btn_close"
android:layout_width="match_parent"
android:layout_height="40dp"
android:layout_margin="5dp"
android:layout_weight="1"
android:background="../style/images/btn_selctor_choose"
android:text="关闭"
android:textColor="#ffffff"
android:textSize="20sp" />
</LinearLayout>
</RelativeLayout>
private Button btn_show;
private View view_custom;
private Context mContext;
private AlertDialog alert = null;
private AlertDialog.Builder builder = null;
@Override
protected void onCreate(Bundle savedInstanceState) {
super.onCreate(savedInstanceState);
setContentView(R.layout.activity_main);
mContext = MainActivity.this;
btn_show = (Button) findViewById(R.id.btn_show);
//初始化Builder
builder = new AlertDialog.Builder(mContext);
//加载自定义的那个View,同时设置下
final LayoutInflater inflater = MainActivity.this.getLayoutInflater();
view_custom = inflater.inflate(R.layout.view_dialog_custom, null,false);
builder.setView(view_custom);
builder.setCancelable(false);
alert = builder.create();
view_custom.findViewById(R.id.btn_cancle).setOnClickListener(new View.OnClickListener() {
@Override
public void onClick(View v) {
alert.dismiss();
}
});
view_custom.findViewById(R.id.btn_blog).setOnClickListener(new View.OnClickListener() {
@Override
public void onClick(View v) {
Toast.makeText(getApplicationContext(), "访问博客", Toast.LENGTH_SHORT).show();
Uri uri = Uri.parse("http://blog.csdn.net/coder_pig");
Intent intent = new Intent(Intent.ACTION_VIEW, uri);
startActivity(intent);
alert.dismiss();
}
});
view_custom.findViewById(R.id.btn_close).setOnClickListener(new View.OnClickListener() {
@Override
public void onClick(View v) {
Toast.makeText(getApplicationContext(), "对话框已关闭~", Toast.LENGTH_SHORT).show();
alert.dismiss();
}
});
btn_show.setOnClickListener(new View.OnClickListener() {
@Override
public void onClick(View v) {
alert.show();
}
});
}
}4.示例代码下载
本节小结:


