Detailed explanation of Notification (status bar notification)
Introduction to this section:
This section brings about the control used to display notification information in the status bar in Android: Notification, I believe most Anyone who studies Android is familiar with it, and many tutorials on using Notification on the Internet are based on 2.x, and Nowadays, common Android devices are basically 4.x or above, or even 5.0 or above; their respective Notification They are all different! This section will explain to you Notification based on 4.x and above, and Notification based on 5.0 and above We will explain it in the chapter of the new features of Android 5.0 in the advanced tutorial~
Some introductions to Notification in the official documents:
Design ideas: Notifications in Android 4.4 and Lower
Translation:Notification
API Document:Notification
You may need a ladder to access the above website~
1. Interpretation of the design document part
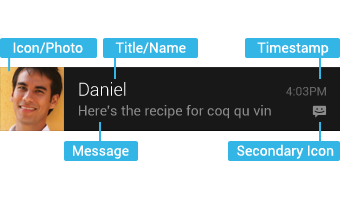
1) Basic layout of Notification

above The constituent elements are:
- Icon/Photo: Large icon
- Title/Name: Title
- Message: Content information
- Timestamp: Notification time, the default is the time when the system sends notification, it can also be set by setWhen()
- Secondary Icon: small icon
- content text, a text on the left hand side of the small icon
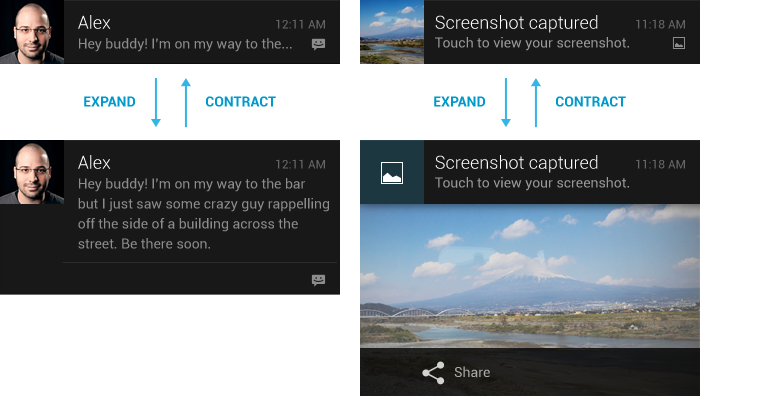
2) Extended layout
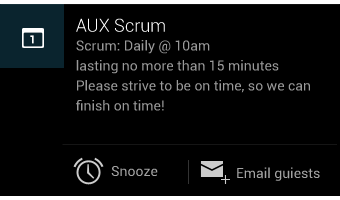
In Jelly Bean you can provide more event details for notifications. You can display the first few lines of a message or a preview of an image by extending the layout. This allows users to see more content - sometimes even the entire message. Users can pinch-zoom or slide with two fingers to open the expanded layout. Android provides two extended layouts (text and images) for a single message for you to use when developing applications.
Regarding some other design things, I won’t mention them one by one. If you are interested, check the API documentation provided above. Know This Notification can be varied in versions 4.x or above! What we pay more attention to is How to write code to use this thing? Let’s learn how to use Notification!
2. Basic usage process of Notification
The status notification bar mainly involves 2 categories: Notification and NotificationManager
Notification: notification information class, which corresponds to each attribute of the notification bar
NotificationManager: is the management class of status bar notifications, responsible for sending notifications, clearing notifications and other operations.
Basic process used:
- Step 1. Obtain the NotificationManager object: NotificationManager mNManager = (NotificationManager) getSystemService(NOTIFICATION_SERVICE);
- Step 2. Create a Builder construction class for the notification bar: Notification.Builder mBuilder = new Notification.Builder(this);
- Step 3. Make relevant settings for Builder, such as title, content, icon, action, etc.!
- Step 4.Call Build() method of Builder to assign value to notification
- Step 5.Call NotificationManager’s notify() method to send notification!
- PS:In addition, we can also call the cancel() method of NotificationManager to cancel the notification
3. Set some related methods:
Notification.Builder mBuilder = new Notification.Builder(this);
and then call the following related methods to set: (Official API document: Notification.Builder) Commonly used methods are as follows:
- setContentTitle(CharSequence):Set the title
- setContentText(CharSequence):Set the content
- setSubText(CharSequence): Set a small line of text below the content
- setTicker(CharSequence): Set the text information displayed at the top when receiving notifications
- setWhen(long): Set the notification time. Generally, the setting is System.currentTimeMillis()
- setSmallIcon(int): Set the small icon in the lower right corner when the notification is received. This small icon will also be displayed at the top when receiving a notification
- setLargeIcon(Bitmap): Set the large icon on the left
- setAutoCancel(boolean ): Whether the notification will be canceled after the user clicks the Notification panel (not canceled by default)
- setDefaults(int): The simplest way to add sound, flash and vibration effects to the notification. Using the defaults attribute, you can combine multiple attributes,
Notification.DEFAULT_VIBRATE (add a default vibration reminder);
Notification.DEFAULT_SOUND (add a default sound reminder) ;
Notification.DEFAULT_LIGHTS(Add default three-color light reminder)
Notification.DEFAULT_ALL(Add default reminder of all the above 3 types)- setVibrate(long[]): Set the vibration mode, for example:
setVibrate(new long[] {0,300,500,700}); delay 0ms, then vibrate 300ms, delay 500ms, Then vibrate for 700ms. The usage of Vibrate will be explained later!- setLights(int argb, int onMs, int offMs): Set the three-color lights. The parameters are: light color, The light duration and dark time are not available for all colors. This depends on the device. Some mobile phones do not have three-color lights; In addition, you also need to set flags for Notification to Notification.FLAG_SHOW_LIGHTS to support three-color light reminders!
setSound(Uri): Set the ringtone when a notification is received. You can use the system one or set it yourself. The example is as follows:
.setDefaults(Notification.DEFAULT_SOUND ) //Get the default ringtone
.setSound(Uri.parse("file:///sdcard/xx/xx.mp3")) //Get the custom ringtone
.setSound(Uri.withAppendedPath(Audio. Media.INTERNAL_CONTENT_URI, "5")) //Get the ringtone in the Android multimedia librarysetOngoing(boolean): Set to true, indicating that it is an ongoing notification. They are usually used to express A background task in which the user is actively involved (such as playing music) or is waiting in some way and therefore occupies the device (such as a file download, Synchronous operation, active network connection)
- setProgress(int,int,boolean): Set notification with progress bar The parameters are: maximum value of the progress bar, current progress, and whether the progress is uncertain If it is a confirmed progress bar: call setProgress(max, progress, false) to set the notification, When updating the progress, initiate a notification to update the progress here, and remove the progress bar after the download is completed. , just by calling setProgress(0, 0, false). If it is an indeterminate (continuously active) progress bar, This shows that the activity is continuing when the processing progress cannot be accurately known, so setProgress(0, 0, true) is called , when the operation ends, call setProgress(0, 0, false) and update the notification to remove the indicator bar
setContentIntent(PendingIntent): PendingIntent and Intent are slightly different, it You can set the number of executions, It is mainly used for remote service communications, alarms, notifications, launchers, and text messages. It is rarely used under normal circumstances. For example, pass here Pending starts Activity: getActivity(Context, int, Intent, int), of course you can also start Service or Broadcast The bit identifier of PendingIntent (the fourth parameter):
FLAG_ONE_SHOT means that the returned PendingIntent can only be executed once and will be automatically canceled after execution.
FLAG_NO_CREATE means that if the described If the PendingIntent does not exist, the corresponding PendingIntent will not be created. Instead, NULL
FLAG_CANCEL_CURRENT will be returned, indicating that the corresponding PendingIntent already exists. The former will be canceled and a new PendingIntent will be created. This is conducive to keeping the data up to date and can be used in communication scenarios for instant messaging
FLAG_UPDATE_CURRENT Represents updated PendingIntent
Usage example://点击后跳转Activity Intent intent = new Intent(context,XXX.class); PendingIntent pendingIntent = PendingIntent.getActivity(context, 0, intent, 0); mBuilder.setContentIntent(pendingIntent)
setPriority(int): Set priority:
Corresponding attribute: Notification.PRIORITY_HIGH...
Priority User MAX Important and urgent notification, informing the user that this event is time-critical or needs to be handled immediately. HIGH High priority is used for important communication content, such as short messages or chats, which are more interesting to users. DEFAULT The default priority is used for notifications that have no special priority classification. LOW Low priority can notify users of events that are not very urgent. MIN is used for background messages (such as weather or location information). The lowest priority notification will only display an icon in the status bar, and the content will only be visible if the user pulls down the notification drawer.
4. Code example: The most common Notification:
Let’s write the simplest example below Experience the usage of Notification:
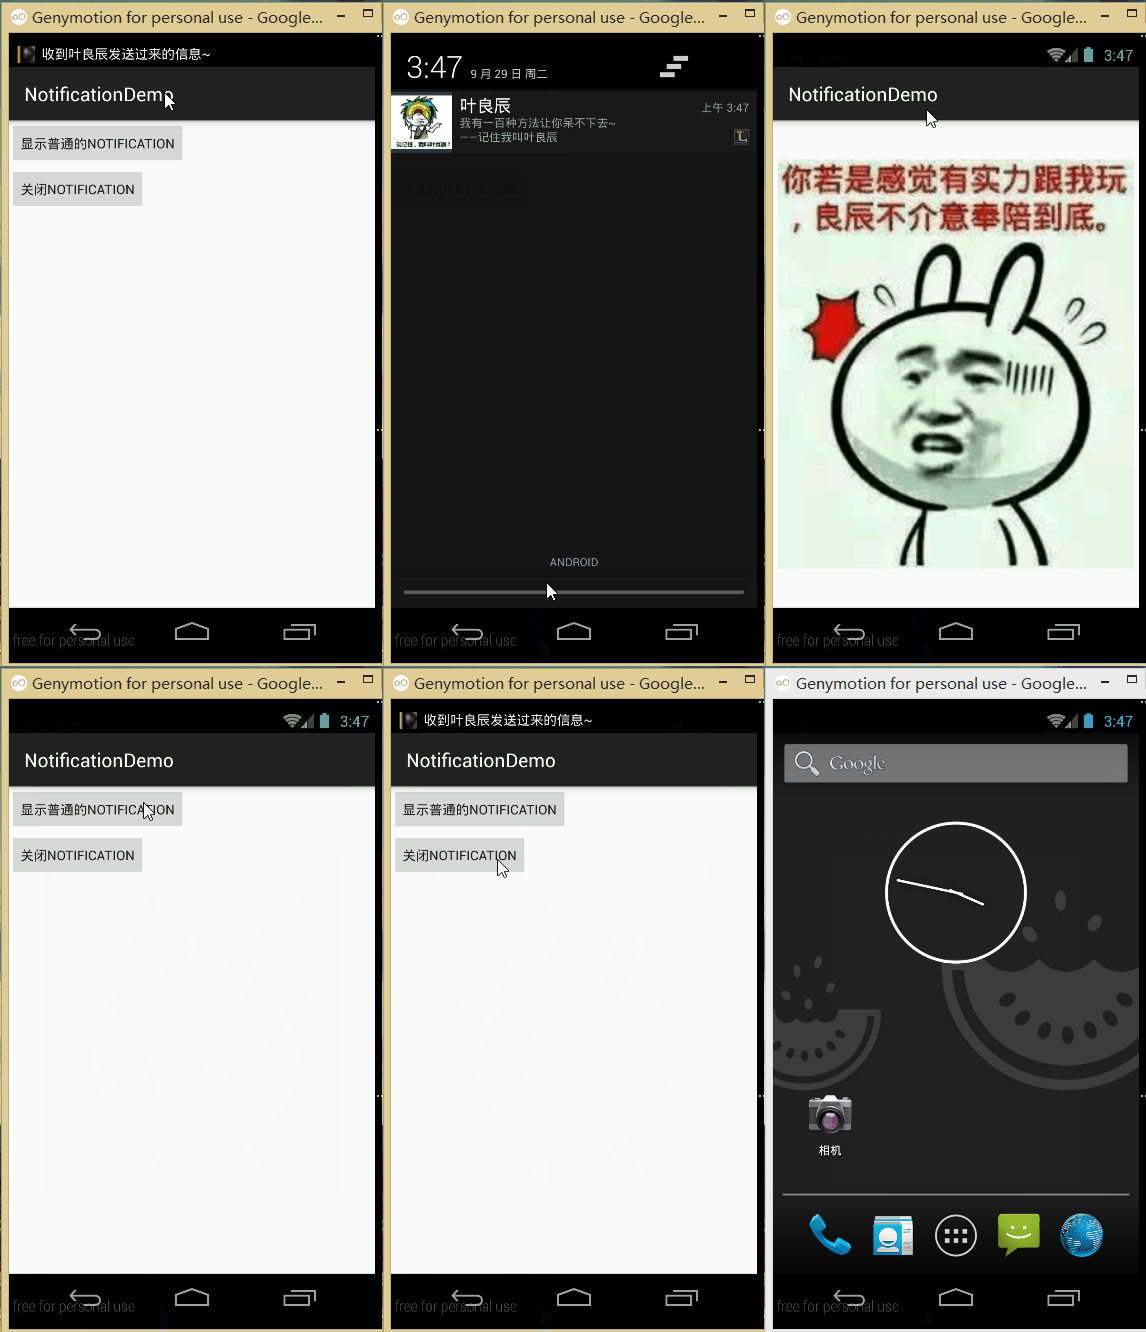
Running renderings:

##Key code:
Post the code ofMainActivity.java directly here:
private Context mContext;
private NotificationManager mNManager;
private Notification notify1;
Bitmap LargeBitmap = null;
private static final int NOTIFYID_1 = 1;
private Button btn_show_normal;
private Button btn_close_normal;
@Override
protected void onCreate(Bundle savedInstanceState) {
super.onCreate(savedInstanceState);
setContentView(R.layout.activity_main);
mContext = MainActivity.this;
//创建大图标的Bitmap
LargeBitmap = BitmapFactory.decodeResource(getResources(), R.mipmap.iv_lc_icon);
mNManager = (NotificationManager) getSystemService(NOTIFICATION_SERVICE);
bindView();
}
private void bindView() {
btn_show_normal = (Button) findViewById(R.id.btn_show_normal);
btn_close_normal = (Button) findViewById(R.id.btn_close_normal);
btn_show_normal.setOnClickListener(this);
btn_close_normal.setOnClickListener(this);
}
@Override
public void onClick(View v) {
switch (v.getId()) {
case R.id.btn_show_normal:
//定义一个PendingIntent点击Notification后启动一个Activity
Intent it = new Intent(mContext, OtherActivity.class);
PendingIntent pit = PendingIntent.getActivity(mContext, 0, it, 0);
//Title
.setContentText("I have a hundred ways to make you unable to stay~") .setSubText . A short paragraph of text below the content
.setTicker("Received the message sent by Ye Liangchen~") .
.setSmallIcon " .setDefaults(Notification.DEFAULT_LIGHTS | Notification.DEFAULT_VIBRATE) //Set the default three-color lights and vibrator
.setSound(Uri.parse("android.resource://" + getPackageName() + "/" + R.raw.biaobiao)) //Set a custom prompt sound
.setAutoCancel(true) Cancel Notification
after clicking .setContentIntent(pit); mNManager.notify(NOTIFYID_1, notify1);
break;
Case R.id.btn_Close_normal:
// In addition to canceling the notification according to the ID, you can also call Cancelial () to close all notifications generated by the application
Mnmanager.cancel (notifyid_1); // Notification
## 5. Code sample download:
NotificationDemo.zip
Summary of this section:
Okay, this section introduces Notification in 4. The basic usage of version I’ve studied it~ By the way, part of this section refers to the following blog. Post the link. You can also check it out: Comprehensive study of the integration of Android notification bar Notification (a DEMO allows you to fully understand it). It is written in quite detail~ That’s it for this section, thank you~


