vue插槽解決什麼問題
- 青灯夜游原創
- 2023-01-13 18:26:512446瀏覽
vue插槽解決的問題:在引入的子元件標籤中間不允許寫內容的。插槽(Slot)是vue為元件的封裝者提供的能力;允許開發者在封裝元件時,把不確定的、希望由使用者指定的部分定義為插槽;可以把插槽認為是元件封裝期間,為使用者預留的內容的佔位符。

本教學操作環境:windows7系統、vue3版,DELL G3電腦。
什麼是插槽?
我們知道,在vue中,引入的子元件標籤中間是不允許寫內容的。為了解決這個問題,官方引入了插槽(slot)的概念。
插槽,其實就等於佔位符。它在元件中給你的HTML模板佔了一個位置,讓你來傳入一些東西。插槽又分為匿名插槽、具名插槽、作用域插槽。
你可能不太明白,為什麼我要給子元件中傳入HTML,而不直接寫在子元件中?答案是這樣的。你可以想像一個場景,你有五個頁面,這五個頁面中只有一個區域的內容不一樣,你會怎麼去寫這五個頁面呢?複製貼上是一種辦法,但在vue中,插槽(slot)是更好的做法。

#匿名插槽
「匿名插槽,我們又可以叫它單一插槽或預設插槽。與具名插槽相對,它不需要設定name屬性。 (它隱藏的name屬性為default。)
範例:
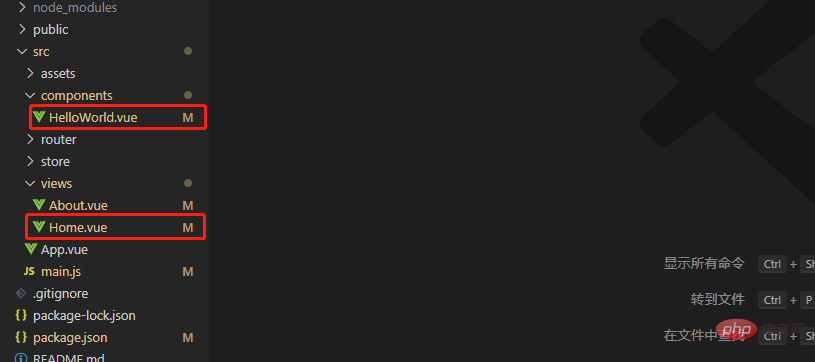
#檔案目錄如下,Home元件是HelloWorld的父元件。

- 在HelloWorld中寫一個匿名插槽
<template>
  <div>
     Helloworld组件

     <div>
       <slot></slot>
     </div>

  </div>
</template>

<script>
export default {

}
</script>

<!-- Add "scoped" attribute to limit CSS to this component only -->
<style>
.hello{
  width:100%;
  height:300px;
  background:#ccc;
  margin-top:50px;
  .slotTxt{
    width:500px;
    height:200px;
    margin:30px auto;
    background:red;
  }
}
</style>
- 在Home元件中引入子元件,並在子元件標籤中寫入內容
<template>
<div>
我是Home父组件
<helloworld>
<!-- 没有插槽,这里的内容不显示 -->
<h1>我是helloworld中的插槽啊</h1>
</helloworld>
</div>
</template>
<script>
import HelloWorld from '@/components/HelloWorld.vue'
export default {
name: 'home',
components: {
HelloWorld
}
}
</script>
效果

#不難看出,HelloWorld標籤中的內容(紅色部分)已經顯示出來了。
具名插槽
上面已經說過,插槽有一個name屬性。與匿名插槽相對,加了name屬性的匿名插槽就是具名插槽。
- HelloWorld元件中寫入name屬性分別為left和right的插槽
<template>
  <div>
     Helloworld组件

     <div>
       <slot></slot>
     </div>

     <div>
       <slot></slot>
     </div>

  </div>
</template>

<script>
export default {

}
</script>

<!-- Add "scoped" attribute to limit CSS to this component only -->
<style>
.hello{
  width:700px;
  height:300px;
  background:#ccc;
  margin: 0 auto;
  margin-top:50px;
  .slotLeft{
    width:300px;
    height:200px;
    float:left;
    background:red;
  }
  .slotRight{
    width:300px;
    height:200px;
    float:right;
    background:pink;
  }
}
</style>
- Home元件透過在template上寫v-slot:name來使用具名插槽
<template>
<div>
我是Home父组件
<helloworld>
<template>
<h1>name属性为left</h1>
</template>
<template>
<h1>name属性为right</h1>
</template>
</helloworld>
</div>
</template>
<script>
import HelloWorld from '@/components/HelloWorld.vue'
export default {
name: 'home',
components: {
HelloWorld
}
}
</script>
<style>
.home{
width:900px;
margin:0 auto;
background:yellow;
padding-bottom:100px;
}
</style>
注意v-slot 只能加入在template標籤上(只有一種例外情況)。
效果

- #例外(被廢棄的slot='name ')
帶有slot屬性的具名插槽自2.6.0 起被廢棄,vue3.x被完全廢棄。只有vue3之前的cli可以使用。
<template>
<div>
我是Home父组件
<helloworld>
<h1>name属性为left</h1>
<h1>name属性为right</h1>
</helloworld>
</div>
</template>
<script>
import HelloWorld from '@/components/HelloWorld.vue'
export default {
name: 'home',
components: {
HelloWorld
}
}
</script>
<style>
.home{
width:900px;
margin:0 auto;
background:yellow;
padding-bottom:100px;
}
</style>
效果同上。
- 具名插槽的小知識點
跟v-on 和v-bind 一樣,v-slot 也有縮寫,即把參數之前的所有內容(v-slot:) 替換為字元#。例如 v-slot:header 可以被重寫為 #header。
作用域插槽
#作用域插槽其實就是可以傳遞資料的插槽。子元件中的一些資料想在父元件中使用,必須透過規定的方法來傳遞。在官方文件中提出了一條規則,**父級模板裡的所有內容都是在父級作用域中編譯的。子模板裡的所有內容都是在子作用域中編譯的。 **如果你在父元件直接使用子元件中的值,是會報錯的。
匿名插槽的作用域插槽
為了讓子元件中的資料在父級的插槽內容中可用,我們可以將資料作為元素的一個特性綁定上去:
语法:v-bind:users="user"
- 子元件HelloWorld程式碼
<template>
<div>
Helloworld组件
<div>
<slot></slot>
</div>
</div>
</template>
<script>
export default {
data(){
return{
user:{
name:'oralinge',
age:18
}
}
}
}
</script>
<!-- Add "scoped" attribute to limit CSS to this component only -->
<style>
.hello{
width:700px;
height:300px;
background:#ccc;
margin: 0 auto;
margin-top:50px;
.slotLeft{
width:300px;
height:200px;
// float:left;
background:red;
margin:20px auto
}
.slotRight{
width:300px;
height:200px;
float:right;
background:pink;
}
}
</style>
綁定在元素上的特性(v-bind:users=“user”)被稱為插槽prop。現在在父級作用域中,我們可以使用帶有值的 v-slot 來定義我們提供的插槽 prop 的名字。
语法:v-slot:default="随意取的名字" // default可省略,简写为v-slot="随意取的名字"
- 父元件Home程式碼
<template>
<div>
我是Home父组件
<helloworld>
<template>
<h1>{{slotProps.users.name}}</h1>
</template>
</helloworld>
</div>
</template>
<script>
import HelloWorld from '@/components/HelloWorld.vue'
export default {
name: 'home',
components: {
HelloWorld
}
}
</script>
<style>
.home{
width:900px;
margin:0 auto;
background:yellow;
padding-bottom:100px;
}
</style>
注意:
父元件中的slotProps可以是隨意取的。
子組件中users是隨意取的,與之對應的是父組件中的users。
子元件中的user為資料。
效果

具名插槽的作用域插槽
與匿名插槽同理,只需要把default替換成插槽的name值即可。
- 子元件HelloWorld程式碼
<template>
<div>
Helloworld组件
<div>
<slot></slot>
</div>
</div>
</template>
<script>
export default {
data(){
return{
user:{
name:'hello world',
age:18
}
}
}
}
</script>
<!-- Add "scoped" attribute to limit CSS to this component only -->
<style>
.hello{
width:700px;
height:300px;
background:#ccc;
margin: 0 auto;
margin-top:50px;
.slotLeft{
width:300px;
height:200px;
// float:left;
background:red;
margin:20px auto
}
.slotRight{
width:300px;
height:200px;
float:right;
background:pink;
}
}
</style>
- 父元件Home程式碼
<template>
<div>
我是Home父组件
<helloworld>
<template>
<h1>{{slotProps.users.name}}</h1>
</template>
</helloworld>
</div>
</template>
<script>
import HelloWorld from '@/components/HelloWorld.vue'
export default {
name: 'home',
components: {
HelloWorld
}
}
</script>
<style>
.home{
width:900px;
margin:0 auto;
background:yellow;
padding-bottom:100px;
}
</style>
效果

注意:
默认插槽的缩写语法不能和具名插槽混用,因为它会导致作用域不明确。

另,slot-scope写法在2.6之后已废弃,作用与上面相同,在此不做解释。
上面的写法是不是觉得有些麻烦?别着急,我们来看一看解构插槽 Prop。
解构插槽 Prop
作用域插槽的内部工作原理是将你的插槽内容包括在一个传入单个参数的函数里:
function (slotProps) {
  // 插槽内容
}
这意味着 v-slot 的值实际上可以是任何能够作为函数定义中的参数的 JavaScript 表达式。所以在支持的环境下 (单文件组件或现代浏览器),你也可以使用 ES2015 解构来传入具体的插槽 prop。
语法:v-slot="{ users }"
- HelloWold组件
<template>
<div>
Helloworld组件
<div>
<slot></slot>
</div>
</div>
</template>
<script>
export default {
data(){
return{
user:{
name:'hello world',
age:18
}
}
}
}
</script>
<!-- Add "scoped" attribute to limit CSS to this component only -->
<style>
.hello{
width:700px;
height:300px;
background:#ccc;
margin: 0 auto;
margin-top:50px;
.slotLeft{
width:300px;
height:200px;
// float:left;
background:red;
margin:20px auto
}
.slotRight{
width:300px;
height:200px;
float:right;
background:pink;
}
}
</style>
- Home组件
<template>
<div>
我是Home父组件
<helloworld>
<template>
<h1>{{users.name}}</h1>
</template>
</helloworld>
</div>
</template>
<script>
import HelloWorld from '@/components/HelloWorld.vue'
export default {
name: 'home',
components: {
HelloWorld
}
}
</script>
<style>
.home{
width:900px;
margin:0 auto;
background:yellow;
padding-bottom:100px;
}
</style>
效果

- 重命名----更改users这个名字
<template>
<div>
我是Home父组件
<helloworld>
<template>
<h1>{{person.name}}</h1>
</template>
</helloworld>
</div>
</template>
<script>
import HelloWorld from '@/components/HelloWorld.vue'
export default {
name: 'home',
components: {
HelloWorld
}
}
</script>
<style>
.home{
width:900px;
margin:0 auto;
background:yellow;
padding-bottom:100px;
}
</style>
效果如上图。
- 定义后备内容,用于插槽 prop 是 undefined 的情形
此处按照官方文档的写法会出现语法报错,后期应该会修复(有知道的麻烦通知一声)。
<template>
<div>
我是Home父组件
<helloworld>
<template>
<h1>{{users.name}}</h1>
</template>
</helloworld>
</div>
</template>
<script>
import HelloWorld from '@/components/HelloWorld.vue'
export default {
name: 'home',
components: {
HelloWorld
}
}
</script>
<style>
.home{
width:900px;
margin:0 auto;
background:yellow;
padding-bottom:100px;
}
</style>
使用场景
- 复用公共组件
代码示例如下:
<template>
  <div>
    <div>
      <span>{{title}}</span>
      <div>
        <slot></slot>
      </div>
    </div>
    <div>
      <slot></slot>
    </div>
  </div>
</template>
<script>
export default {
  data () {
    return {
    }
  },
  props: {
    title: {
      type: String,
      required: true
    }
  }
}
</script>
<style>
.title-box {
  padding: 16px 0;
  border-bottom: 1px solid #eff1f5;
  .title {
    font-family: MicrosoftYaHei;
    font-size: 24px;
    color: #283039;
    letter-spacing: 0;
    line-height: 24px;
    &::before {
      width: 4px;
      margin-right: 20px;
      content: "";
      background-color: #5da1ff;
      display: inline-block;
      height: 20px;
      vertical-align: middle;
    }
  }
  .right {
    float: right;
    margin-right: 20px;
  }
}
</style>
使用的ui框架为ivew。
相关推荐:vue.js视频教程
以上是vue插槽解決什麼問題的詳細內容。更多資訊請關注PHP中文網其他相關文章!

