JS怎麼實現簡單輪播圖特效? (圖文詳解)
- 青灯夜游轉載
- 2020-06-12 10:14:035188瀏覽

本文實例為大家分享了JS實現輪播圖特效的具體程式碼,供大家參考,具體內容如下
知識點

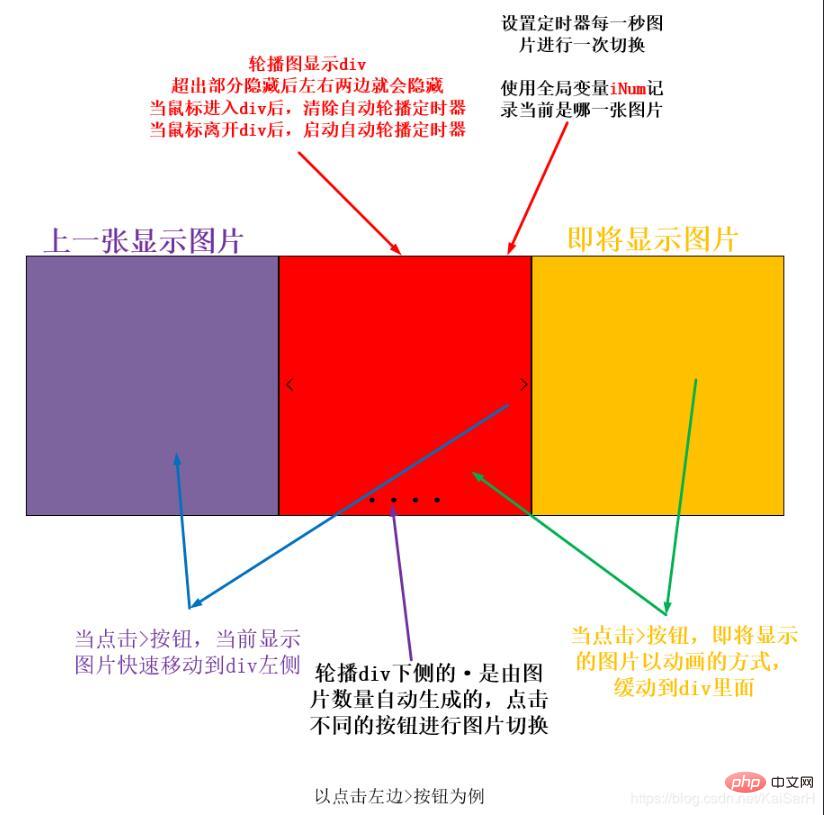
輪播圖想法:
① 建立一個全域變數索引,並始終標記目前顯示圖片。
② 根據目前圖片的數量,動態建立下方的●圖片指示器。
③ 輪播圖的初始狀態為第一張圖片在中間,剩餘所有圖片都放在即將顯示圖片位置。
④ 當點擊>的時候,當前圖片調用動畫移動函數進行左移,與此同時新的一張圖片調用動畫函數移入到p中,而會將下一張展示的圖片移動到p右側。
⑤ 需要進行邊界判斷,如果目前的圖片大於圖片數量或小於等於0,重新賦值給索引。
⑥ 當點擊圖片指示器的時候,先判定點擊的與索引的位置關係,然後進行動畫移動。
⑦ 為p新增計時器,自動移動圖片。當滑鼠進入p,刪除定時器,當滑鼠移出p,設定定時器。
運行效果
1.自動輪播
2.點擊左右切換圖片
3.點擊下方圖片指示器切換圖片

#程式碼
引入MyTools.js庫
1.html
<!DOCTYPE html>
<html>
<head>
 <meta charset="UTF-8">
 <title>Title</title>
 <link rel="stylesheet" href="1.css" rel="external nofollow" >
</head>
<body>
<div id="box">
 <div id="box_content">
 <div><img src="casual01.jpg" alt=""></div>
 <div><img src="casual02.jpg" alt=""></div>
 <div><img src="casual03.jpg" alt=""></div>
 <div><img src="casual04.jpg" alt=""></div>
 <div><img src="casual05.jpg" alt=""></div>
 </div>
 <div id="box_control">
 <a href="javascript:;"><i><</i></a>
 <a href="javascript:;"><i>></i></a>
 <ul>
 </ul>
 </div>
</div>
<script src="../JavaScript学习/00MyTools/MyTools.js"></script>
<script src="1.js"></script>
</body>
</html>
2.css
*{margin: 0;padding: 0;}
a{
 color: #999;
 text-decoration: none;
 position: absolute;
 top: 50%;
 transform: translateY(-50%);
 background-color: rgba(0, 0, 0, .4);
}
a:hover{
 color: #f8b62b;
}
i{
 font-size: 50px;
 font-family: "Helvetica Neue", Helvetica, Arial, sans-serif;
}
#box{
 height: 482px;
 width: 830px;
 background-color: red;
 position: absolute;
 left: 50%;
 top: 50%;
 transform: translate(-50%,-50%);
 overflow: hidden;
}
#box_content{
 height: 100%;
 width: 100%;
 cursor: pointer;
}
#box_content img{
 position: absolute;
 vertical-align: top;
 height: 100%;
 width: 100%;
 /*left: 830px;*/
}
.box_img{
 width: 100%;
 height: 100%;
 position: absolute;}
.box_control_right{
 position: absolute;
 right: 0;
}
.box_control_left{
 position: absolute;
 left: 0;
}
ul{
 position: absolute;
 bottom: 30px;
 left: 50%;
 transform: translateX(-50%);
 display: flex;
 justify-content:space-evenly;
}
ul>li{
 list-style: none;
 width: 16px;
 height: 16px;
 background-color: #fff;
 margin: 0 3px;
 border-radius: 50%;
 cursor: pointer;
}
ul>li.current{
 background-color: darkorange;
}
3.js
window.addEventListener('load',function (ev) {
// 轮播图
(function () {
// 1. 获取需要标签
var boxContent = myTool.$('box_content');
var contentImg = boxContent.children;
var boxControl = myTool.$('box_control');
var controlBottom = boxControl.children[2];
// 2. 全局索引
var iNow = 0;
// 3. 根据图片个数动态添加下方图片指示器
for (var i = 0; i < contentImg.length; i++) {
var li = document.createElement('li');
controlBottom.insertBefore(li,controlBottom.children[0]);
}
// 4. 让第一个图片指示器选中
controlBottom.children[0].className = 'current';
// 5. 让除了第一张图片以外所有图片进入待显示区域
var scrollImgWidth = boxContent.offsetWidth;
for (var j = 1; j < contentImg.length; j++) {
contentImg[j].style.left = scrollImgWidth + 'px';
}
// 6. 处理左右两侧点击
var cPrev = boxControl.children[0];
var cNext = boxControl.children[1];
// 6.1 点击左边
cPrev.addEventListener('click',function (evt) {
// 1. 当前可视区域图片快速右移
// 2. 上一张幻灯片出现在可视区域左侧
// 3. 让这张幻灯片做动画进入
myTool.slowMoving(contentImg[iNow],{'left':scrollImgWidth},null);
iNow--;
// 边界处理
if (iNow < 0){
iNow = contentImg.length - 1;
}
contentImg[iNow].style.left = -scrollImgWidth + 'px';
myTool.slowMoving(contentImg[iNow],{'left':0},null);
// 切换索引
changeIndex();
},false);
// 6.2 点击右边
cNext.addEventListener('click',function (evt) {
autoPlay();
},false);
// 7. 下侧图片指示器操作
for (var k = 0; k < controlBottom.children.length; k++) {
// 取出单个li标签
var bottomLi = controlBottom.children[k];
// 监听鼠标进入
(function (index) {
bottomLi.addEventListener('mouseover',function (evt) {
// 比较当前索引和点击指示器位置关系
if (index > iNow){
myTool.slowMoving(contentImg[iNow],{'left':-scrollImgWidth},null);
contentImg[index].style.left = scrollImgWidth + 'px';
}else if(index < iNow){
myTool.slowMoving(contentImg[iNow],{'left':scrollImgWidth},null);
contentImg[index].style.left = -scrollImgWidth + 'px';
}
iNow = index;
myTool.slowMoving(contentImg[iNow],{'left':0});
// 切换索引
changeIndex();
},false);
})(k)
}
/**
* 切换索引操作
*/
function changeIndex() {
for (var i = 0; i < controlBottom.children.length; i++) {
controlBottom.children[i].className = '';
}
// 当前的被选中
controlBottom.children[iNow].className = 'current';
}
/**
* 点击右侧和图片自动运动操作
*/
function autoPlay(){
// 1. 当前可视区域图片快速左移
// 2. 下一张图片出现在可视区域右侧
// 3. 让这张图片做动画进入
myTool.slowMoving(contentImg[iNow],{'left':-scrollImgWidth},null);
iNow++;
// 边界处理
if (iNow >= contentImg.length) {
iNow = 0;
}
contentImg[iNow].style.left = scrollImgWidth + 'px';
myTool.slowMoving(contentImg[iNow], {"left": 0},null);
// 切换索引
changeIndex();
}
// 8. 设置定时器
var timerId = setInterval(autoPlay,2000);
// 9. 鼠标进入图片p后设置和清除定时器
myTool.$('box').addEventListener('mouseover',function () {
clearInterval(timerId);
});
myTool.$('box').addEventListener('mouseout',function () {
timerId = setInterval(autoPlay,2000);
});
})();
},false);更多js特效,請移步js特效下載欄位。
以上是JS怎麼實現簡單輪播圖特效? (圖文詳解)的詳細內容。更多資訊請關注PHP中文網其他相關文章!
陳述:
本文轉載於:jb51.net。如有侵權,請聯絡admin@php.cn刪除

