微信小程式input表單與redio及下拉式清單實例詳解
- 小云云原創
- 2018-02-05 11:10:553001瀏覽
本文主要和大家介紹微信小程式 input表單與redio及下拉列表的使用實例的相關資料,希望透過本文能幫助到大家,需要的朋友可以參考下,希望能幫助到大家。
微信小程式input表單與redio及下拉清單的使用實例
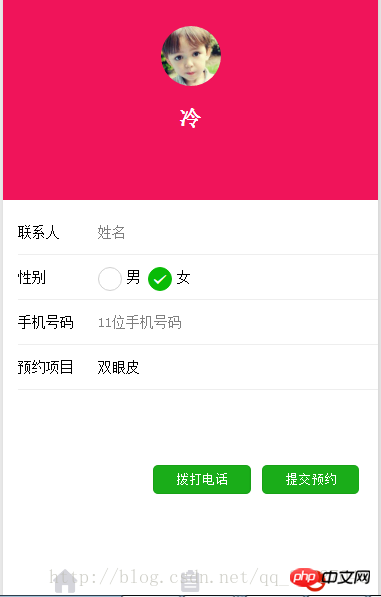
一個簡單的預約類型的表單,效果

主要程式碼:
  <form bindsubmit="bindSave">
   <view class="form-box">
    <view class="row-wrap">
     <view class="label">联系人</view>
     <view class="label-right">
      <input name="userName" class="input" type="text" placeholder="姓名" value="{{addressData.userName}}" />
     </view>
    </view>

    <view class="row-wrap">
     <view class="label">性别</view>
     <radio-group class="radio-group" bindchange="radioChange">
      <label class="radio" wx:for="{{items}}">
       <radio value="{{item.name}}" checked="{{item.checked}}" />{{item.value}}
      </label>
     </radio-group>

    </view>
    <view class="row-wrap">
     <view class="label">手机号码</view>
     <view class="label-right">
      <input name="mobile" class="input" maxlength="11" type="number" placeholder="11位手机号码" value="{{addressData.mobile}}" />
     </view>
    </view>

    <view class="row-wrap">
     <view class="label">预约项目</view>
     <picker bindchange="bindCasPickerChange" value="{{casIndex1}}" range="{{casArray}}">
      <view>
       <text>{{casArray[casIndex]}}</text>
      </view>
     </picker>


    </view>

   </view>

   <view class="btn-tyc">

    <button size="mini" bindtap="tapAddCart" class="submit" type="primary" formType="submit">提交预约</button>
   </view>

   <button size="mini" bindtap="tlp_phone" class="phone" type="primary">拨打电话</button>
  </form>
.js檔案
 data: {
  nickName: "",
  avatarUrl: "",
  casArray: ['双眼皮', 'TBM', '隆胸', '减肥', 'qita'],
  userName: '',
  mobile: '',
  Gender: 'female',
  casIndex: 0,
  items: [
   { name: 'male', value: '男' },
   { name: 'female', value: '女', checked: 'true' },
  ]
 },
 radioChange: function (e) {
  console.log('值:', e.detail.value)
  this.setData({
   Gender: e.detail.value
  })
 },
 /**
  * 生命周期函数--监听页面加载
  */
 bindCasPickerChange: function (e) {
  console.log(this.data.casArray);
  console.log('下拉选择的是', this.data.casArray[e.detail.value])
  this.setData({
   casIndex: e.detail.value
  })
 },
具體的表單樣式可以自己調整,wxss樣式文件程式碼不寫了
參考官方文件form元件
https://mp.weixin.qq.com/debug /wxadoc/dev/component/form.html
相關推薦:
以上是微信小程式input表單與redio及下拉式清單實例詳解的詳細內容。更多資訊請關注PHP中文網其他相關文章!
陳述:
本文內容由網友自願投稿,版權歸原作者所有。本站不承擔相應的法律責任。如發現涉嫌抄襲或侵權的內容,請聯絡admin@php.cn

